构建高性能Java WebService在Linux环境下的实践指南?Java WebService在Linux下如何优化?Linux下Java WebService怎么优化?
** ,《构建高性能Java WebService在Linux环境下的实践指南》聚焦于在Linux系统中部署和优化Java WebService的关键策略,选择高性能框架(如Spring Boot或Apache CXF)并启用NIO(如Netty)以提升并发处理能力;结合JVM调优(堆内存配置、GC算法选择)减少延迟,Linux层面需优化内核参数(文件描述符限制、TCP缓冲区大小),并通过Nginx实现负载均衡与静态资源缓存,数据库连接池(如HikariCP)和异步处理(CompletableFuture)可进一步降低响应时间,容器化部署(Docker+Kubernetes)和分布式监控(Prometheus+ELK)确保可扩展性与故障快速定位,通过压测工具(JMeter)验证优化效果,实现高吞吐、低延迟的WebService服务。
WebService技术概述
WebService核心概念
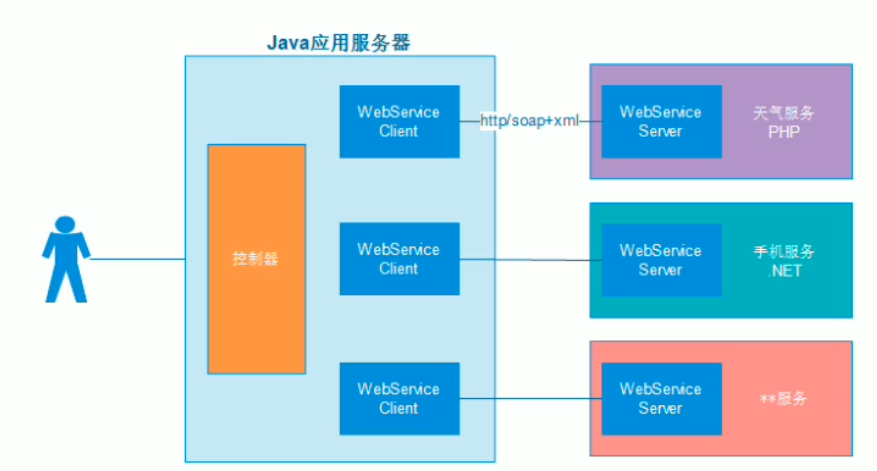
WebService是一种基于Web的分布式计算技术,它通过标准化的HTTP/HTTPS协议进行跨平台通信,使用XML(SOAP)或JSON(REST)等结构化数据格式实现系统间的数据交换,这种技术架构使得运行在不同操作系统、使用不同编程语言的应用程序能够无缝集成,是现代企业系统互联的重要技术手段。
WebService的核心特性包括:
- 平台无关性:服务提供者和消费者可以运行在任何支持HTTP和XML/JSON的平台上
- 语言中立:不同编程语言开发的系统可以相互调用
- 松耦合:服务接口与实现分离,便于系统演进
- 标准化协议:基于开放标准(SOAP、WSDL、UDDI等)
- 可扩展性:支持通过中间件扩展功能
- 可发现性:支持通过服务注册中心进行服务发现
Java生态中的WebService实现
在Java技术栈中,主流的WebService实现方案包括:
JAX-WS (Java API for XML Web Services)
- 基于SOAP协议的企业级解决方案
- 支持WS-*标准系列(WS-Security、WS-ReliableMessaging等)
- 适合需要严格事务控制和复杂消息交换的场景
- 提供WSDL优先和代码优先两种开发模式
- 典型实现:Metro、Axis2、CXF
JAX-RS (Java API for RESTful Web Services)
- 基于REST架构风格的轻量级方案
- 使用HTTP标准方法(GET/POST/PUT/DELETE/PATCH)
- 支持多种数据格式(JSON/XML/Protobuf等)
- 更适合移动应用和现代Web应用
- 典型实现:Jersey、RESTEasy、Apache CXF
Spring Web Services
- 与Spring生态深度集成
- 支持契约优先(Contract-first)开发模式
- 提供强大的消息处理机制
- 与Spring Security无缝集成
- 支持SOAP和REST两种风格
本文将重点解析JAX-RS(RESTful)和Spring Boot WebService这两种现代化实现方案的技术细节和实践方法。
Linux环境下Java WebService开发实践
开发环境配置
在Linux系统(推荐Ubuntu LTS或CentOS Stream)上搭建Java WebService开发环境需要以下组件:
| 组件 | 推荐版本 | 作用说明 |
|---|---|---|
| JDK | OpenJDK 11/17 | Java运行环境 |
| Maven | 8+ | 项目构建和依赖管理 |
| 应用服务器 | Tomcat 9+/Jetty 10+ | 可选,用于传统部署 |
| 测试工具 | Postman/cURL | API功能测试 |
| IDE | IntelliJ IDEA/VSCode | 开发工具(可选) |
| Docker | 10+ | 容器化开发环境 |
Ubuntu系统安装示例:
# 更新软件源
sudo apt update && sudo apt upgrade -y
# 安装OpenJDK和Maven
sudo apt install -y openjdk-17-jdk maven docker.io
# 验证安装
java -version
mvn -v
docker --version
基于JAX-RS构建RESTful服务
JAX-RS作为Java EE标准API,其参考实现Jersey和WildFly默认的RESTEasy都是企业级应用的热门选择。
项目结构配置
Maven依赖配置(pom.xml):
<dependencies>
    <!-- Jersey核心 -->
    <dependency>
        <groupId>org.glassfish.jersey.containers</groupId>
        <artifactId>jersey-container-grizzly2-http</artifactId>
        <version>3.1.0</version>
    </dependency>
    <!-- JSON支持 -->
    <dependency>
        <groupId>org.glassfish.jersey.media</groupId>
        <artifactId>jersey-media-json-binding</artifactId>
        <version>3.1.0</version>
    </dependency>
    <!-- 日志记录 -->
    <dependency>
        <groupId>org.glassfish.jersey.ext</groupId>
        <artifactId>jersey-logging</artifactId>
        <version>3.1.0</version>
    </dependency>
</dependencies>
服务端点实现
import javax.ws.rs.*;
import javax.ws.rs.core.MediaType;
import javax.ws.rs.core.Response;
import javax.json.*;
@Path("/system")
public class SystemInfoService {
    @GET
    @Path("/status")
    @Produces(MediaType.APPLICATION_JSON)
    public Response getSystemStatus() {
        // 获取Linux系统信息
        String osName = System.getProperty("os.name");
        String osVersion = System.getProperty("os.version");
        Runtime runtime = Runtime.getRuntime();
        // 构造响应JSON
        JsonObject response = Json.createObjectBuilder()
            .add("status", "running")
            .add("os", osName)
            .add("version", osVersion)
            .add("memory", Json.createObjectBuilder()
                .add("total", runtime.totalMemory())
                .add("free", runtime.freeMemory())
                .add("used", runtime.totalMemory() - runtime.freeMemory()))
            .add("timestamp", System.currentTimeMillis())
            .build();
        return Response.ok(response).build();
    }
    @POST
    @Path("/command")
    @Consumes(MediaType.TEXT_PLAIN)
    @Produces(MediaType.TEXT_PLAIN)
    public String executeCommand(String command) {
        // 安全检查
        if (!isSafeCommand(command)) {
            throw new WebApplicationException("Unsafe command detected", 403);
        }
        try {
            // 执行Linux命令
            Process process = Runtime.getRuntime().exec(new String[]{"bash", "-c", command});
            BufferedReader reader = new BufferedReader(
                new InputStreamReader(process.getInputStream()));
            StringBuilder output = new StringBuilder();
            String line;
            while ((line = reader.readLine()) != null) {
                output.append(line).append("\n");
            }
            return output.toString();
        } catch (IOException e) {
            throw new WebApplicationException("Command execution failed", 500);
        }
    }
    private boolean isSafeCommand(String command) {
        // 实现命令白名单检查
        return true;
    }
}
服务启动类
import org.glassfish.grizzly.http.server.HttpServer;
import org.glassfish.jersey.grizzly2.httpserver.GrizzlyHttpServerFactory;
import org.glassfish.jersey.server.ResourceConfig;
import java.net.URI;
public class LinuxServiceLauncher {
    private static final String BASE_URI = "http://0.0.0.0:8080/api/";
    public static HttpServer startServer() {
        // 创建资源配置
        ResourceConfig config = new ResourceConfig()
            .packages("com.example.services")
            .register(JacksonFeature.class)
            .register(new LoggingFeature());
        // 创建并启动服务器
        return GrizzlyHttpServerFactory
            .createHttpServer(URI.create(BASE_URI), config);
    }
    public static void main(String[] args) {
        try {
            final HttpServer server = startServer();
            // 添加关闭钩子
            Runtime.getRuntime().addShutdownHook(new Thread(() -> {
                server.shutdownNow();
                System.out.println("Service stopped gracefully");
            }));
            System.out.println("JAX-RS service running on Linux at: " + BASE_URI);
            System.out.println("Press CTRL+C to exit...");
            Thread.currentThread().join();
        } catch (InterruptedException e) {
            System.err.println("Server interrupted: " + e.getMessage());
        }
    }
}
Spring Boot WebService开发
Spring Boot极大地简化了WebService的开发流程,以下是创建生产级REST服务的实践:
项目初始化
使用Spring Initializr创建项目或手动添加依赖:
<dependencies>
    <!-- Web支持 -->
    <dependency>
        <groupId>org.springframework.boot</groupId>
        <artifactId>spring-boot-starter-web</artifactId>
    </dependency>
    <!-- Actuator监控 -->
    <dependency>
        <groupId>org.springframework.boot</groupId>
        <artifactId>spring-boot-starter-actuator</artifactId>
    </dependency>
    <!-- 安全支持 -->
    <dependency>
        <groupId>org.springframework.boot</groupId>
        <artifactId>spring-boot-starter-security</artifactId>
    </dependency>
    <!-- OSHI系统信息库 -->
    <dependency>
        <groupId>com.github.oshi</groupId>
        <artifactId>oshi-core</artifactId>
        <version>6.4.0</version>
    </dependency>
    <!-- Swagger文档 -->
    <dependency>
        <groupId>org.springdoc</groupId>
        <artifactId>springdoc-openapi-ui</artifactId>
        <version>1.7.0</version>
    </dependency>
</dependencies>
高级REST控制器实现
import org.springframework.web.bind.annotation.*;
import org.springframework.http.ResponseEntity;
import oshi.SystemInfo;
import oshi.hardware.HardwareAbstractionLayer;
import io.swagger.v3.oas.annotations.Operation;
import io.swagger.v3.oas.annotations.security.SecurityRequirement;
@RestController
@RequestMapping("/api/v1/system")
public class AdvancedSystemController {
    private final SystemInfo systemInfo = new SystemInfo();
    private final HardwareAbstractionLayer hardware = systemInfo.getHardware();
    @Operation(summary = "获取系统指标", security = @SecurityRequirement(name = "bearerAuth"))
    @GetMapping("/metrics")
    public ResponseEntity<SystemMetrics> getSystemMetrics() {
        // 获取CPU使用率
        double[] loadAverage = hardware.getProcessor().getSystemLoadAverage(3);
        double cpuLoad = loadAverage[0] / hardware.getProcessor().getLogicalProcessorCount();
        // 获取内存信息
        long totalMemory = hardware.getMemory().getTotal();
        long availableMemory = hardware.getMemory().getAvailable();
        // 获取磁盘信息
        List<DiskMetrics> diskMetrics = hardware.getDiskStores().stream()
            .map(disk -> new DiskMetrics(
                disk.getName(),
                disk.getReadBytes(),
                disk.getWriteBytes(),
                disk.getReads(),
                disk.getWrites()
            ))
            .collect(Collectors.toList());
        // 构造响应对象
        SystemMetrics metrics = new SystemMetrics(
            cpuLoad,
            totalMemory,
            availableMemory,
            diskMetrics,
            System.currentTimeMillis()
        );
        return ResponseEntity.ok(metrics);
    }
    // DTO类
    @Data
    @AllArgsConstructor
    static class SystemMetrics {
        private double cpuLoad;
        private long totalMemory;
        private long availableMemory;
        private List<DiskMetrics> diskMetrics;
        private long timestamp;
    }
    @Data
    @AllArgsConstructor
    static class DiskMetrics {
        private String name;
        private long readBytes;
        private long writeBytes;
        private long reads;
        private long writes;
    }
}
安全配置
import org.springframework.context.annotation.Bean;
import org.springframework.security.config.annotation.web.builders.HttpSecurity;
import org.springframework.security.web.SecurityFilterChain;
import org.springframework.security.config.http.SessionCreationPolicy;
@Configuration
@EnableWebSecurity
public class SecurityConfig {
    @Bean
    public SecurityFilterChain securityFilterChain(HttpSecurity http) throws Exception {
        http
            .csrf().disable()
            .authorizeRequests(auth -> auth
                .antMatchers("/api/public/**").permitAll()
                .antMatchers("/swagger-ui/**").permitAll()
                .antMatchers("/v3/api-docs/**").permitAll()
                .antMatchers("/actuator/health").permitAll()
                .anyRequest().authenticated()
            )
            .sessionManagement()
                .sessionCreationPolicy(SessionCreationPolicy.STATELESS)
            .and()
            .oauth2ResourceServer()
                .jwt();
        return http.build();
    }
}
生产环境部署与优化
应用打包策略
JAR打包(推荐)
# Spring Boot项目
mvn clean package -DskipTests
# 传统JAX-RS项目
mvn clean package assembly:single
# 构建Docker镜像
docker build -t java-webservice .
WAR打包(传统部署)
<!-- pom.xml中配置 -->
<packaging>war</packaging>
<dependency>
    <groupId>org.springframework.boot</groupId>
    <artifactId>spring-boot-starter-tomcat</artifactId>
    <scope>provided</scope>
</dependency>
高级部署方案
Systemd服务管理
创建/etc/systemd/system/java-webservice.service:
[Unit]
Description=Java WebService
After=syslog.target network.target
Requires=docker.service
[Service]
User=appuser
Group=appuser
WorkingDirectory=/opt/java-webservice
ExecStartPre=/usr/bin/docker pull my-registry/java-webservice:latest
ExecStart=/usr/bin/docker run --name java-webservice \
    -p 8080:8080 \
    -v /opt/java-webservice/config:/config \
    -e SPRING_PROFILES_ACTIVE=prod \
    my-registry/java-webservice:latest
ExecStop=/usr/bin/docker stop java-webservice
ExecStopPost=/usr/bin/docker rm java-webservice
Restart=always
RestartSec=30
TimeoutStopSec=30
[Install]
WantedBy=multi-user.target
管理命令:
sudo systemctl daemon-reload
sudo systemctl enable java-webservice
sudo systemctl start java-webservice
Kubernetes部署
deployment.yaml示例:
apiVersion: apps/v1
kind: Deployment
metadata:
  name: java-webservice
spec:
  replicas: 3
  selector:
    matchLabels:
      app: java-webservice
  template:
    metadata:
      labels:
        app: java-webservice
    spec:
      containers:
      - name: webservice
        image: my-registry/java-webservice:latest
        ports:
        - containerPort: 8080
        env:
        - name: SPRING_PROFILES_ACTIVE
          value: "prod"
        resources:
          limits:
            cpu: "2"
            memory: "2Gi"
          requests:
            cpu: "500m"
            memory: "1Gi"
        livenessProbe:
          httpGet:
            path: /actuator/health
            port: 8080
          initialDelaySeconds: 60
          periodSeconds: 10
        readinessProbe:
          httpGet:
            path: /actuator/health
            port: 8080
          initialDelaySeconds: 30
          periodSeconds: 5
性能调优指南
JVM参数优化
java -server \
     -Xms2g -Xmx2g \
     -XX:MaxMetaspaceSize=512m \
     -XX:+UseG1GC \
     -XX:MaxGCPauseMillis=200 \
     -XX:ParallelGCThreads=4 \
     -XX:ConcGCThreads=2 \
     -XX:+HeapDumpOnOutOfMemoryError \
     -XX:HeapDumpPath=/var/log/java-webservice/heapdump.hprof \
     -XX:+UseContainerSupport \
     -XX:InitialRAMPercentage=75.0 \
     -XX:MaxRAMPercentage=75.0 \
     -jar app.jar
Web容器调优
Spring Boot配置示例(application.yml):
server:
  tomcat:
    max-threads: 200
    min-spare-threads: 20
    accept-count: 100
    connection-timeout: 5000
    max-connections: 10000
    max-keep-alive-requests: 100
  compression:
    enabled: true
    mime-types: text/html,text/xml,text/plain,application/json,application/xml
    min-response-size: 1024
安全防护体系
传输层安全
使用Let's Encrypt配置HTTPS:
# 安装Certbot
sudo apt install certbot python3-certbot-nginx
# 获取证书
sudo certbot certonly --standalone -d yourdomain.com --email admin@yourdomain.com --agree-tos --non-interactive
# 自动续期测试
sudo certbot renew --dry-run
# Spring Boot配置
server:
  ssl:
    enabled: true
    key-store: file:/etc/letsencrypt/live/yourdomain.com/keystore.p12
    key-store-password: changeit
    key-store-type: PKCS12
    protocol: TLSv1.3
    ciphers: TLS_AES_256_GCM_SHA384,TLS_CHACHA20_POLY1305_SHA256,TLS_AES_128_GCM_SHA256
API安全防护
JWT认证实现
@Configuration
@EnableWebSecurity
public class SecurityConfig {
    @Bean
    public SecurityFilterChain securityFilterChain(HttpSecurity http) throws Exception {
        http
            .csrf().disable()
            .authorizeRequests(auth -> auth
                .antMatchers("/api/public/**").permitAll()
                .anyRequest().authenticated()
            )
            .oauth2ResourceServer(oauth2 -> oauth2
                .jwt(jwt -> jwt
                    .decoder(jwtDecoder())
                )
            );
        return http.build();
    }
    @Bean
    JwtDecoder jwtDecoder() {
        return NimbusJwtDecoder.withPublicKey(publicKey()).build();
    }
    @Bean
    JwtEncoder jwtEncoder() {
        JWK jwk = new RSAKey.Builder(publicKey())
            .privateKey(privateKey())
            .keyID(UUID.randomUUID().toString())
            .build();
        JWKSource<SecurityContext> jwkSource = new ImmutableJWKSet<>(new JWKSet(jwk));
        return new NimbusJwtEncoder(jwkSource);
    }
    private RSAPublicKey publicKey() {
        // 从密钥库加载公钥
免责声明:我们致力于保护作者版权,注重分享,被刊用文章因无法核实真实出处,未能及时与作者取得联系,或有版权异议的,请联系管理员,我们会立即处理! 部分文章是来自自研大数据AI进行生成,内容摘自(百度百科,百度知道,头条百科,中国民法典,刑法,牛津词典,新华词典,汉语词典,国家院校,科普平台)等数据,内容仅供学习参考,不准确地方联系删除处理! 图片声明:本站部分配图来自人工智能系统AI生成,觅知网授权图片,PxHere摄影无版权图库和百度,360,搜狗等多加搜索引擎自动关键词搜索配图,如有侵权的图片,请第一时间联系我们。


