
Spring Boot 整合mybatis

2025/4/3
向全栈工程师迈进!!!

配置文件在实际开发中如何使用呢,接下去将通过Spring Boot整合mybatis来看配置文件如何在实际开发中被使用。
一、引入mybatis起步依赖
在pom.xml中引入mybatis的起步依赖,如下。
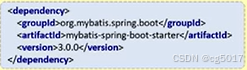
在这个起步依赖的内部,还会自动把一些会被使用到的bean对象注入到IOC容器中。但是想用让mybatis正确的去操作数据库,那就还需要在配置文件中编写相应的配置文件。
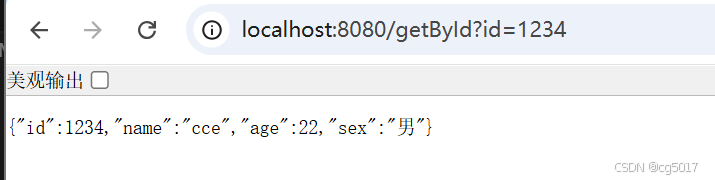
二、测试案例
当如上都正确的配置好的,就可以正常的去编写controller层、service层、mapper层。浏览器按着下图依次访问,数据在依次传到浏览器上。

2.1添加起步依赖
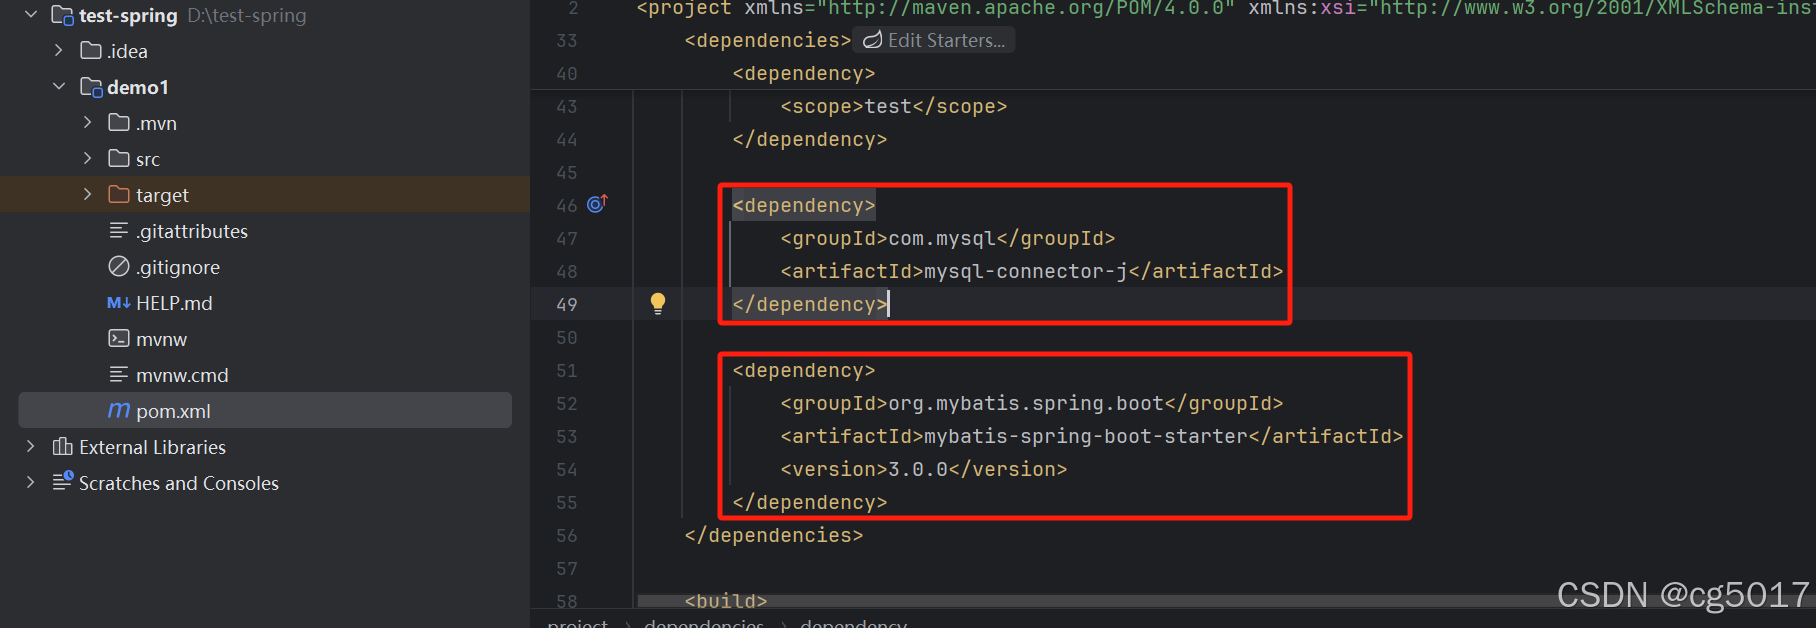
pom.xml文件中添加下图的起步依赖,包括mysql的起步依赖,因为是让mybatis去操作mysql的。
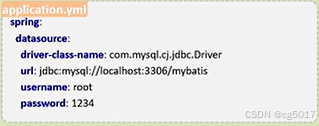
由于是操作mysql,所以需要去配置文件(application.yml)写mysql的相关信息,加上要操作的数据库。以及数据库的密码信息等。
spring:
  datasource:
    driver-class-name: com.mysql.cj.jdbc.Driver
    url: jdbc:mysql://localhost:3306/你的数据库名字?serverTimezone=Asia/Shanghai&useUnicode=true&characterEncoding=utf-8
    username: root
    password: 123456
2.2 编写相应的代码
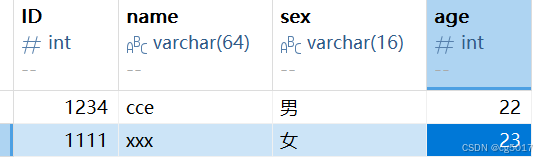
先编写一个User实体类,要和数据库的中的字段相对应,其User数据库如下
编写的实体类如下:
package com.example.demo.entity;
public class User {
    private int id;
    private String name;
    private int age;
    private String sex;
    public User() {
    }
    public User(int id, String name, int age, String sex) {
        this.id = id;
        this.name = name;
        this.age = age;
        this.sex = sex;
    }
    public int getId() {
        return id;
    }
    public void setId(int id) {
        this.id = id;
    }
    public String getName() {
        return name;
    }
    public void setName(String name) {
        this.name = name;
    }
    public int getAge() {
        return age;
    }
    public void setAge(int age) {
        this.age = age;
    }
    public String getSex() {
        return sex;
    }
    public void setSex(String sex) {
        this.sex = sex;
    }
    @Override
    public String toString() {
        return "User{" +
                "id=" + id +
                ", name='" + name + '\'' +
                ", age=" + age +
                ", sex='" + sex + '\'' +
                '}';
    }
}
编写mapper层,直接和数据库交互的层。
package com.example.demo.mapper;
import com.example.demo.entity.User;
import org.apache.ibatis.annotations.Mapper;
import org.apache.ibatis.annotations.Select;
@Mapper
public interface UserMapper {
    @Select("SELECT * FROM test WHERE id = #{id}")
    public User getUserById(int id);
}
编写service接口:
package com.example.demo.service;
import com.example.demo.entity.User;
public interface UserSerivce {
    public User getUserById(int id);
}
编写service的实现类
package com.example.demo.service.impl;
import com.example.demo.entity.User;
import com.example.demo.mapper.UserMapper;
import com.example.demo.service.UserSerivce;
import org.springframework.beans.factory.annotation.Autowired;
import org.springframework.stereotype.Service;
@Service
public class UserSerivceImpl implements UserSerivce {
    @Autowired
    private UserMapper userMapper;
    @Override
    public User getUserById(int id){
        return userMapper.getUserById(id);
    }
}
编写controller 层,和浏览器之间交互的层。
package com.example.demo.controller;
import com.example.demo.entity.User;
import com.example.demo.service.UserSerivce;
import org.springframework.beans.factory.annotation.Autowired;
import org.springframework.web.bind.annotation.RequestMapping;
import org.springframework.web.bind.annotation.RestController;
@RestController
public class UserController {
    @Autowired
    private UserSerivce userSerivce;
    @RequestMapping("/getById")
    public User getUserById(int id) {
        return userSerivce.getUserById(id);
    }
}
编写完成后,我们就可以启动这个程序运行起来,看看效果。
三、在运行过程中可能会出现的问题
3.1 版本不兼容
Spring Boot 和 MyBatis 的版本兼容性,我使用的Spring Boot 是3.4.4 版本,而MyBatis Spring Boot Starter 使用的是 3.0.0 版本,在运行的时候就导致出错了,所以如下将Spring Boot改成了3.2.3,然后MyBatis Spring Boot Starter 使用的是 3.0.3的 版本。
    4.0.0


        org.springframework.boot
        spring-boot-starter-parent
        3.2.3


    com.example
    demo1
    0.0.1-SNAPSHOT
    demo1
    demo1


        17
        3.0.3


            org.springframework.boot
            spring-boot-starter-web


            org.springframework.boot
            spring-boot-starter-test
            test


            com.mysql
            mysql-connector-j
            runtime


            org.mybatis.spring.boot
            mybatis-spring-boot-starter
            3.0.3


                org.springframework.boot
                spring-boot-maven-plugin

2025/4/3
保持好奇......
免责声明:我们致力于保护作者版权,注重分享,被刊用文章因无法核实真实出处,未能及时与作者取得联系,或有版权异议的,请联系管理员,我们会立即处理! 部分文章是来自自研大数据AI进行生成,内容摘自(百度百科,百度知道,头条百科,中国民法典,刑法,牛津词典,新华词典,汉语词典,国家院校,科普平台)等数据,内容仅供学习参考,不准确地方联系删除处理! 图片声明:本站部分配图来自人工智能系统AI生成,觅知网授权图片,PxHere摄影无版权图库和百度,360,搜狗等多加搜索引擎自动关键词搜索配图,如有侵权的图片,请第一时间联系我们。


