
Linux基本指令/下

目录
1.echo、cat与printf
2. > 操作符 与 >> 操作符
3.
4.消息传送 + linux文件深入
5.文件类型
6.mv命令
7.时间相关指令
8.查找命令
9.grep命令
10.zip/unzip/tar命令
11.scp命令
12.bc命令
13.uname 指令
14.快捷键大全
15.关机/重启/睡眠
16.shell(外壳程序)运行原理
1.echo、cat与printf
echo:打印字符串(会把test.c当作字符串),格式是 echo linux
cat:打印指定文件中内容,格式是 cat test.c
printf:不解释了,格式是 printf "hello linux "
[root@VM-16-3-centos ~]# cat
aabb
aabb
bbcc
bbcc
ddee
ddee
^C
[root@VM-16-3-centos ~]#
[root@VM-16-3-centos ~]# cat /var/log/messages
[root@VM-16-3-centos ~]# more /var/log/messages
May 26 21:46:03 VM-16-3-centos kernel: Initializing cgroup subsys cpuset
May 26 21:46:03 VM-16-3-centos kernel: Initializing cgroup subsys cpu
May 26 21:46:03 VM-16-3-centos kernel: Initializing cgroup subsys cpuacct
May 26 21:46:03 VM-16-3-centos kernel: Linux version 3.10.0-1160.119.1.el7.x86_64 (mockbuild@kbuilder.bsys.centos.org) (gcc version 4.8.5 20150623 (Red Hat 4.8.5-44) (GCC) ) #1 SMP Tue Jun 4 14:43:51 UTC 2024
May 26 21:46:03 VM-16-3-centos kernel: Command line: BOOT_IMAGE=/boot/vmlinuz-3.10.0-1160.119.1.el7.x86_64 root=UUID=4b499d76-769a-40a0-93dc-4a31a59add28 ro crashkernel=2G-8G:256M,8G-16G:512M,16G-:768M console=ttyS0,115200 consol
e=tty0 panic=5 net.ifnames=0 biosdevname=0 intel_idle.max_cstate=1 intel_pstate=disable processor.max_cstate=1 amd_iommu=on iommu=pt LANG=en_US.UTF-8
May 26 21:46:03 VM-16-3-centos kernel: e820: BIOS-provided physical RAM map:
May 26 21:46:03 VM-16-3-centos kernel: BIOS-e820: [mem 0x0000000000000000-0x000000000009fbff] usable
May 26 21:46:03 VM-16-3-centos kernel: BIOS-e820: [mem 0x000000000009fc00-0x000000000009ffff] reserved
May 26 21:46:03 VM-16-3-centos kernel: BIOS-e820: [mem 0x00000000000f0000-0x00000000000fffff] reserved
May 26 21:46:03 VM-16-3-centos kernel: BIOS-e820: [mem 0x0000000000100000-0x000000007ffddfff] usable
May 26 21:46:03 VM-16-3-centos kernel: BIOS-e820: [mem 0x000000007ffde000-0x000000007fffffff] reserved
May 26 21:46:03 VM-16-3-centos kernel: BIOS-e820: [mem 0x00000000feffc000-0x00000000feffffff] reserved
May 26 21:46:03 VM-16-3-centos kernel: BIOS-e820: [mem 0x00000000fffc0000-0x00000000ffffffff] reserved
May 26 21:46:03 VM-16-3-centos kernel: NX (Execute Disable) protection: active
May 26 21:46:03 VM-16-3-centos kernel: SMBIOS 2.8 present.
May 26 21:46:03 VM-16-3-centos kernel: DMI: Tencent Cloud CVM, BIOS seabios-1.9.1-qemu-project.org 04/01/2014
May 26 21:46:03 VM-16-3-centos kernel: Hypervisor detected: KVM
May 26 21:46:03 VM-16-3-centos kernel: e820: last_pfn = 0x7ffde max_arch_pfn = 0x400000000
May 26 21:46:03 VM-16-3-centos kernel: PAT configuration [0-7]: WB  WC  UC- UC  WB  WP  UC- UC
May 26 21:46:03 VM-16-3-centos kernel: found SMP MP-table at [mem 0x000f6bb0-0x000f6bbf] mapped at [ffffffffff200bb0]
May 26 21:46:03 VM-16-3-centos kernel: Using GB pages for direct mapping
May 26 21:46:03 VM-16-3-centos kernel: RAMDISK: [mem 0x35aa8000-0x36d4bfff]
May 26 21:46:03 VM-16-3-centos kernel: Early table checksum verification disabled
May 26 21:46:03 VM-16-3-centos kernel: ACPI: RSDP 00000000000f69d0 00014 (v00 BOCHS )
May 26 21:46:03 VM-16-3-centos kernel: ACPI: RSDT 000000007ffe27f5 00030 (v01 BOCHS  BXPCRSDT 00000001 BXPC 00000001)
May 26 21:46:03 VM-16-3-centos kernel: ACPI: FACP 000000007ffe2639 00074 (v01 BOCHS  BXPCFACP 00000001 BXPC 00000001)
May 26 21:46:03 VM-16-3-centos kernel: ACPI: DSDT 000000007ffe0040 025F9 (v01 BOCHS  BXPCDSDT 00000001 BXPC 00000001)
May 26 21:46:03 VM-16-3-centos kernel: ACPI: FACS 000000007ffe0000 00040
May 26 21:46:03 VM-16-3-centos kernel: ACPI: APIC 000000007ffe26ad 00080 (v01 BOCHS  BXPCAPIC 00000001 BXPC 00000001)
May 26 21:46:03 VM-16-3-centos kernel: ACPI: SRAT 000000007ffe272d 000C8 (v01 BOCHS  BXPCSRAT 00000001 BXPC 00000001)
May 26 21:46:03 VM-16-3-centos kernel: SRAT: PXM 0 -> APIC 0x00 -> Node 0
May 26 21:46:03 VM-16-3-centos kernel: SRAT: PXM 0 -> APIC 0x01 -> Node 0
May 26 21:46:03 VM-16-3-centos kernel: SRAT: Node 0 PXM 0 [mem 0x00000000-0x0009ffff]
May 26 21:46:03 VM-16-3-centos kernel: SRAT: Node 0 PXM 0 [mem 0x00100000-0x7fffffff]
May 26 21:46:03 VM-16-3-centos kernel: NUMA: Node 0 [mem 0x00000000-0x0009ffff] + [mem 0x00100000-0x7ffddfff] -> [mem 0x00000000-0x7ffddfff]
May 26 21:46:03 VM-16-3-centos kernel: NODE_DATA(0) allocated [mem 0x7ffb7000-0x7ffddfff]
May 26 21:46:03 VM-16-3-centos kernel: kvm-clock: cpu 0, msr 0:7ff66001, primary cpu clock
May 26 21:46:03 VM-16-3-centos kernel: kvm-clock: Using msrs 4b564d01 and 4b564d00
May 26 21:46:03 VM-16-3-centos kernel: kvm-clock: using sched offset of 8738820158 cycles
May 26 21:46:03 VM-16-3-centos kernel: Zone ranges:
May 26 21:46:03 VM-16-3-centos kernel:  DMA      [mem 0x00001000-0x00ffffff]
May 26 21:46:03 VM-16-3-centos kernel:  DMA32    [mem 0x01000000-0xffffffff]
May 26 21:46:03 VM-16-3-centos kernel:  Normal   empty
May 26 21:46:03 VM-16-3-centos kernel: Movable zone start for each node
May 26 21:46:03 VM-16-3-centos kernel: Early memory node ranges
May 26 21:46:03 VM-16-3-centos kernel:  node   0: [mem 0x00001000-0x0009efff]
--More--(0%)
cat默认是读取输入文件(键盘输入文件)的内容,因此后续我们输入什么,他就给我们输出什么;cat -n 文件 是把文件内容分段加上行号,tac 命令是反向打印文件内容
为什么会用到cat、tac?
因为在linux中,因为我们有时候不想打开文件,只是想查看文件内容,所以用到了这两个命令
cat /var/log/messages:查看该服务器的日志文件内容,日志里记录了我们所有的操作
此时先打印的操作都是最老的,但如果我们想查看最新的操作(例如这台服务器为什么挂掉了)呢?需要不断刷屏直到最后几条日志文件才能查看,这个时候我们就可以用到tac命令了
more:只打印一屏幕的内容,防止日志文件刷屏;此时more命令还未结束,如果此时我们想查看某天的(例如五月28)日志文件内容,我们可以通过 /May 28 这条指令来查看(如下所示),然后通过回车不断往后查看;旁边的百分比--More--(0%)指的是,当前日志文件查看到哪个位置;最后就是按q键,退出more命令
less:可以网上翻又可以往下翻,要好于more指令(只可以向下翻);通过⬇键往下翻,通过⬆键往上翻,退出按q键
head:只打印文件开头的内容(日志文件头是最老的操作!!!)
tail:只打印文件末尾的内容
head、tail后都可以加上 -num (num是一个数字),代表只查看num行内容
可以结合 > 操作符 与 head或tail,把一部分内容存到某个文件,然后对这个小文件进行操作
也可以结合head、tail,例如我要对日志文件的第500-510行文件进行查看;那么就先提取开头的510行,然后对提取完的510行再提取末尾的10行,代码如下所示
| 操作符:名为管道,在对某个文件进行完某一个操作以后,会把操作完的文件递交到管道后所跟的操作,然后进行一步一步的操作,最后输出最后所有操作结束以后的内容
wc(word count):统计总共有多少文字内容,和管道结合以后会有下面的效果;后面跟着的是 -l ,lines即文字内容行数
/May 28
...skipping
May 27 23:59:01 VM-16-3-centos systemd: Started Session 1978 of user root.
May 27 23:59:01 VM-16-3-centos systemd: Removed slice User Slice of root.
May 28 00:00:01 VM-16-3-centos systemd: Created slice User Slice of root.
May 28 00:00:01 VM-16-3-centos systemd: Started Session 1980 of user root.
May 28 00:00:01 VM-16-3-centos systemd: Started Session 1981 of user root.
May 28 00:00:01 VM-16-3-centos systemd: Started Session 1979 of user root.
May 28 00:00:01 VM-16-3-centos systemd: Removed slice User Slice of root.
May 28 00:01:01 VM-16-3-centos systemd: Created slice User Slice of root.
May 28 00:01:01 VM-16-3-centos systemd: Started Session 1983 of user root.
May 28 00:01:01 VM-16-3-centos systemd: Started Session 1982 of user root.
May 28 00:01:01 VM-16-3-centos systemd: Removed slice User Slice of root.
May 28 00:02:01 VM-16-3-centos systemd: Created slice User Slice of root.
May 28 00:02:01 VM-16-3-centos systemd: Started Session 1984 of user root.
May 28 00:02:01 VM-16-3-centos systemd: Removed slice User Slice of root.
May 28 00:03:01 VM-16-3-centos systemd: Created slice User Slice of root.
May 28 00:03:01 VM-16-3-centos systemd: Started Session 1985 of user root.
May 28 00:03:01 VM-16-3-centos systemd: Removed slice User Slice of root.
May 28 00:04:01 VM-16-3-centos systemd: Created slice User Slice of root.
May 28 00:04:01 VM-16-3-centos systemd: Started Session 1986 of user root.
May 28 00:04:01 VM-16-3-centos systemd: Removed slice User Slice of root.
May 28 00:05:01 VM-16-3-centos systemd: Created slice User Slice of root.
May 28 00:05:01 VM-16-3-centos systemd: Started Session 1987 of user root.
May 28 00:05:01 VM-16-3-centos systemd: Started Session 1988 of user root.
May 28 00:05:01 VM-16-3-centos systemd: Removed slice User Slice of root.
May 28 00:06:01 VM-16-3-centos systemd: Created slice User Slice of root.
May 28 00:06:01 VM-16-3-centos systemd: Started Session 1989 of user root.
May 28 00:06:01 VM-16-3-centos systemd: Removed slice User Slice of root.
May 28 00:07:01 VM-16-3-centos systemd: Created slice User Slice of root.
May 28 00:07:01 VM-16-3-centos systemd: Started Session 1990 of user root.
May 28 00:07:01 VM-16-3-centos systemd: Removed slice User Slice of root.
May 28 00:08:01 VM-16-3-centos systemd: Created slice User Slice of root.
May 28 00:08:01 VM-16-3-centos systemd: Started Session 1991 of user root.
May 28 00:08:01 VM-16-3-centos systemd: Removed slice User Slice of root.
May 28 00:09:01 VM-16-3-centos systemd: Created slice User Slice of root.
May 28 00:09:01 VM-16-3-centos systemd: Started Session 1992 of user root.
May 28 00:09:01 VM-16-3-centos systemd: Removed slice User Slice of root.
May 28 00:10:01 VM-16-3-centos systemd: Created slice User Slice of root.
May 28 00:10:01 VM-16-3-centos systemd: Started Session 1993 of user root.
May 28 00:10:01 VM-16-3-centos systemd: Started Session 1994 of user root.
May 28 00:10:01 VM-16-3-centos systemd: Removed slice User Slice of root.
May 28 00:11:01 VM-16-3-centos systemd: Created slice User Slice of root.
May 28 00:11:01 VM-16-3-centos systemd: Started Session 1995 of user root.
May 28 00:11:01 VM-16-3-centos systemd: Removed slice User Slice of root.
May 28 00:12:01 VM-16-3-centos systemd: Created slice User Slice of root.
May 28 00:12:01 VM-16-3-centos systemd: Started Session 1996 of user root.
May 28 00:12:01 VM-16-3-centos systemd: Removed slice User Slice of root.
[root@VM-16-3-centos ~]# head -510  /var/log/messages | tail -10
May 26 21:46:04 VM-16-3-centos kernel: [TTM] Initializing DMA pool allocator
May 26 21:46:04 VM-16-3-centos kernel: [drm] fb mappable at 0xFC000000
May 26 21:46:04 VM-16-3-centos kernel: [drm] vram aper at 0xFC000000
May 26 21:46:04 VM-16-3-centos kernel: [drm] size 33554432
May 26 21:46:04 VM-16-3-centos kernel: [drm] fb depth is 16
May 26 21:46:04 VM-16-3-centos kernel: [drm]    pitch is 2048
May 26 21:46:04 VM-16-3-centos kernel: fbcon: cirrusdrmfb (fb0) is primary device
May 26 21:46:04 VM-16-3-centos kernel: Console: switching to colour frame buffer device 128x48
May 26 21:46:04 VM-16-3-centos kernel: cirrus 0000:00:02.0: fb0: cirrusdrmfb frame buffer device
May 26 21:46:04 VM-16-3-centos kernel: [drm] Initialized cirrus 1.0.0 20110418 for 0000:00:02.0 on minor 0
[root@VM-16-3-centos ~]# head -510 /var/log/messages | tail -10 | wc -l
10
2. > 操作符 与 >> 操作符
[root@VM-16-3-centos ~]# echo hello linux > hello.txt
[root@VM-16-3-centos ~]# ll
total 20
drwxr-xr-x 4 root root 4096 May 28 16:14 a
drwxr-xr-x 3 root root 4096 May 28 15:50 a-backup
-rw-r--r-- 1 root root    0 May 28 13:45 code.c
-rw-r--r-- 1 root root   12 May 29 20:03 hello.txt
-rw-r--r-- 1 root root    0 May 27 21:39 test1.c
-rw-r--r-- 1 root root   59 May 28 14:03 test.c
-rw-r--r-- 1 root root   32 May 28 15:49 tt.txt
[root@VM-16-3-centos ~]# cat hello.txt
hello linux
> 叫做输出重定项,是专门用来把文本内容,写入到某个文件中;类似于输入文件流 stdin 或者 c++中的 >>,此处需要知道的是:linux中一切都是文件,输入输出也都用输入输出流来完成的;echo默认向预置好的输出文件输入,预置好的那个文件会自动帮我们输出
a.后面文件不存在,新建之(可以通过该操作符代替touch)
b.后面文件存在,先清空再输入
c.文件清空如下示
[root@VM-16-3-centos ~]# >hello.txt
[root@VM-16-3-centos ~]# cat hello.txt
[root@VM-16-3-centos ~]#
[root@VM-16-3-centos ~]# cat hello.txt
[root@VM-16-3-centos ~]# echo hello > hello.txt
[root@VM-16-3-centos ~]# cat hello.txt
hello
[root@VM-16-3-centos ~]# echo hello >> hello.txt
[root@VM-16-3-centos ~]# cat hello.txt
hello
hello
>> 叫做追加重定项,当我们不想清空文件时,就可以通过该操作符
3.
与 2 所提到的 > 功能相反,叫做输入重定项
4.消息传送 + linux文件深入
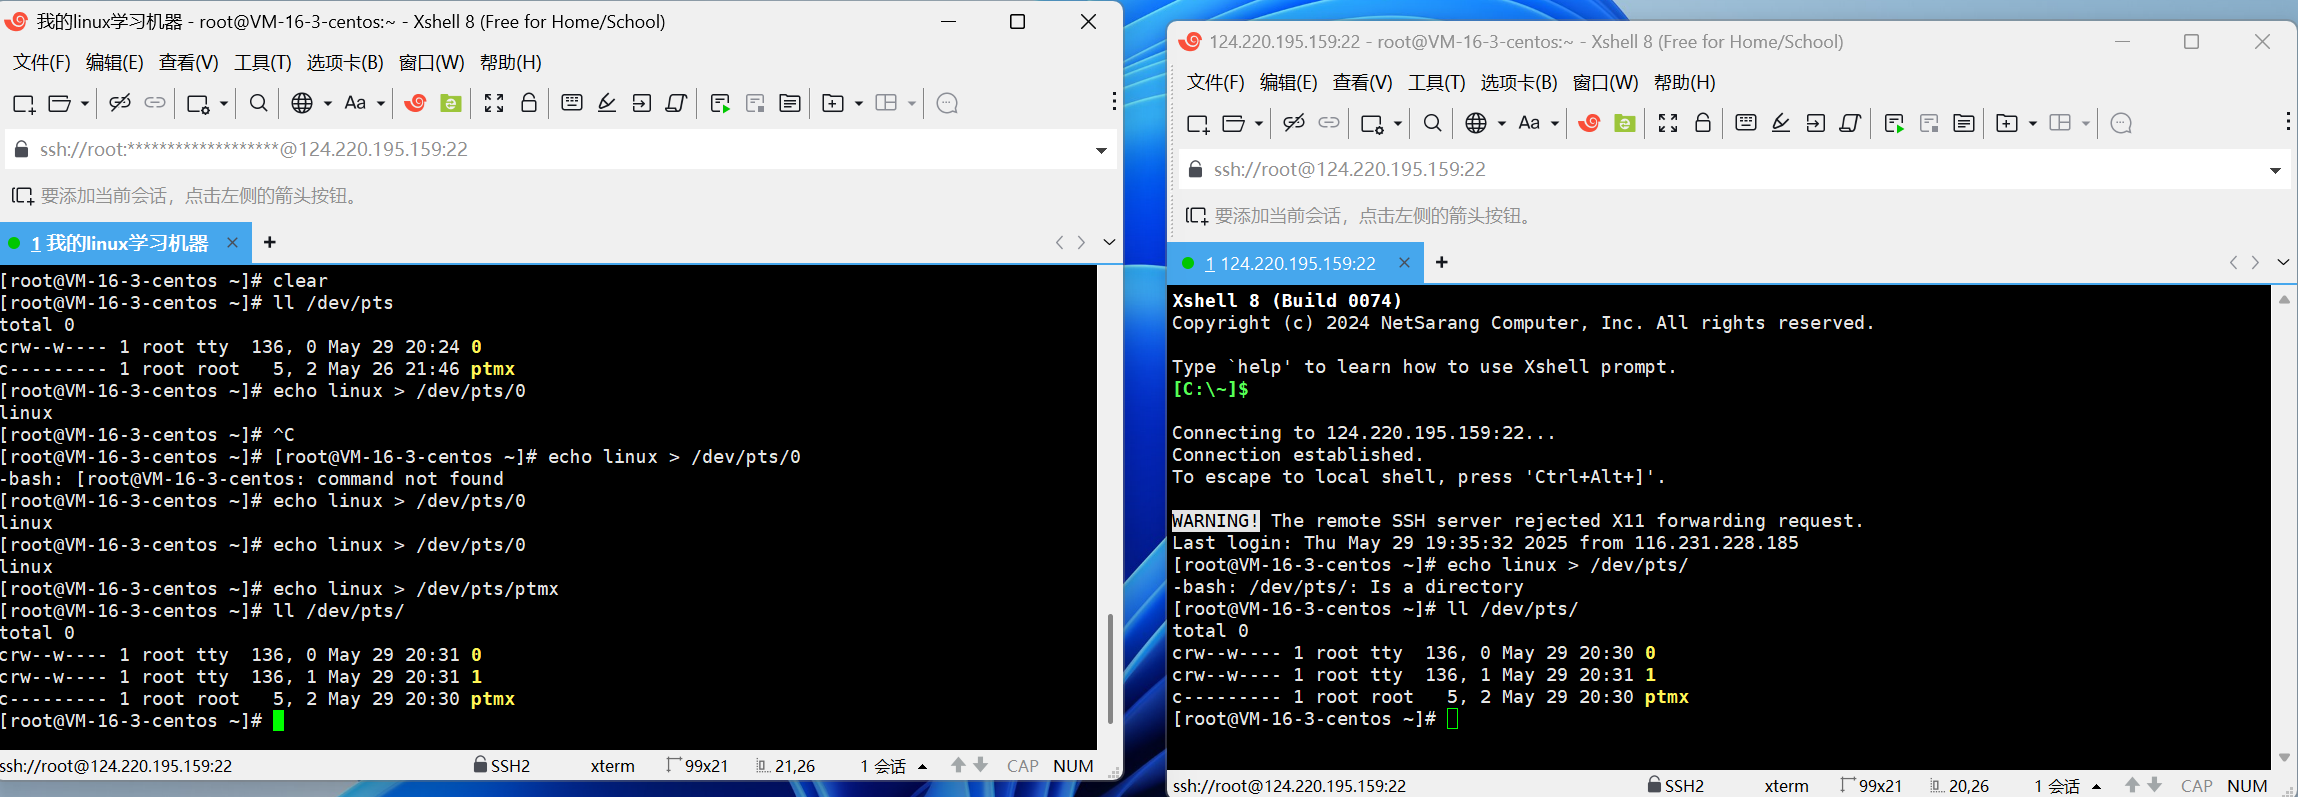
可以看到如果两个超级管理员连接了同一台服务器,那么 ll /dev/pts/ 目录就能看到第二名用户的信息;该目录保存的是各个用户的显示器输出文件,0代表的是第一位连接上服务器的用户的输出文件,1代表第二位;如果我们现在想要从左边那个超级用户窗口发送信息到右边那个用户窗口,就可以通过输出重定项来实现;c 开头的文件叫做字符文件,说明这个文件内容与字符串相关
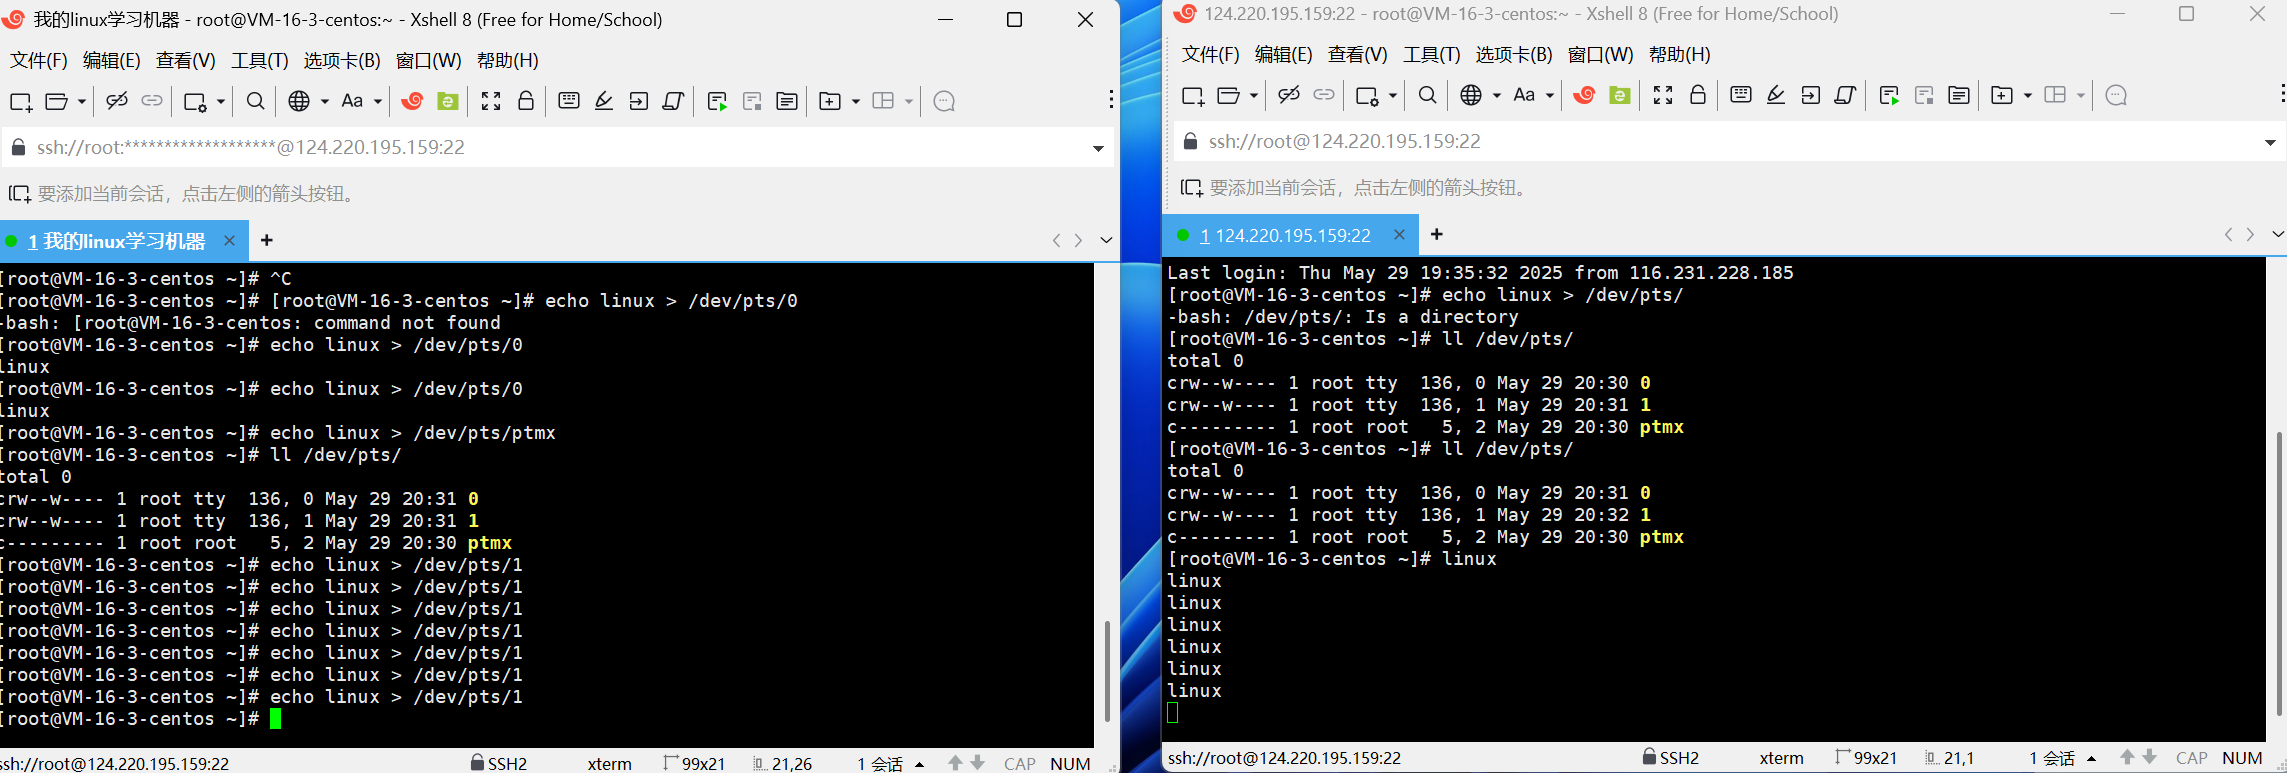
为什么 ll 命令输入以后,都会在对应的设备终端上打印呢?
就是因为每次一个新用户连接服务器以后,都会根据连接顺序分配一个新的输入文件给到新用户
我们甚至可以在 .c 文件中通过fopen打开别的用户的输出文件,然后给别人写一段死循环程序(请勿这么做)
5.文件类型
- d 目录文件
- c 字符文件,与键盘、显示器和终端相关,输入的数据具有顺序性
- b 块设备文件,与磁盘有关
- l 连接文件
- p 管道文件
- s socket文件
- - 普通文件
brw-rw---- 1 root disk 253, 0 May 26 21:46 /dev/vda
brw-rw---- 1 root disk 253, 1 May 26 21:46 /dev/vda1
每台电脑都会有上面的那种文件,那些文件是磁盘文件;所以最好不要对这些文件进行修改,修改了之后可能windows系统要出大问题
linux中,系统不看文件后缀,工具(例如gcc)关心文件后缀;在windows中,我们想要修改一个 .c 文件的后缀,随便修改以后如果我们把文件在vscode打开,不是报错就是无法识别文件
6.mv命令
mv用来 更改普通文件名称与所处位置 或者 删除文件 或者 更改目录所处位置,mv即move的缩写
[root@VM-16-3-centos ~]# ll
total 36
drwxr-xr-x 4 root root 4096 May 28 16:14 a
drwxr-xr-x 3 root root 4096 May 28 15:50 a-backup
-rw-r--r-- 1 root root   69 May 29 21:36 code.x
-rw-r--r-- 1 root root   12 May 29 20:11 hello.txt
-rwxr-xr-x 1 root root 8360 May 29 21:37 mycmd
-rw-r--r-- 1 root root    0 May 27 21:39 test1.c
-rw-r--r-- 1 root root   59 May 28 14:03 test.c
-rw-r--r-- 1 root root   32 May 28 15:49 tt.txt
[root@VM-16-3-centos ~]# mv test.c ..
[root@VM-16-3-centos ~]# ll
total 32
drwxr-xr-x 4 root root 4096 May 28 16:14 a
drwxr-xr-x 3 root root 4096 May 28 15:50 a-backup
-rw-r--r-- 1 root root   69 May 29 21:36 code.x
-rw-r--r-- 1 root root   12 May 29 20:11 hello.txt
-rwxr-xr-x 1 root root 8360 May 29 21:37 mycmd
-rw-r--r-- 1 root root    0 May 27 21:39 test1.c
-rw-r--r-- 1 root root   32 May 28 15:49 tt.txt
[root@VM-16-3-centos ~]# cd ../
[root@VM-16-3-centos /]# ls
a.txt  bin  boot  data  dev  etc  home  lib  lib64  lost+found  media  mnt  opt  proc  root  run  sbin  srv  sys  test.c  tmp  usr  var
如上所示,通过move操作将test.c文件移动到了上层目录,需要注意的是move还可移动目录,所以move的移动操作就很像剪切mv与alias之别
mv:更换普通文件文件名称
alias:更换命令名称
mv格式:mv code.c code.txt (如果重命名的是普通文件,当code.txt位置不是目录,那么就是命名;并且move还能对目录进行重命名,格式与普通文件一样,同时对新名字没有任何要求)
alias格式:alias zhangsan=pwd
7.时间相关指令
date 指令
指定格式显⽰时间: date +%Y:%m:%d
⽤法: date [OPTION]... [+FORMAT]
在显⽰⽅⾯,使⽤者可以设定欲显⽰的格式,格式设定为⼀个加号后接数个标记,其中常⽤的标记 列表如下
- %X : 相当于 %H:%M:%S
- %d : ⽇ (01..31) • %m : ⽉份 (01..12)
- %Y : 完整年份 (0000..9999)
- %F : 相当于 %Y-%m-%d
- %H : ⼩时(00..23)
- %M : 分钟(00..59)
- %S : 秒(00..61)
- 时间->时间戳:date +%s(获取时间戳到目前所经过的总秒数)
- 时间戳->时间:date -d@1508749502
- Unix时间戳(英⽂为Unix epoch, Unix time, POSIX time 或 Unix timestamp)是从1970年1⽉1 ⽇(UTC/GMT的午夜)开始所经过的秒数,不考虑闰秒
[root@VM-16-3-centos ~]# date -d@0
Thu Jan  1 08:00:00 CST 1970
注:中国处在东八区,所以时间戳从8:00:00开始算
cal命令可以⽤来显⽰公历(阳历)⽇历。公历是现在国际通⽤的历法,⼜称格列历,通称阳历。“阳 历”⼜名“太阳历”,系以地球绕⾏太阳⼀周为⼀年,为西⽅各国所通⽤,故⼜名“西历”。
命令格式: cal 参数 [年份]
功能:⽤于查看⽇历等时间信息,如只有⼀个参数,则表⽰年份(1-9999),如有两个参数,则表⽰⽉份 和年份
常⽤选项:
- -3 显⽰系统前⼀个⽉,当前⽉,下⼀个⽉的⽉历
- -j 显⽰在当年中的第⼏天(⼀年⽇期按天算,从1⽉1号算起,默认显⽰当前⽉在⼀年中的天数)
- -y 显⽰当前年份的⽇历
8.查找命令
which:只会去查找命令文件
whereis:以字符串为格式,去查找linux系统中存在该字符串的文件(非常不常用,linux系统指的是系统自带的文件)
find:会查询系统+用户创建的内容,-name 是根据名字进行查找的命令行选项
[root@VM-16-3-centos ~]# whereis man
man: /usr/bin/man /usr/share/man /usr/share/man/man7/man.7.gz /usr/share/man/man1/man.1.gz /usr/share/man/man1p/man.1p.gz
[root@VM-16-3-centos ~]# find ~ -name *.c
/root/test1.c
[root@VM-16-3-centos ~]# find -name *.c
./test1.c
9.grep命令
grep是根据给定的字符串,过滤整个文件的信息,找出有给定字符串的文件or目录or文本输出
如果想要查询日志文件中最新的错误信息,那么就在后面再跟一个tail操作即可
grep还被用来查找某条字符串出现在某文本的第几行,比如现在有个 .c 文件里面写了int main,那么就可以通过该命令去找到,前面写名第几行需要加上 -n 命令行选项
grep还有一个 -v ,v 是reverse的缩写,是grep命令的逆操作;还有 -i ,i 是ignore的缩写,指忽略后面字符串的大小写


10.zip/unzip/tar命令
打包和压缩是什么?
打包是把各种各样的文件,搞到一个文件夹中;此时的文件可能很大,传输比较慢,那么我们就可以压缩这个文件夹,然后以压缩包格式传输给其他主机
打包的意义:只需要传输一个文件,防止文件丢失
压缩的意义:把打包后的大文件,进行存储空间的压缩;能节约磁盘空间的同时,网络传输的速度也能够加快
zip/unzip:
可能需要自己来安装这个命令,安装命令如下代码所示
当我们要把 a 目录打包,那么命令格式如下
zip -r a.zip a ( -r 一定要加,要不然无法把整个目录+目录中内容一起压缩,只会将目录压缩)
当我们需要解压,格式如下
unzip a.zip
可以通过 -d 命令行选项,解压到指定目录;例如我们想解压到a-backup目录,格式如下
unzip a.zip -d /a-backup
tar:
格式如下
tar [-cxtzjvf] 自己取的名字 已存在的文件/目录名 [-C /root]
- -c:建⽴⼀个压缩⽂件的参数指令(create的意思)
- -x:解开⼀个压缩⽂件的参数指令!
- -t:查看tarfile⾥⾯的⽂件!
- -z:是否同时具有gzip的属性?亦即是否需要⽤gzip压缩?
- -j:是否同时具有bzip2的属性?亦即是否需要⽤bzip2压缩?
- -v:压缩的过程中显⽰⽂件!这个常⽤,但不建议⽤在背景执⾏过程!
- -f:使⽤档名,请留意,在f之后要⽴即接档名喔!不要再加参数!
- -C:解压到指定⽬录
注意事项:f 要紧跟着文档名,创建是小写c,指定目录是大写C,不管是压缩还是解压都需要声明以哪种方式(gzip/bzip2)
gzip是一种常用的文件压缩工具,主要用于单个文件的压缩。它将文件压缩为.gz格式,并且以较快的速度提供良好的压缩比。
bzip2也是一种常见的压缩工具,与gzip相比,它提供了更高的压缩率,但压缩和解压缩的速度较慢。
yum install -y zip unzip
yum install -y lrzsz
[root@linux ~]$ tar -cvf /tmp/etc.tar /etc 创建子进程(外壳程序不能挂,子进程可以挂)
 对⽐windowsGUI,我们操作windows不是直接操作windows内核,⽽是通过图形接⼝,点击,从 ⽽完成我们的操作(⽐如进⼊D盘的操作,我们通常是双击D盘盘符.或者运⾏起来⼀个应⽤程序)。
 shell 对于Linux,有相同的作⽤,主要是对我们的指令进⾏解析,解析指令给Linux内核。反馈结果在 通过内核运⾏出结果,通过shell解析给⽤⼾。


