Spring AI MCP Client + DeepSeek R1 搭建自定义可扩展的AI助手服务

一、Spring AI MCP Client
MCP 由 Anthropic 推出的一种开放标准协议,旨在统一大模型(LLM)与外部数据源和工具之间的通信方式。通过 MCP 协议,开发者可以更高效地实现 AI 模型与外部资源的集成,从而提升应用的智能化和上下文感知能力。
上篇文章介绍了关于 Spring AI MCP Server + Cline 的方式实现了数据库 ChatBi 助手,但MCP客户端的能力是基于 Cline 进行实现的,本篇文章继续进行深入,通过 Spring AI MCP Client 端框架调用MCP Server 端的 Tools,AIGC 能力使用 deepseek-r1 进行完成。
上篇文章在实现 MCP Server 端时采用的 stdio 模式进行的接入,本篇文章也继续扩展重新采用 SSE 模式进行实现,同样是实现一个 ChatBi 数据查询助手 ,不过关于表结构的创建,还是请参考上篇文章中的介绍:
Spring AI MCP Server + Cline 快速搭建一个数据库 ChatBi 助手
关于AIGC能力端的说明,本次使用的 OpenRouter 平台提供的大模型能力,非局限于当前平台你可以使用任何支持 tools 调用的AIGC平台。
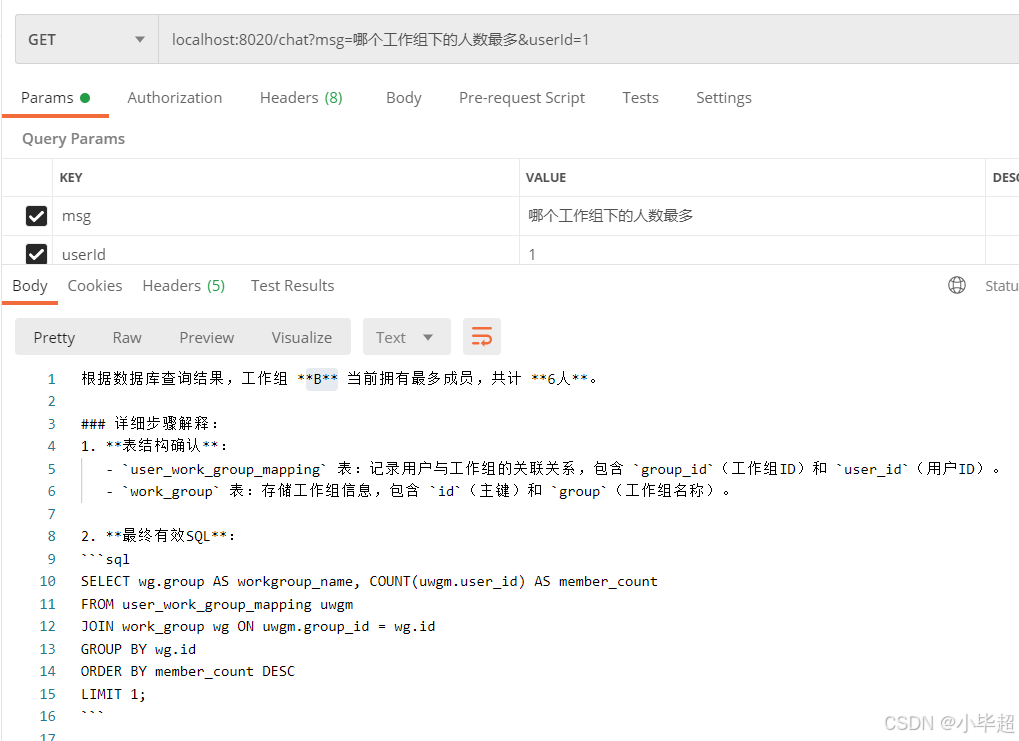
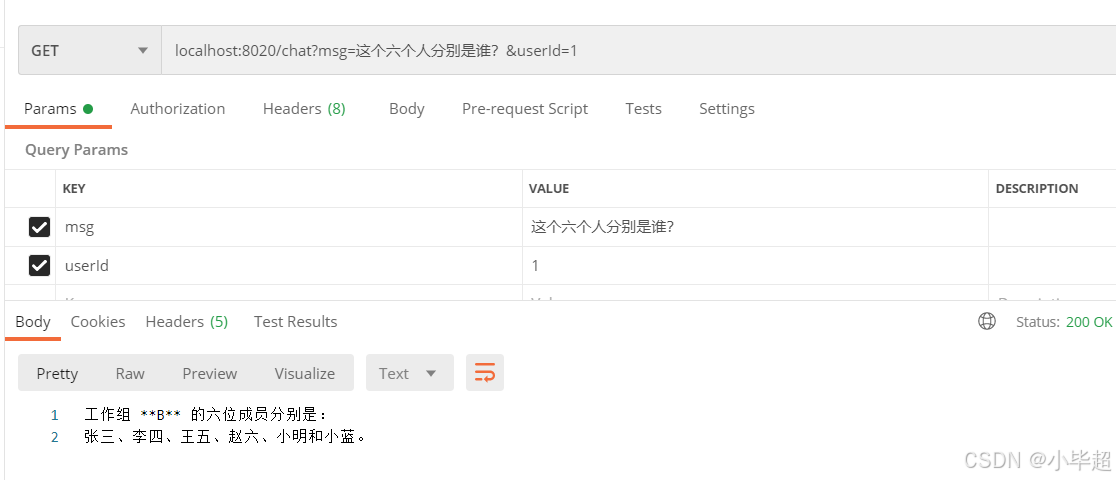
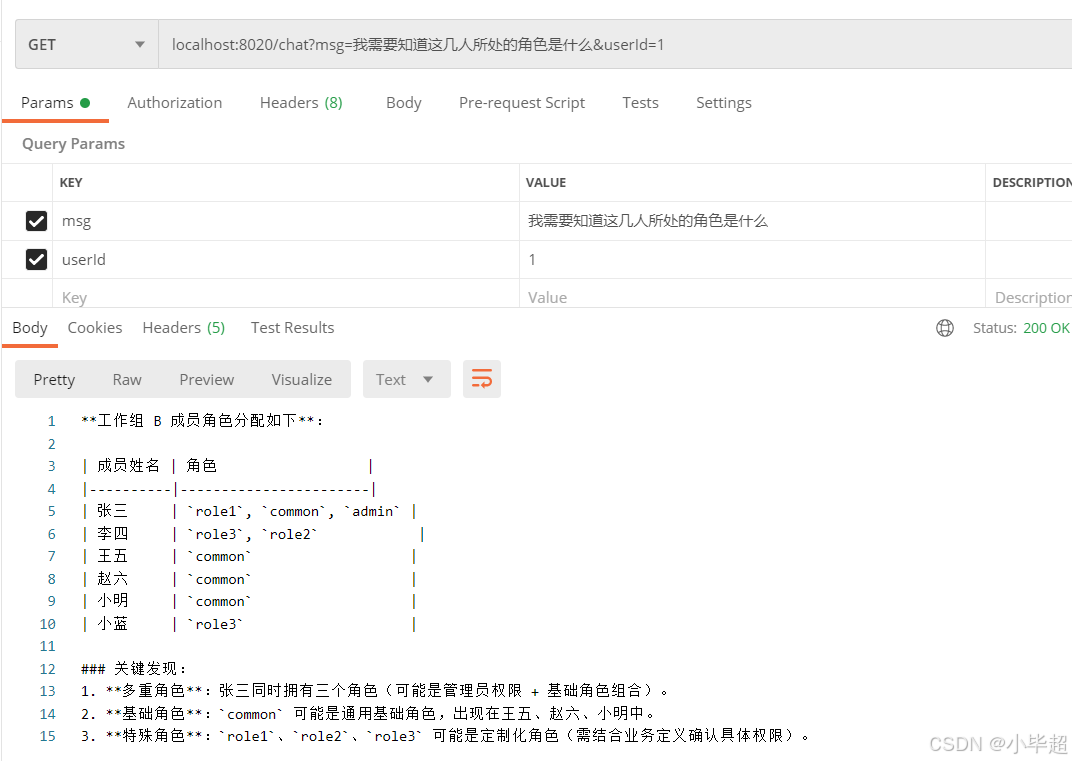
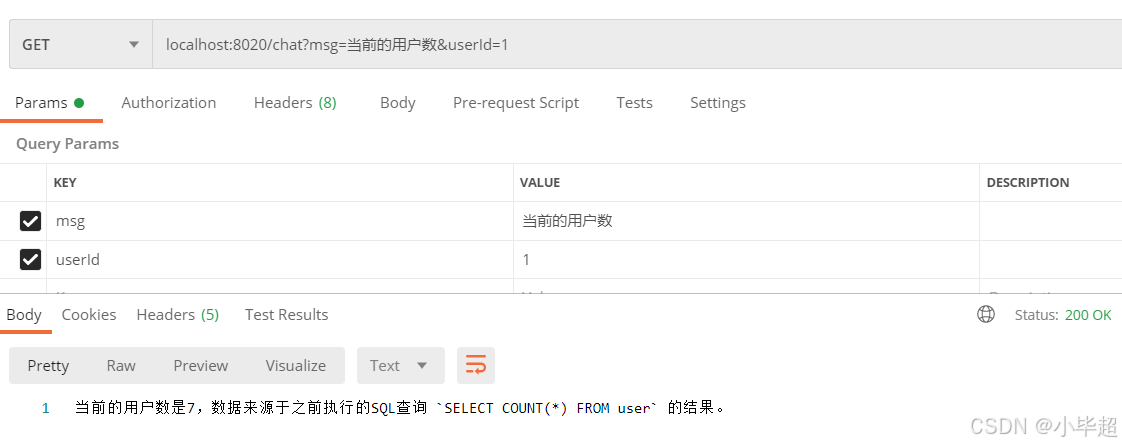
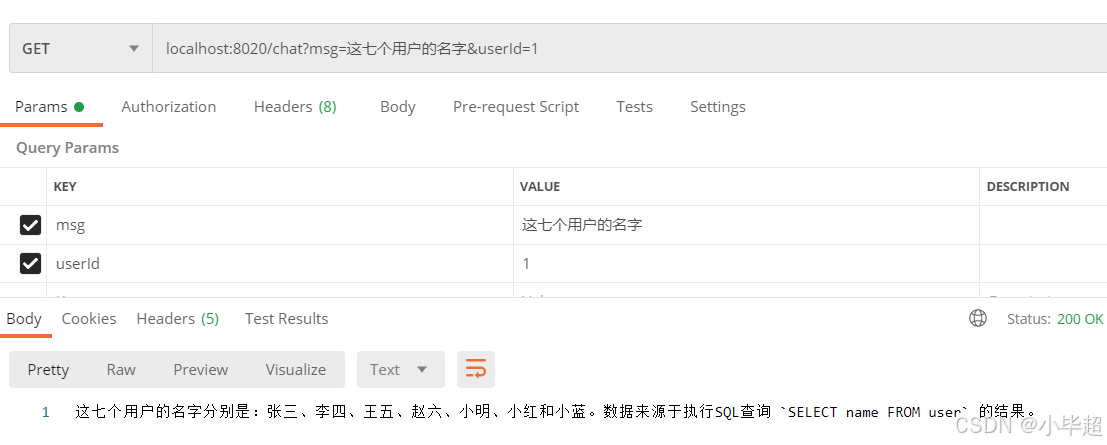
Postman测试调用Client端接口效果如下:
Spring AI MCP Client 端的官方介绍文档如下:
https://docs.spring.io/spring-ai/reference/api/mcp/mcp-client-boot-starter-docs.html
二、Spring AI MCP Server SSE 模式搭建
1. 创建父 Maven
创建父 Maven 项目,在 pom 中加入如下全局声明,这里 Java 使用17版本,SpringBoot 选用 3.3.0 版本,Spring AI 选用 1.0.0-SNAPSHOT 版本。
    4.0.0
    com.example
    mcp-demo
    0.0.1-SNAPSHOT
    mcp-demo
    mcp-demo
    pom

        17
        UTF-8
        UTF-8
        3.3.0
        1.0.0-SNAPSHOT


        mcp-server
        mcp-client


            org.springframework.boot
            spring-boot-starter


            org.springframework.boot
            spring-boot-starter-test
            test


            org.projectlombok
            lombok


                org.springframework.boot
                spring-boot-dependencies
                ${spring-boot.version}
                pom
                import


                org.springframework.ai
                spring-ai-bom
                ${spring-ai.version}
                pom
                import


            Central Portal Snapshots
            central-portal-snapshots
            https://central.sonatype.com/repository/maven-snapshots/

                false


                true


            spring-milestones
            Spring Milestones
            https://repo.spring.io/milestone

                false


            spring-snapshots
            Spring Snapshots
            https://repo.spring.io/snapshot

                false
2. 创建 mcp-server 子模块
在父依赖创建SpringBoot子模块,修改pom依赖如下:
        com.example
        mcp-demo
        0.0.1-SNAPSHOT

    4.0.0
    mcp-server
    0.0.1-SNAPSHOT
    mcp-server
    mcp-server

        17
        UTF-8
        UTF-8


            org.springframework.boot
            spring-boot-starter-web


            org.springframework.ai
            spring-ai-mcp-server-webmvc-spring-boot-starter
            ${spring-ai.version}


            mysql
            mysql-connector-java
            8.0.28


            com.alibaba
            druid
            1.1.6


            org.springframework.boot
            spring-boot-starter-jdbc


                org.apache.maven.plugins
                maven-compiler-plugin
                3.8.1

                    17
                    17
                    UTF-8


                org.springframework.boot
                spring-boot-maven-plugin
                ${spring-boot.version}


                            repackage
application.yml 配置:
server:
  port: 8010
spring:
  datasource:
    url: jdbc:mysql://127.0.0.1:3306/langchain?useUnicode=true&characterEncoding=utf8&serverTimezone=GMT%2B8
    type: com.alibaba.druid.pool.DruidDataSource
    username: root
    password: root
    driver-class-name: com.mysql.cj.jdbc.Driver
  ai:
    mcp:
      server:
        name: mymcp
        type: SYNC
        sse-message-endpoint: /mcp/messages
3. 创建 MCP Tools
创建三个 MCP Tools ,实现 获取可用表名、根据表名获取表结构、执行SQL 三个功能,这点和上篇文章中 stdio 模式是一致的 :
@Component
public class DBTool {
    @Resource
    private JdbcTemplate jdbcTemplate;
    private final String sql = "SELECT TABLE_NAME, TABLE_COMMENT FROM INFORMATION_SCHEMA.TABLES WHERE TABLE_SCHEMA = 'langchain'";
    private final String schemaSql = "SELECT COLUMN_NAME, DATA_TYPE, COLUMN_COMMENT FROM INFORMATION_SCHEMA.COLUMNS " +
            "WHERE TABLE_SCHEMA = 'langchain' AND TABLE_NAME = ?";
    @Tool(description = "获取所有可用的表名")
    public List getTables() {
        List maps = jdbcTemplate.queryForList(sql);
        return maps.stream().map(map -> {
            String tableName = String.valueOf(map.get("TABLE_NAME"));
            String tableComment = String.valueOf(map.get("TABLE_COMMENT"));
            return tableName + " COMMENT " + tableComment;
        }).collect(Collectors.toList());
    }
    @Tool(description = "根据表名获取Schema")
    public String getTableSchema(@ToolParam(description = "表名") List tables) {
        return tables.stream().filter(t -> !t.isBlank()).map(tableName -> {
            List columns = jdbcTemplate.queryForList(schemaSql, tableName);
            String tablePrompt = columns.stream().map(map -> {
                String name = String.valueOf(map.get("COLUMN_NAME"));
                String type = String.valueOf(map.get("DATA_TYPE"));
                String comment = String.valueOf(map.get("COLUMN_COMMENT"));
                return String.format("%s (%s) COMMENT %s", name, type, comment);
            }).collect(Collectors.joining(", \n"));
            return String.format("Table: %s (%s)\n", tableName, tablePrompt);
        }).collect(Collectors.joining("\n"));
    }
    @Tool(description = "执行SQL查询结果")
    public List runSql(@ToolParam(description = "sql") String sql) {
        try {
            if (sql.contains("DELETE") || sql.contains("UPDATE") || sql.contains("INSERT")) {
                throw new RuntimeException("执行SQL仅限于查询语句!");
            }
            return jdbcTemplate.queryForList(sql);
        } catch (RuntimeException e) {
            return Collections.singletonList(Map.of("执行SQL异常",e.getMessage()));
        }
    }
}
4. 注册 MCP Tools :
@Configuration
public class MCPConfig {
    @Bean
    public List tools(DBTool dbTool) {
        return new java.util.ArrayList(List.of(ToolCallbacks.from(dbTool)));
    }
}
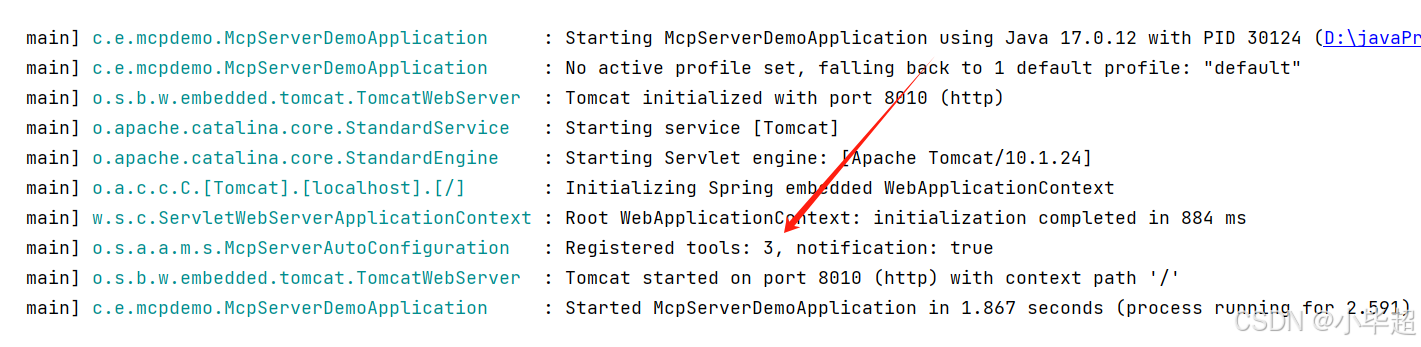
5. 启动服务
启动后可以看到日志中打印注册了三个tools:
三、MCP Client 端搭建
1. 创建 mcp-client 子模块
在父依赖创建SpringBoot子模块,修改pom依赖如下:
        com.example
        mcp-demo
        0.0.1-SNAPSHOT

    4.0.0
    mcp-client
    0.0.1-SNAPSHOT
    mcp-client
    mcp-client

        17
        UTF-8
        UTF-8


            org.springframework.boot
            spring-boot-starter-web


            org.springframework.ai
            spring-ai-mcp-client-spring-boot-starter
            ${spring-ai.version}


            org.springframework.ai
            spring-ai-starter-model-openai
            ${spring-ai.version}


                org.apache.maven.plugins
                maven-compiler-plugin
                3.8.1

                    17
                    17
                    UTF-8


                org.springframework.boot
                spring-boot-maven-plugin
                ${spring-boot.version}

                    com.example.mcpclient.McpClientApplication
                    true


                        repackage

                            repackage
application.yml 配置如下,主要声明出大模型的链接和MCPServer端的连接信息。
server:
  port: 8020
spring:
  ai:
    openai:
      base-url: https://openrouter.ai/api/
      api-key: sk-or-v1-xxxxxxxx ## 修改为你的Key
      chat:
        enabled: true
        options:
          model: deepseek/deepseek-r1
    mcp:
      client:
        enabled: true
        name: mymcp
        version: 1.0.0
        type: SYNC
        request-timeout: 300s
        sse:
          connections:
            url: http://localhost:8010
2. 不依赖大模型,使用MCP API 的方式调用SSE远程Tools, 验证连接
首先实验下不依赖大模型,使用 MCP API的方式测试调用远程Tools,验证连接是否正常。
@SpringBootTest
public class MCPSSEClientSpringTest {
@Resource
List clients;
@Test
public void test() {
clients.stream()
.filter(Objects::nonNull)
.filter(m -> Objects.equals(m.getServerInfo().name(), "mymcp"))
.findFirst()
.ifPresent(client -> {
// 获取所有的 MCP Tools
McpSchema.ListToolsResult toolsList = client.listTools();
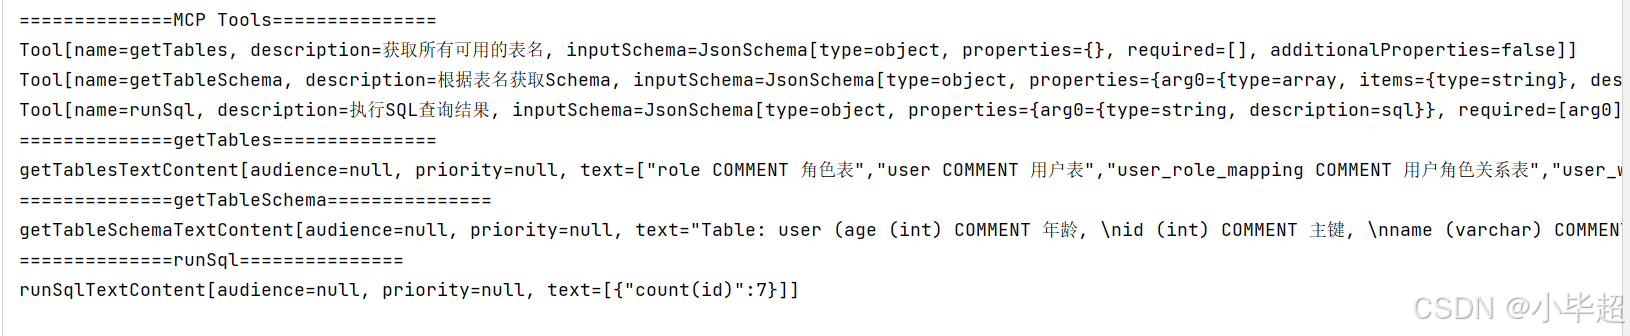
System.out.println("==============MCP Tools===============");
toolsList.tools().forEach(t -> System.out.println(t.toString()));
// 调用工具,获取全部的表
McpSchema.CallToolResult tables = client.callTool(
new McpSchema.CallToolRequest(
"getTables",
Collections.emptyMap()
)
);
System.out.println("==============getTables===============");
System.out.println("getTables" + tables.content().get(0));
// 调用工具,获取表的Schema
McpSchema.CallToolResult tableSchema = client.callTool(
new McpSchema.CallToolRequest(
"getTableSchema",
Map.of("arg0", Arrays.asList("user", "role"))
)
);
System.out.println("==============getTableSchema===============");
System.out.println("getTableSchema" + tableSchema.content().get(0));
// 调用工具,执行SQL
McpSchema.CallToolResult runSQL = client.callTool(
new McpSchema.CallToolRequest(
"runSql",
Map.of("arg0", "select count(id) from user")
)
);
System.out.println("==============runSql===============");
System.out.println("runSql" + runSQL.content().get(0));
});
}
}
运行后看到 Tools 列表和调用 Tool 成功即表示连接正常。
3. 结合 DeepSeek 自动 Tools 调用
这里临时使用 Map 存放多轮对话,通过 userId 区分具体用户。关于 Tools 的组装,
SpringAI 已经自动将 MCP Tools 放入了 ToolCallbackProvider 中,因此可直接将该对象提供给 ChatClient 即可。
这部分的内容可参考:
https://docs.spring.io/spring-ai/reference/api/tools.html
完整实现逻辑如下:
@RestController
public class ChatController {
    private final ChatClient chatClient;
    // 存放会话,临时使用Map, 实际使用请考虑持久化
    private final Map history;
    public ChatController(ChatClient.Builder chatClientBuilder, ToolCallbackProvider toolCallbackProvider) {
        this.chatClient = chatClientBuilder
                .defaultTools(toolCallbackProvider)
                .build();
        history = new ConcurrentHashMap();
    }
    @GetMapping("/chat")
    public String mcpChat(@RequestParam(name = "userId", required = true) String userId,
                          @RequestParam(name = "msg", required = true) String msg) {
        if (!history.containsKey(userId)) {
            history.put(userId, new ArrayList());
            history.get(userId).add(new SystemMessage("You are an AI assistant that helps people find information."));
        }
        history.get(userId).add(new UserMessage(msg));
        String result = chatClient
                .prompt(new Prompt(history.get(userId)))
                .call().content();
        history.get(userId).add(new AssistantMessage(result));
        return result;
    }
}
启动服务,下面进行测试。
四、接口测试