
MySQL【高可用篇】03:MySQL8.0.25InnoDB Cluster【MGR】集群搭建部署

一、详解InnoDB Cluster
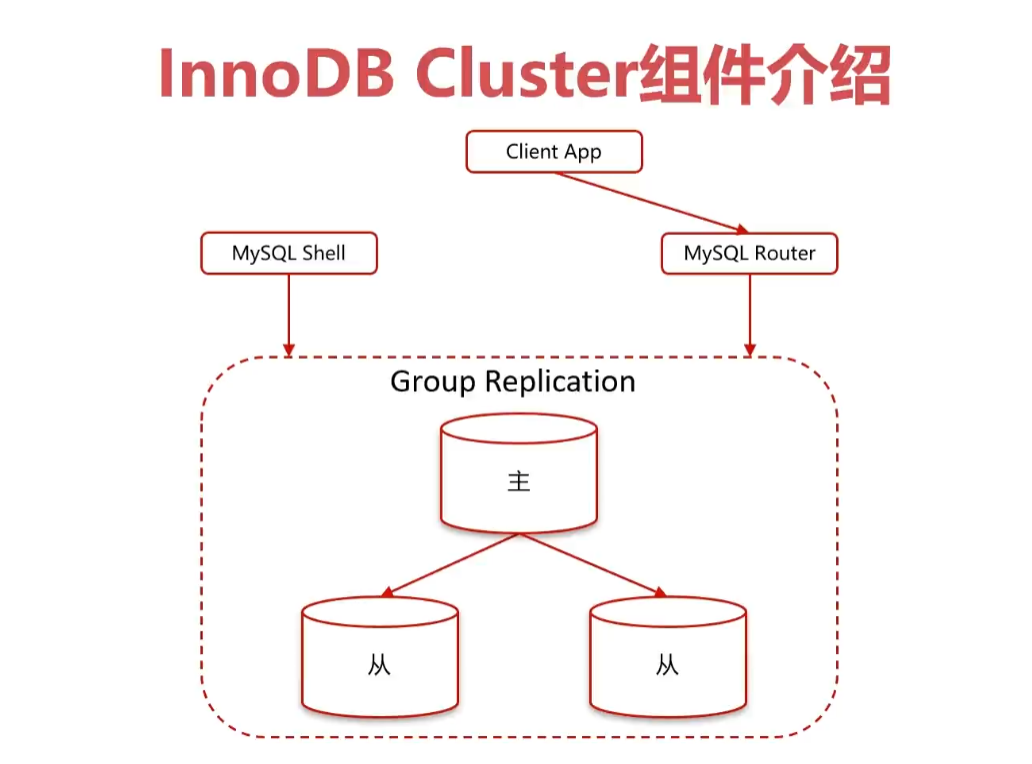
1、InnoDB Cluster组件介绍
2、MGR的两种模式

3、MGR的主要特点

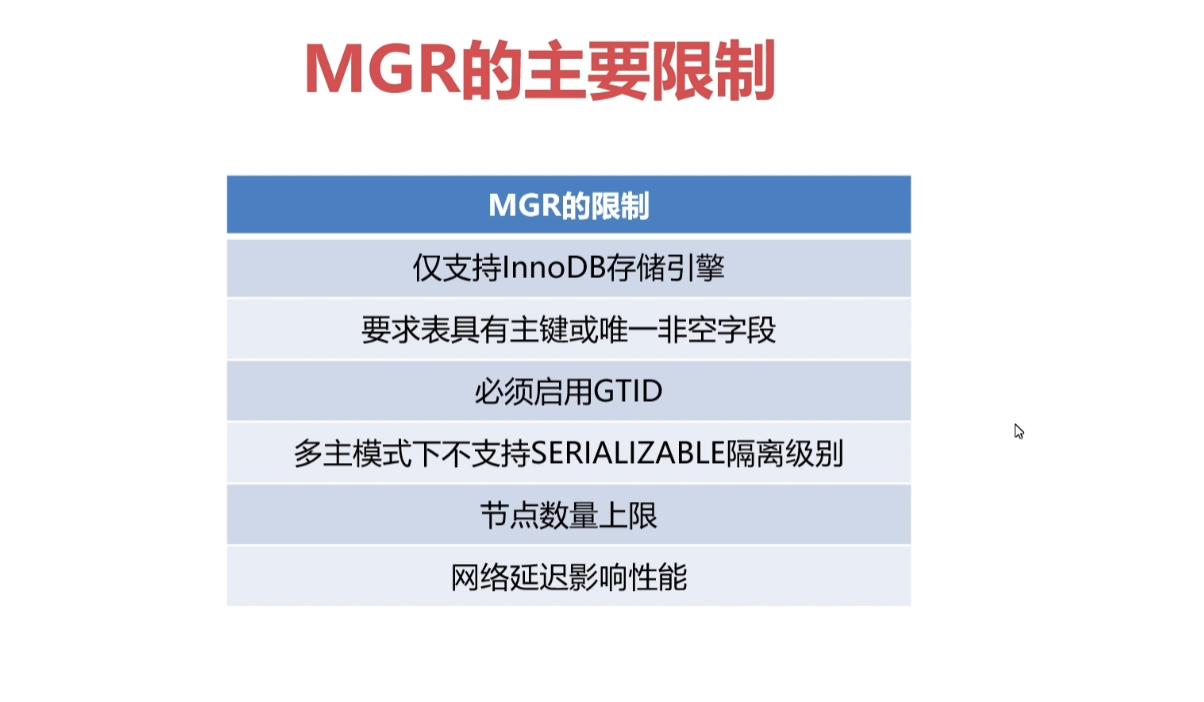
4、MGR的主要限制
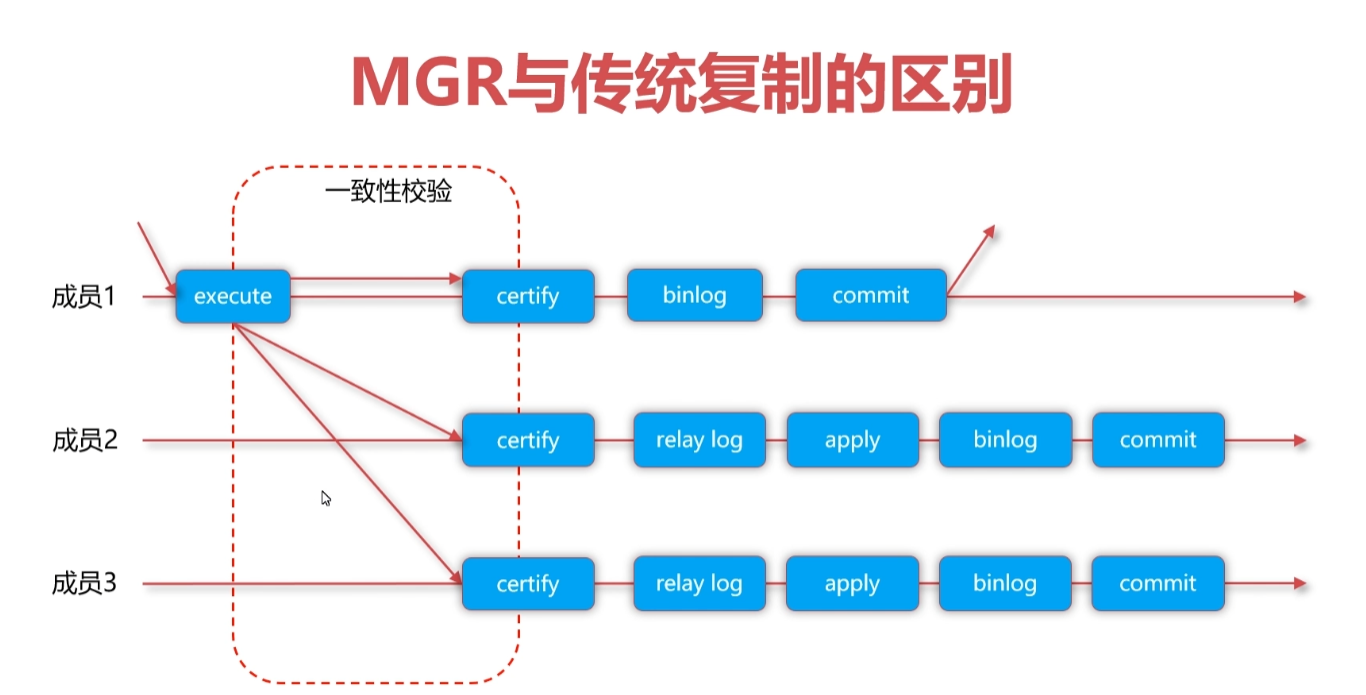
5、MGR与传统复制的区别
二、InnoDB Cluster部署
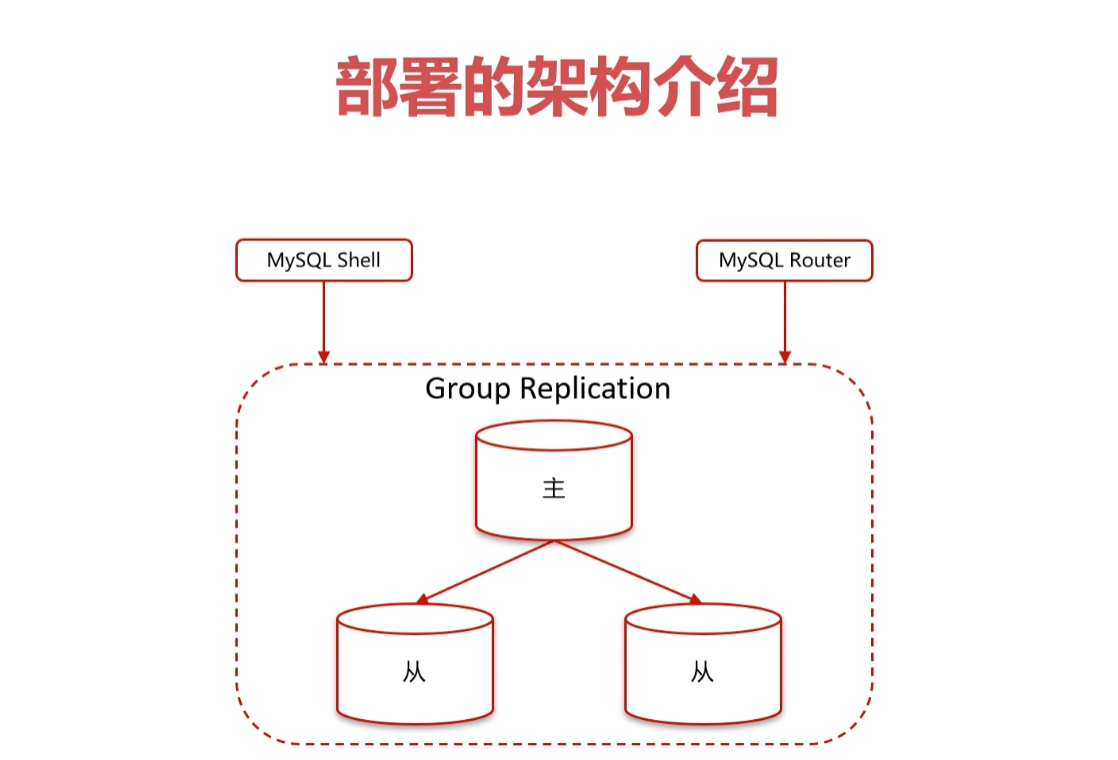
1、部署架构介绍
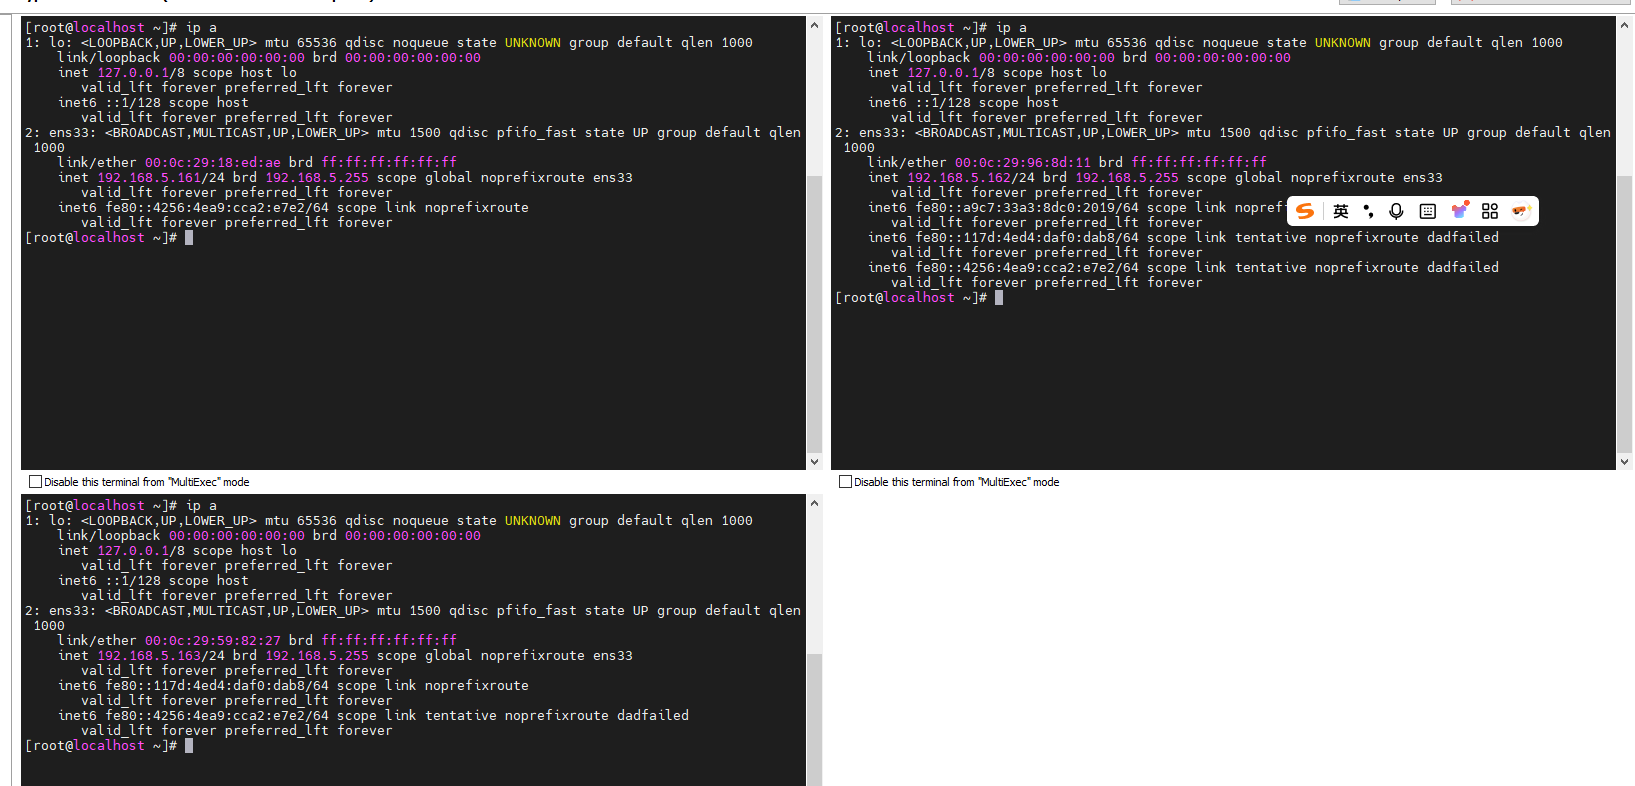
2、环境信息
192.168.5.161    mysql    MySQL Shell    MySQL Router
192.168.5.162    mysql
192.168.5.163    mysql
3、环境准备
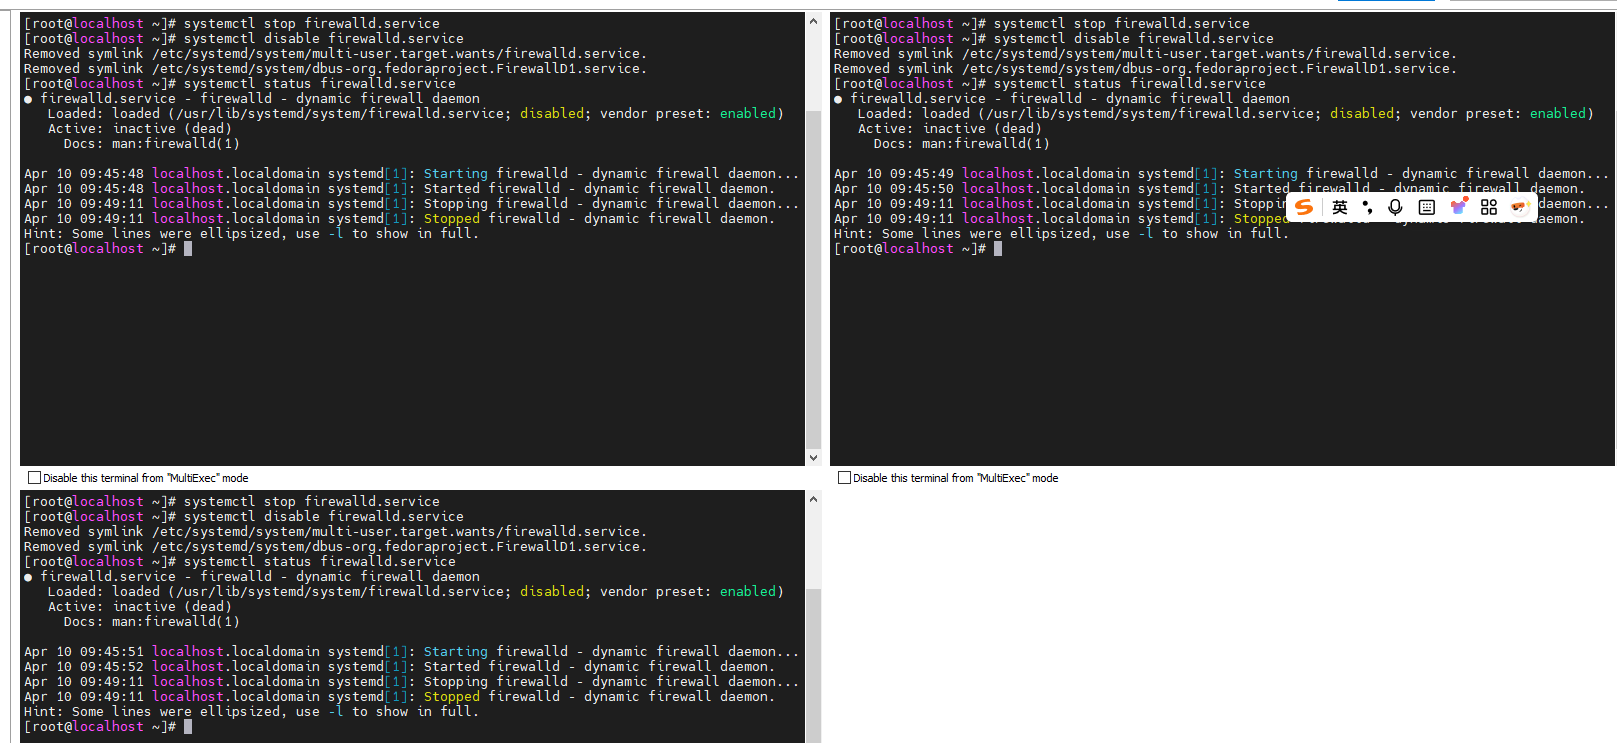
(1)关闭防火墙
systemctl stop firewalld.service
systemctl disable firewalld.service
systemctl status firewalld.service
(2)修改hostname
161节点执行
hostname  mysql01
sudo hostnamectl set-hostname mysql01
su -

162节点执行
hostname  mysql02
sudo hostnamectl set-hostname mysql02
su -

163节点执行
hostname  mysql03
sudo hostnamectl set-hostname mysql03
su -

(3)修改hosts
在三个节点添加hosts信息
vim /etc/hosts
192.168.5.161 mysql01
192.168.5.162 mysql02
192.168.5.163 mysql03

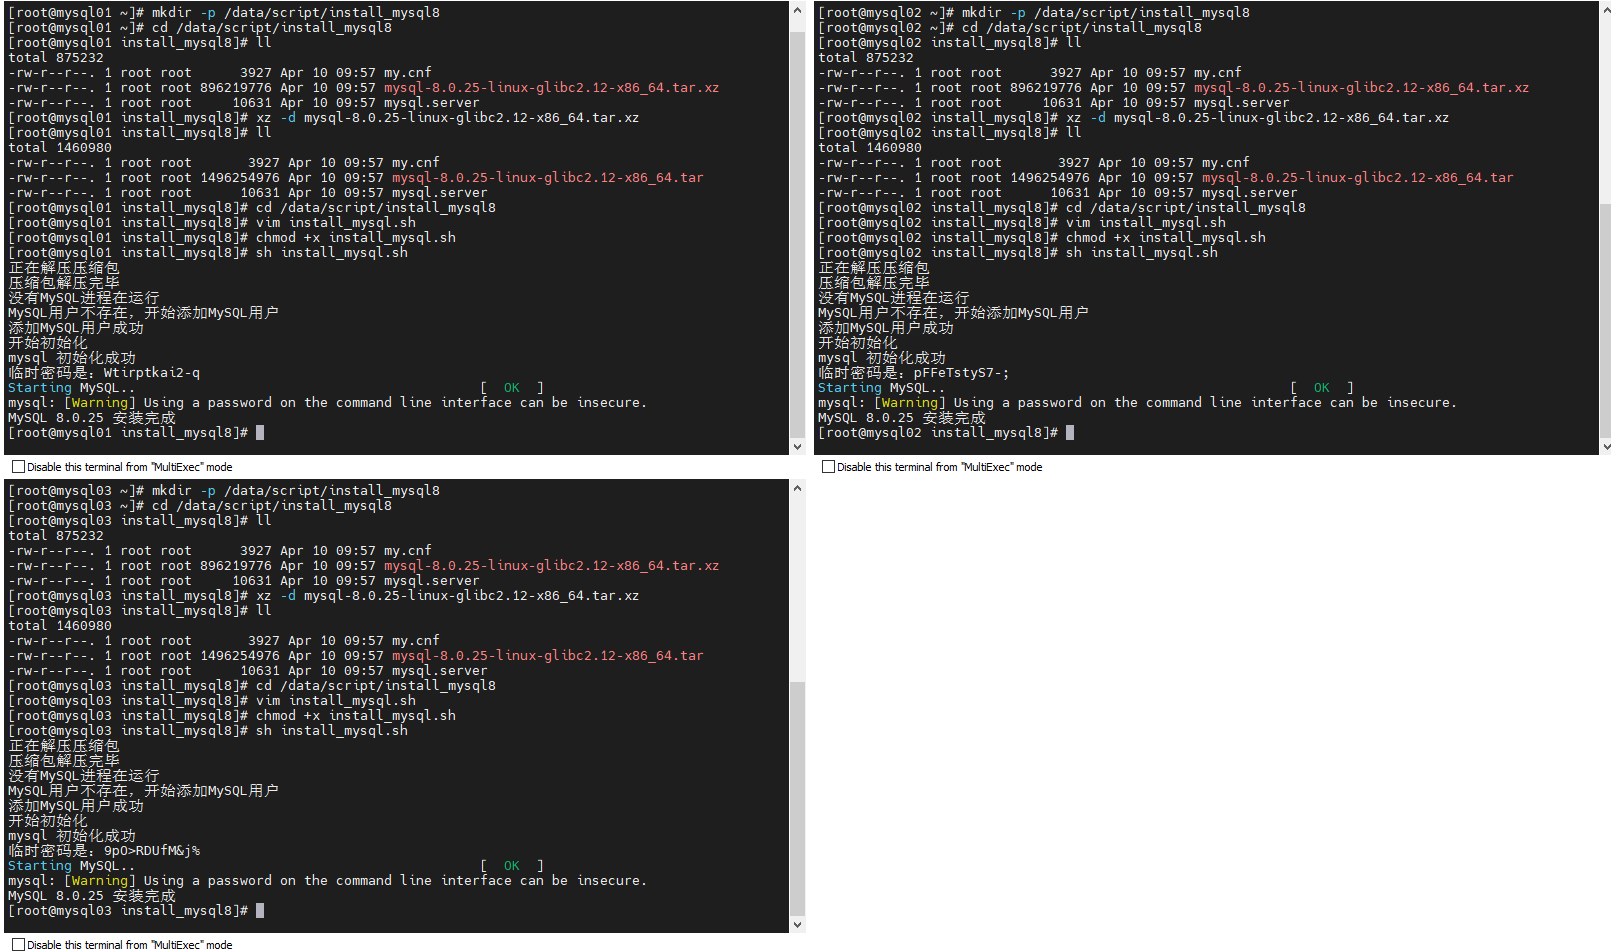
(4)安装MySQL
可参考:
第二阶段【环境搭建】13:Linux环境使用脚本自动安装MySQL8.0.25版本数据库
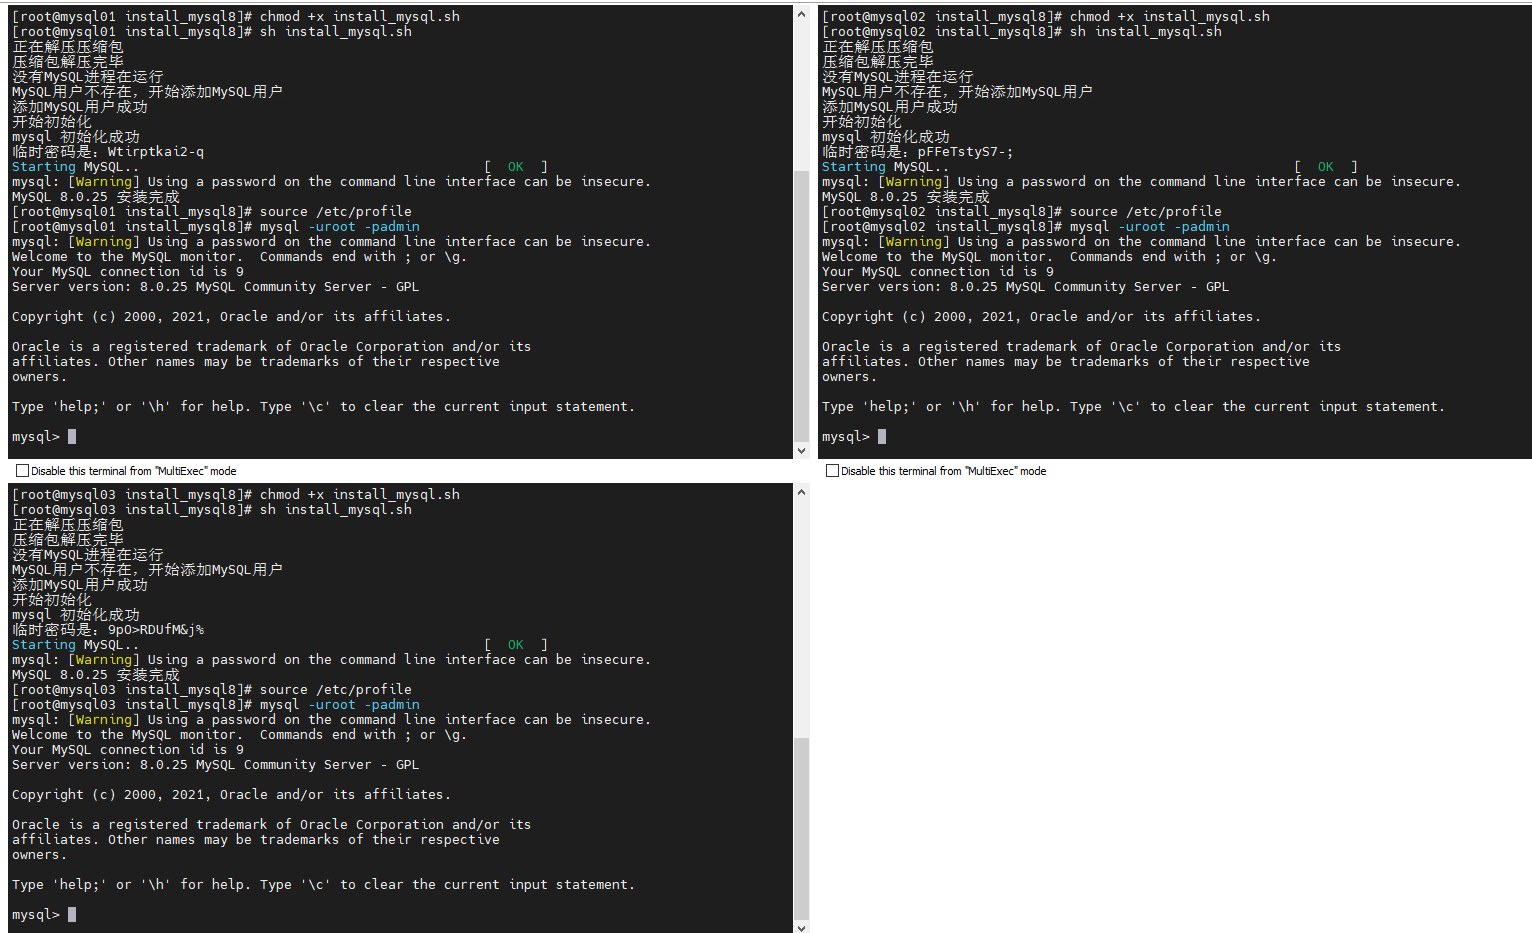
source /etc/profile
mysql -uroot -padmin
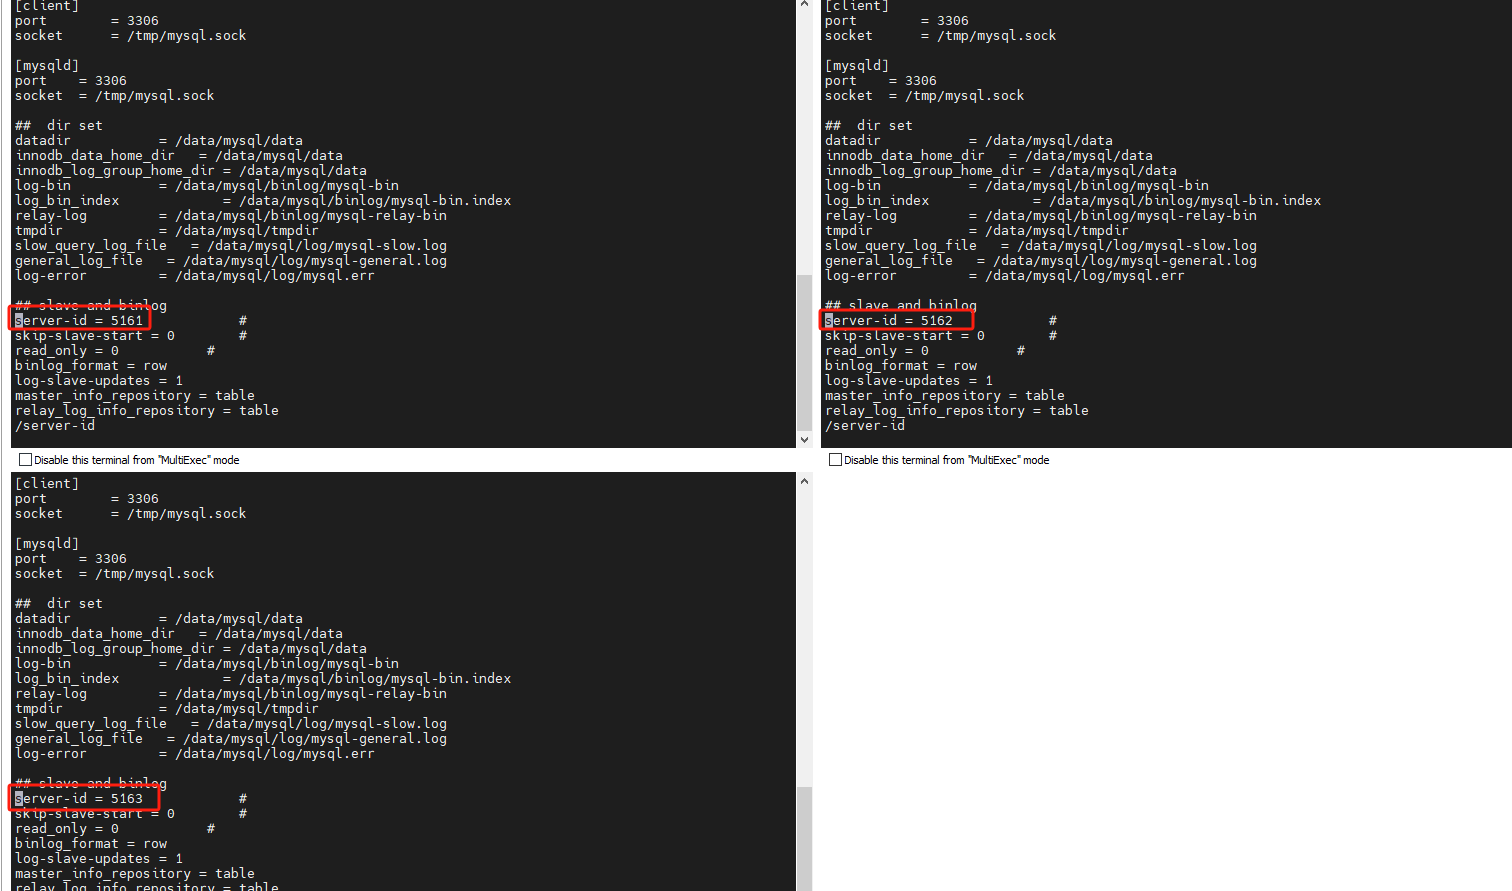
(5)修改mysql参数
修改server-id
将三台mysql的server-id改成不一样的
cd /data/mysql/conf/
vi my.cnf
查看gtid是否开启
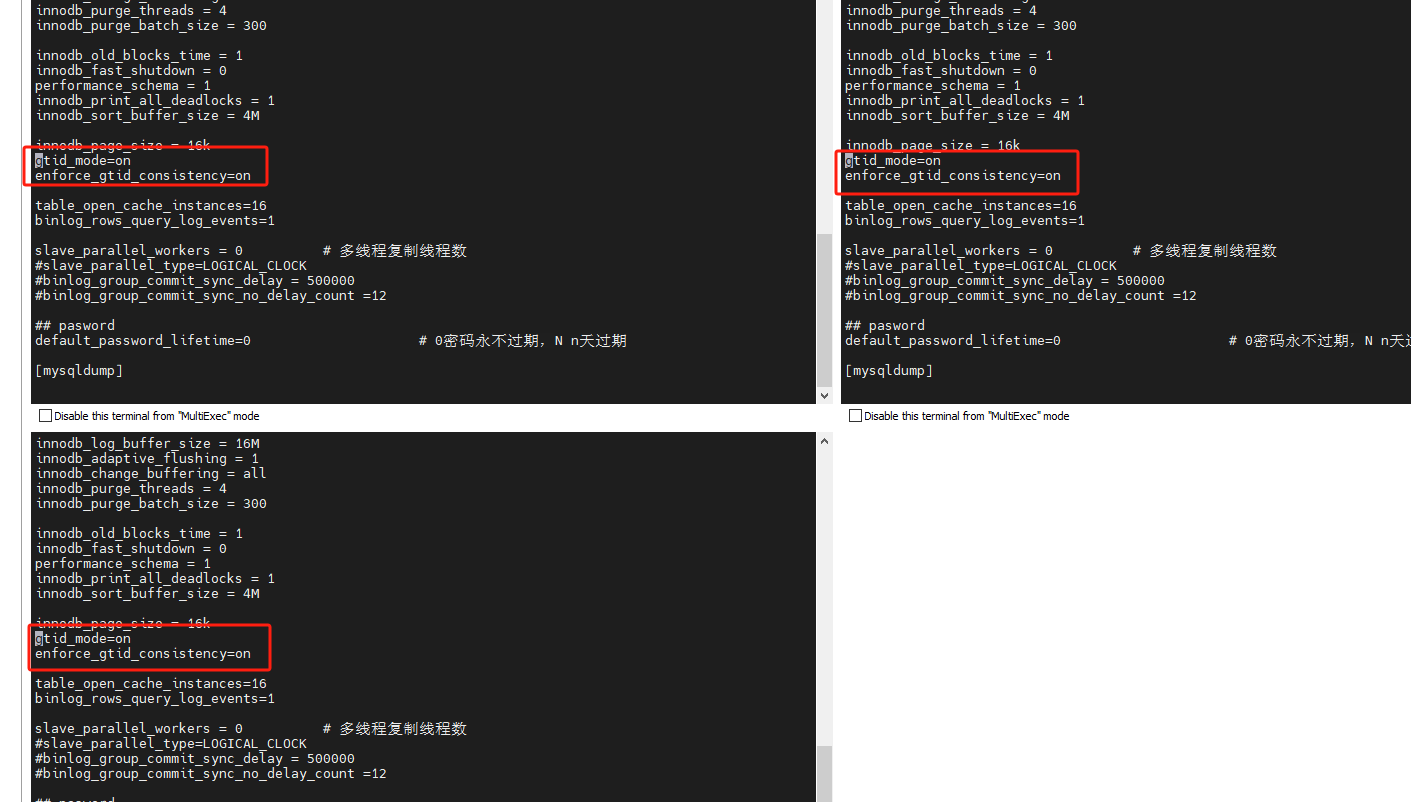
查看bin-log是否开启

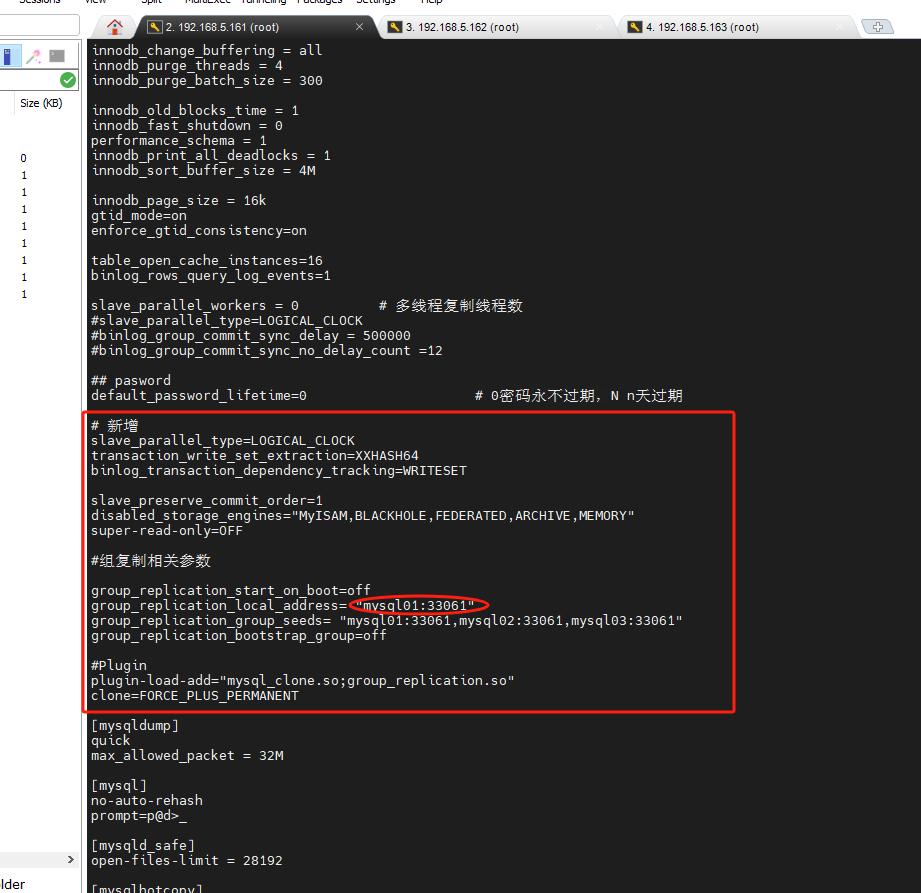
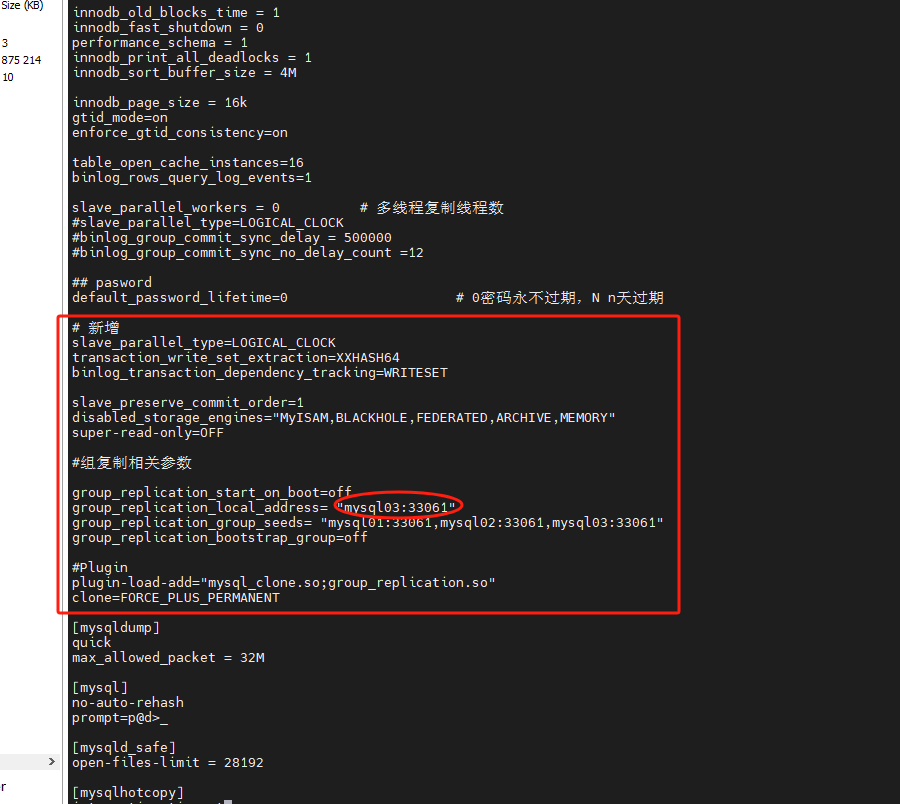
(6)新增参数
区别是group_replication_local_address参数为当前主机名
161上的配置:group_replication_local_address= "mysql01:33061"
162上的配置:group_replication_local_address= "mysql01:33061"
163上的配置:group_replication_local_address= "mysql01:33061"
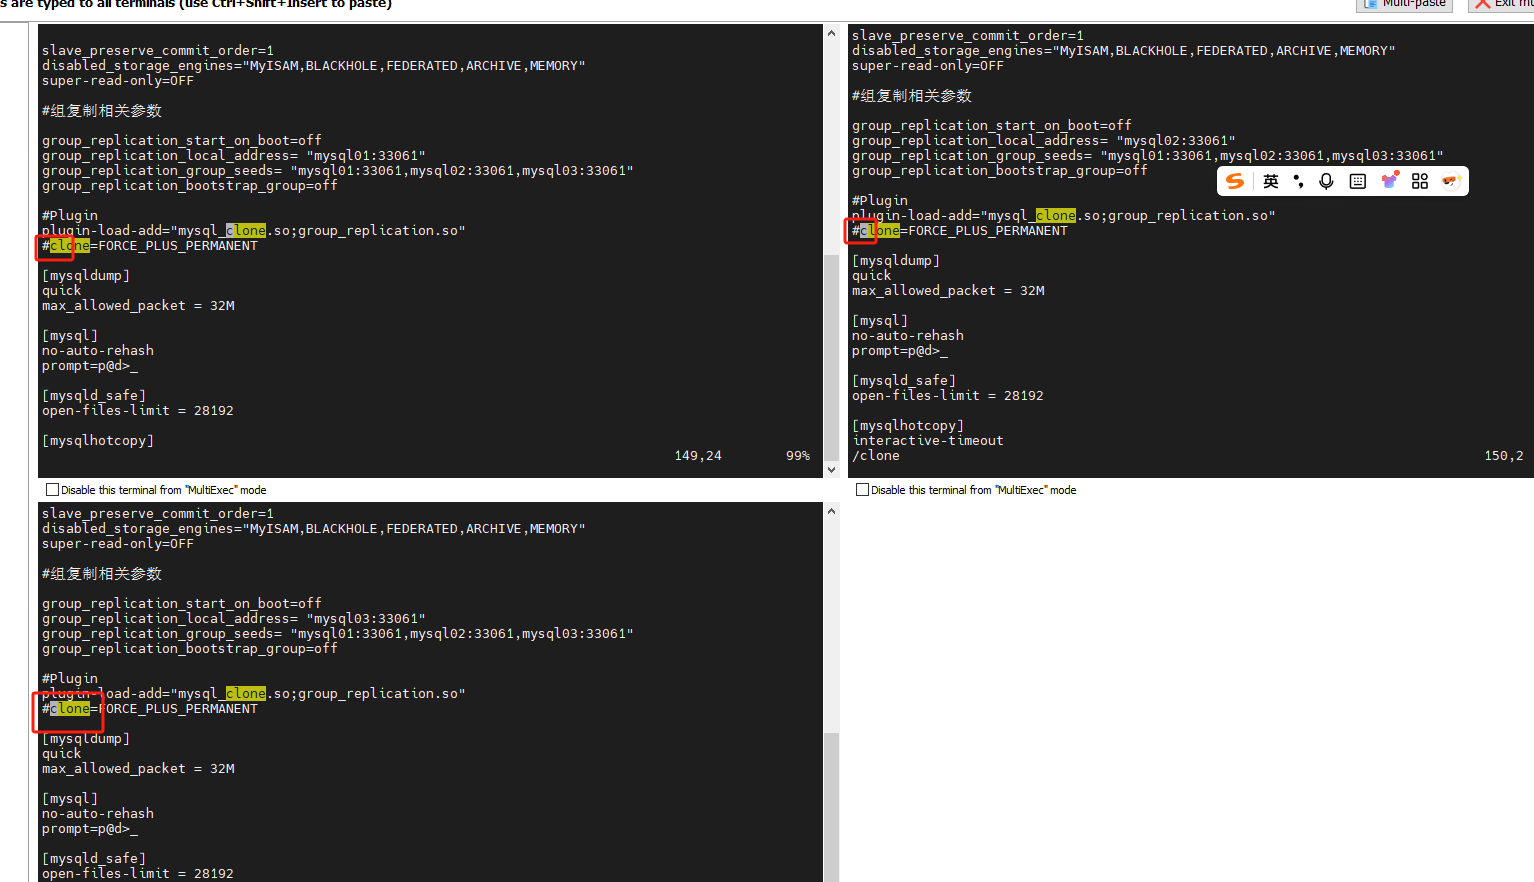
161节点配置文件新增参数
# 新增
slave_parallel_type=LOGICAL_CLOCK
transaction_write_set_extraction=XXHASH64
binlog_transaction_dependency_tracking=WRITESET
slave_preserve_commit_order=1
disabled_storage_engines="MyISAM,BLACKHOLE,FEDERATED,ARCHIVE,MEMORY"
super-read-only=OFF
#组复制相关参数
group_replication_start_on_boot=off
group_replication_local_address= "mysql01:33061"
group_replication_group_seeds= "mysql01:33061,mysql02:33061,mysql03:33061"
group_replication_bootstrap_group=off
#Plugin
plugin-load-add="mysql_clone.so;group_replication.so"
clone=FORCE_PLUS_PERMANENT
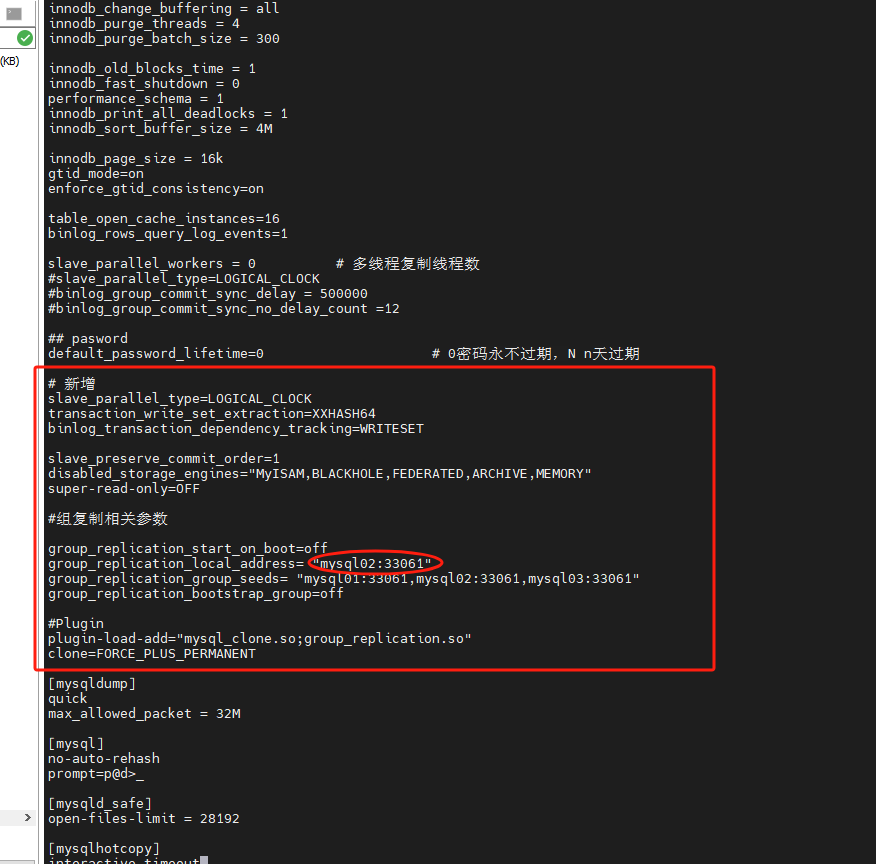
162节点配置文件新增参数
# 新增
slave_parallel_type=LOGICAL_CLOCK
transaction_write_set_extraction=XXHASH64
binlog_transaction_dependency_tracking=WRITESET
slave_preserve_commit_order=1
disabled_storage_engines="MyISAM,BLACKHOLE,FEDERATED,ARCHIVE,MEMORY"
super-read-only=OFF
#组复制相关参数
group_replication_start_on_boot=off
group_replication_local_address= "mysql02:33061"
group_replication_group_seeds= "mysql01:33061,mysql02:33061,mysql03:33061"
group_replication_bootstrap_group=off
#Plugin
plugin-load-add="mysql_clone.so;group_replication.so"
clone=FORCE_PLUS_PERMANENT
163节点配置文件新增参数
# 新增
slave_parallel_type=LOGICAL_CLOCK
transaction_write_set_extraction=XXHASH64
binlog_transaction_dependency_tracking=WRITESET
slave_preserve_commit_order=1
disabled_storage_engines="MyISAM,BLACKHOLE,FEDERATED,ARCHIVE,MEMORY"
super-read-only=OFF
#组复制相关参数
group_replication_start_on_boot=off
group_replication_local_address= "mysql03:33061"
group_replication_group_seeds= "mysql01:33061,mysql02:33061,mysql03:33061"
group_replication_bootstrap_group=off
#Plugin
plugin-load-add="mysql_clone.so;group_replication.so"
clone=FORCE_PLUS_PERMANENT
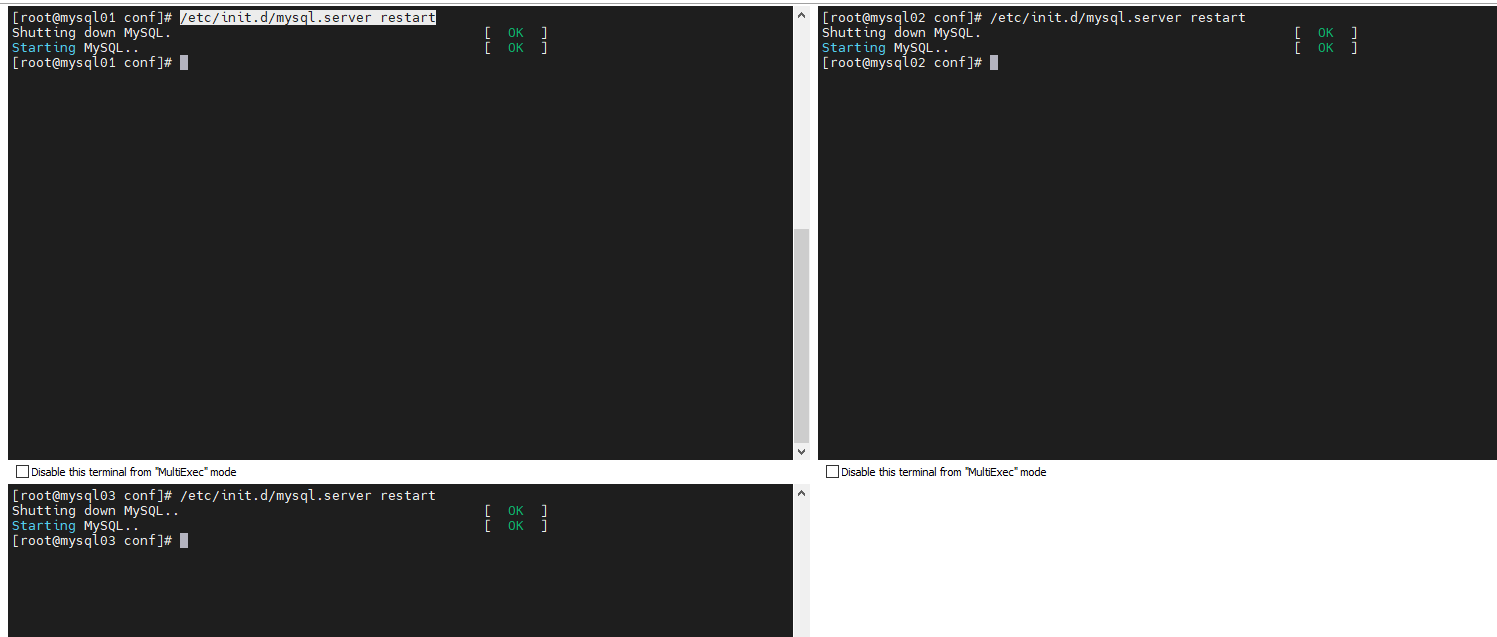
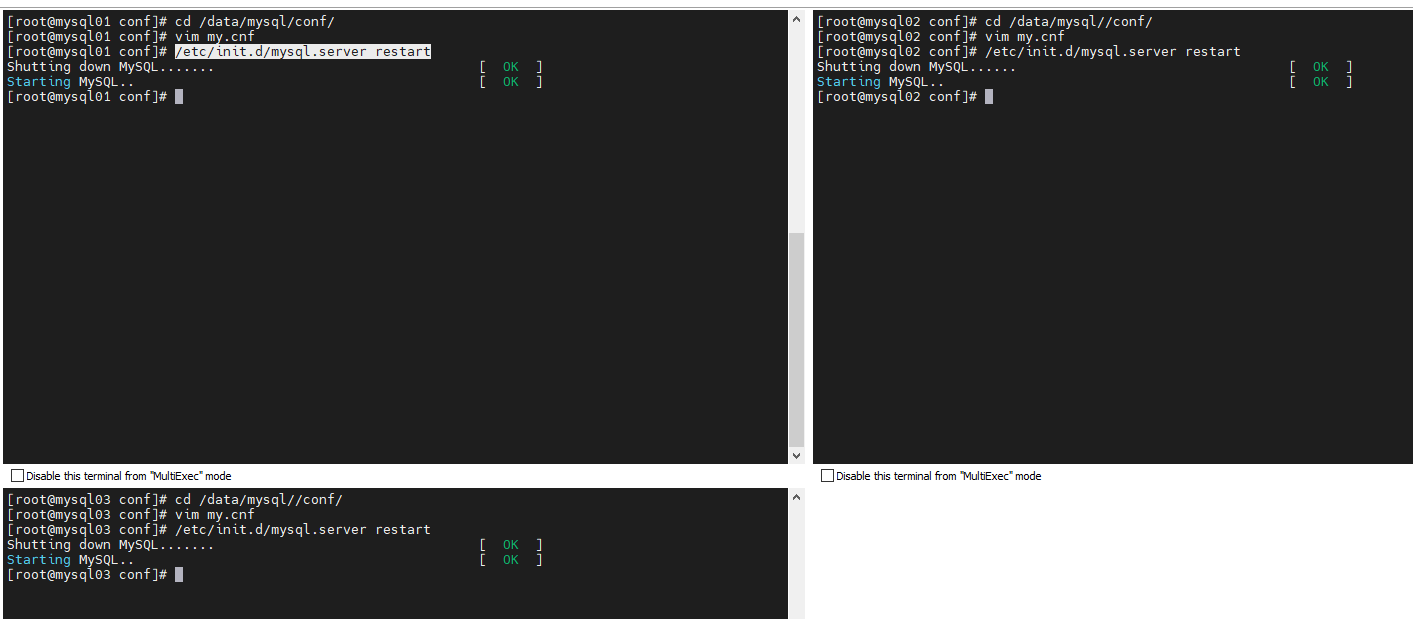
(7)重启MySQL
修改完配置重启MySQL
/etc/init.d/mysql.server restart
(8)安装MySQL Shell
官网获取下载连接
https://downloads.mysql.com/archives/shell/
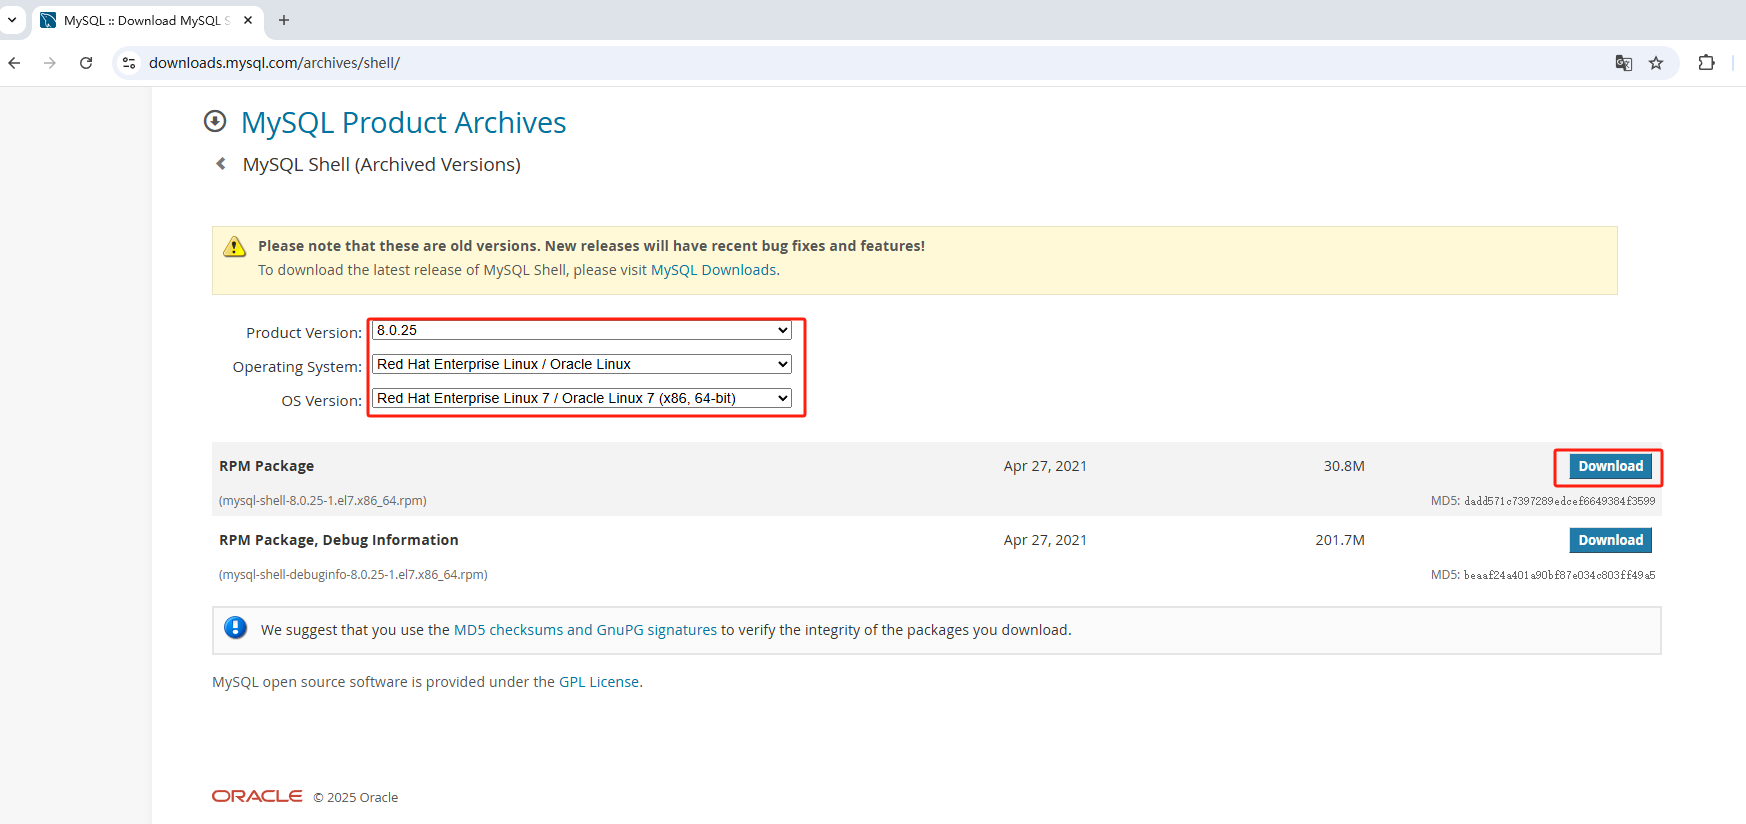
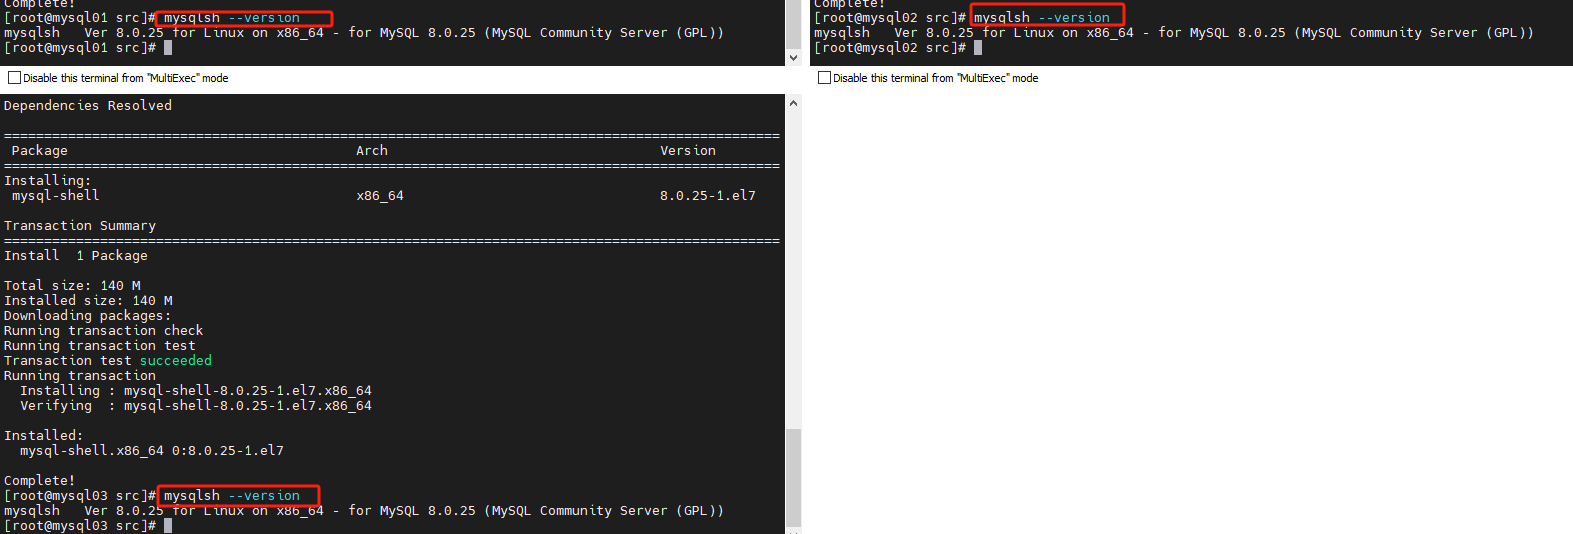
在3个节点都进行安装MySQL Shell
cd /usr/src
yum -y install wget
wget https://downloads.mysql.com/archives/get/p/43/file/mysql-shell-8.0.25-1.el7.x86_64.rpm
yum install mysql-shell-8.0.25-1.el7.x86_64.rpm -y
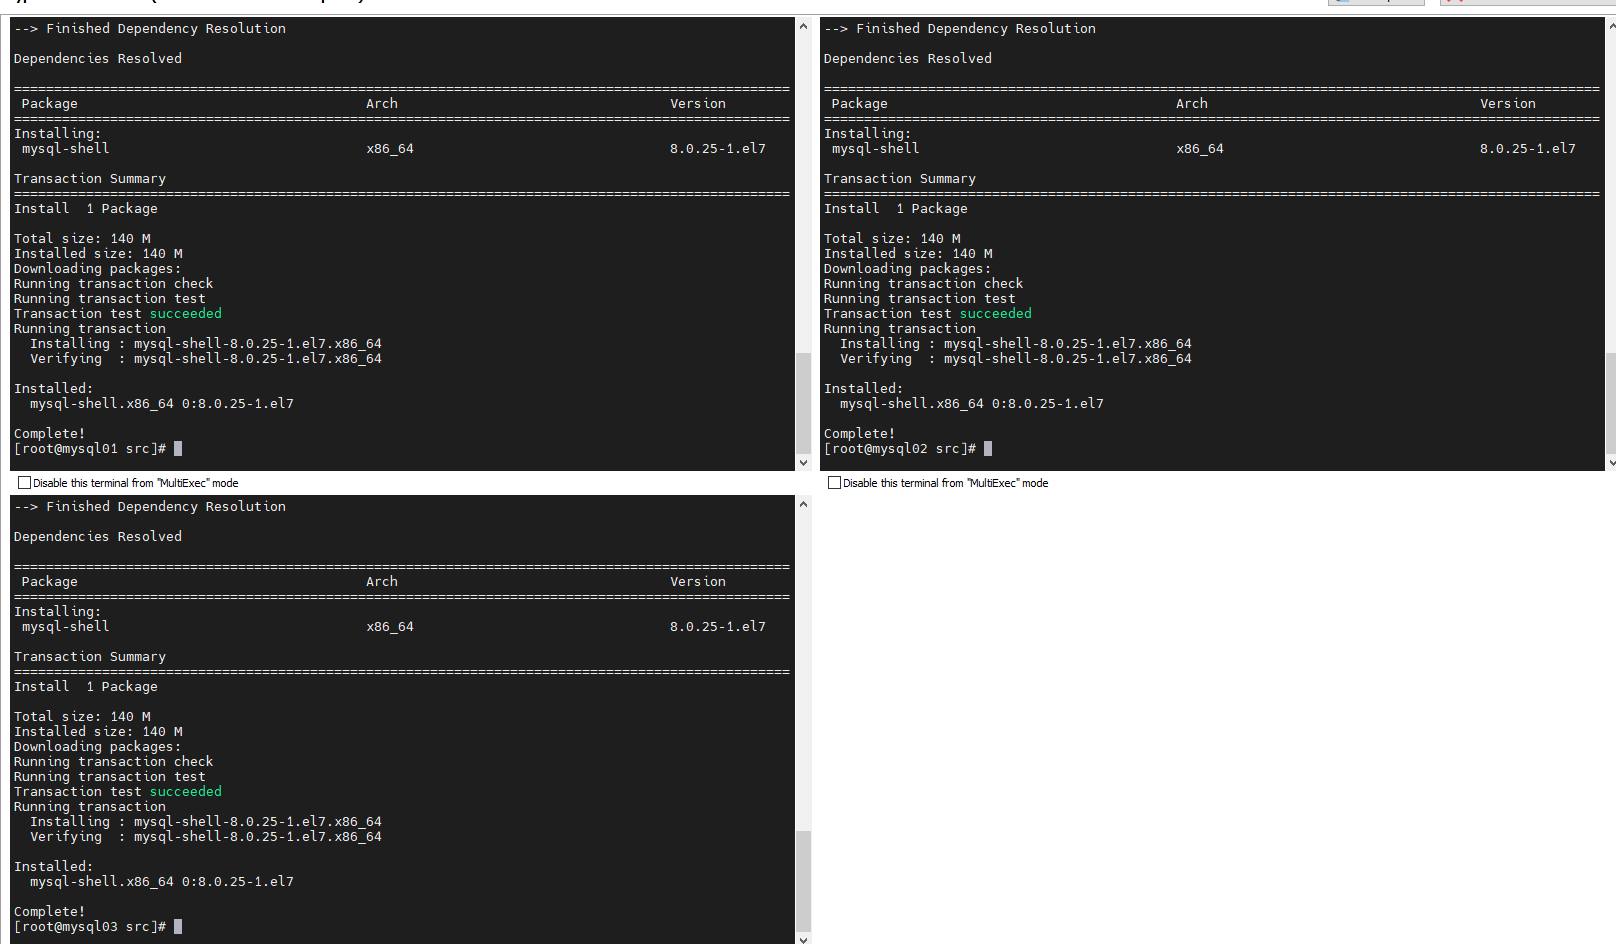
mysqlsh --version
4、创建集群用户
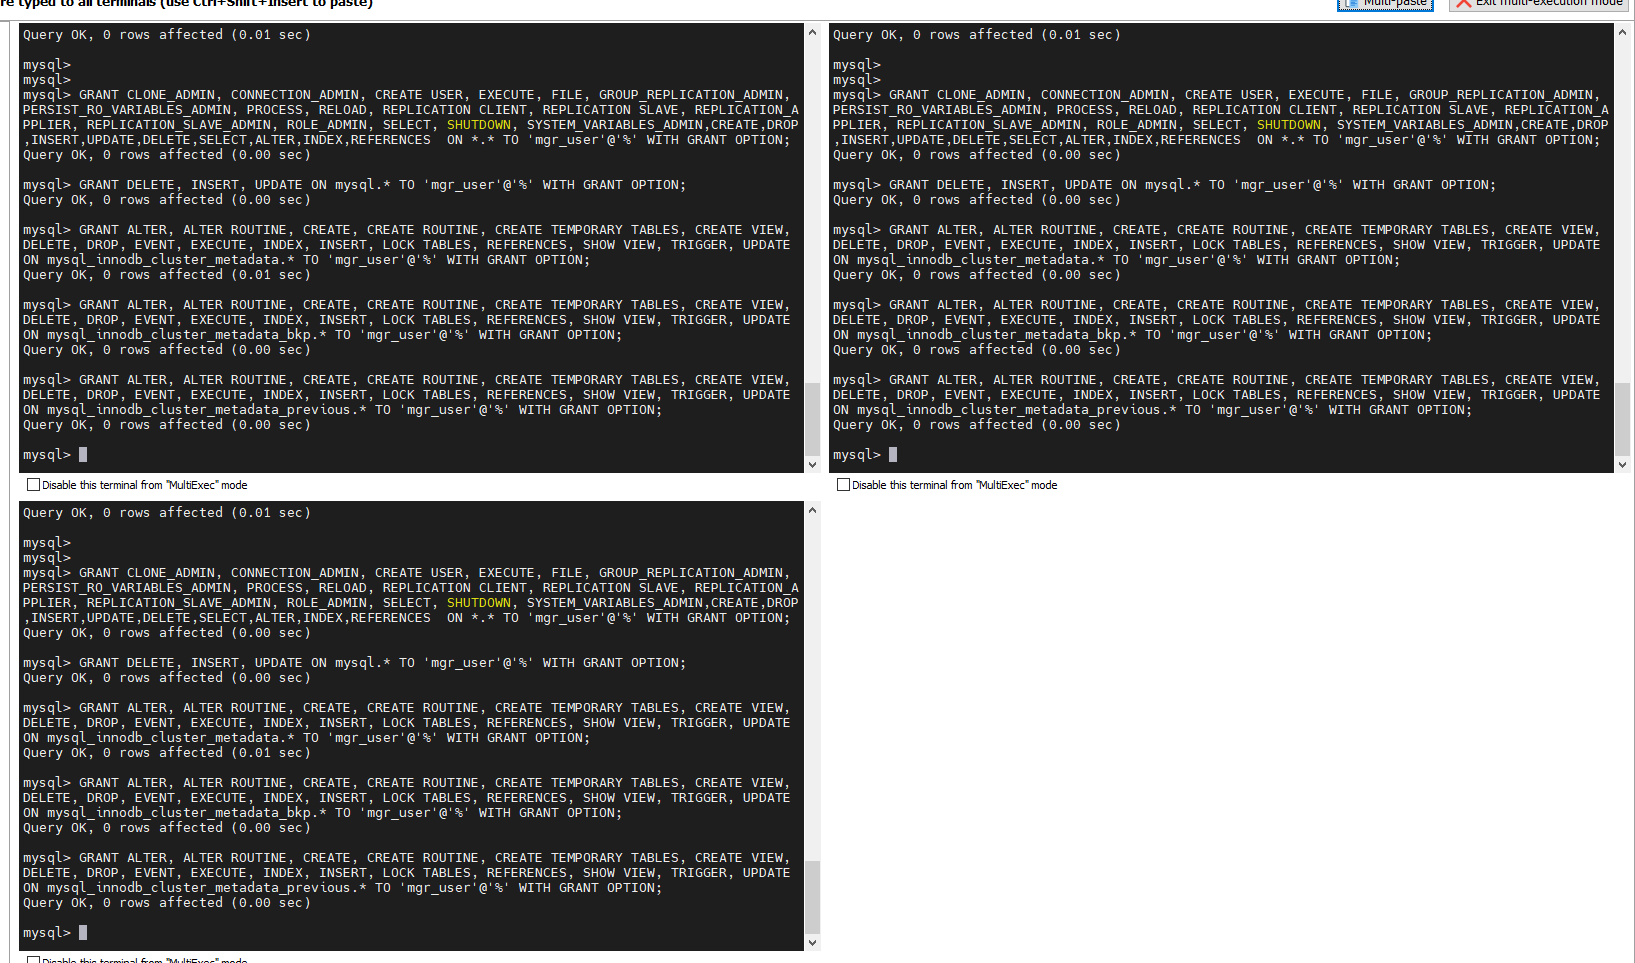
在每个节点进行创建用户
CREATE USER 'mgr_user'@'%' IDENTIFIED BY 'admin';
GRANT CLONE_ADMIN, CONNECTION_ADMIN, CREATE USER, EXECUTE, FILE, GROUP_REPLICATION_ADMIN, PERSIST_RO_VARIABLES_ADMIN, PROCESS, RELOAD, REPLICATION CLIENT, REPLICATION SLAVE, REPLICATION_APPLIER, REPLICATION_SLAVE_ADMIN, ROLE_ADMIN, SELECT, SHUTDOWN, SYSTEM_VARIABLES_ADMIN,CREATE,DROP,INSERT,UPDATE,DELETE,SELECT,ALTER,INDEX,REFERENCES  ON *.* TO 'mgr_user'@'%' WITH GRANT OPTION;
GRANT DELETE, INSERT, UPDATE ON mysql.* TO 'mgr_user'@'%' WITH GRANT OPTION;
GRANT ALTER, ALTER ROUTINE, CREATE, CREATE ROUTINE, CREATE TEMPORARY TABLES, CREATE VIEW, DELETE, DROP, EVENT, EXECUTE, INDEX, INSERT, LOCK TABLES, REFERENCES, SHOW VIEW, TRIGGER, UPDATE ON mysql_innodb_cluster_metadata.* TO 'mgr_user'@'%' WITH GRANT OPTION;
GRANT ALTER, ALTER ROUTINE, CREATE, CREATE ROUTINE, CREATE TEMPORARY TABLES, CREATE VIEW, DELETE, DROP, EVENT, EXECUTE, INDEX, INSERT, LOCK TABLES, REFERENCES, SHOW VIEW, TRIGGER, UPDATE ON mysql_innodb_cluster_metadata_bkp.* TO 'mgr_user'@'%' WITH GRANT OPTION;
GRANT ALTER, ALTER ROUTINE, CREATE, CREATE ROUTINE, CREATE TEMPORARY TABLES, CREATE VIEW, DELETE, DROP, EVENT, EXECUTE, INDEX, INSERT, LOCK TABLES, REFERENCES, SHOW VIEW, TRIGGER, UPDATE ON mysql_innodb_cluster_metadata_previous.* TO 'mgr_user'@'%' WITH GRANT OPTION;
5、用MySQL Shell创建MGR集群
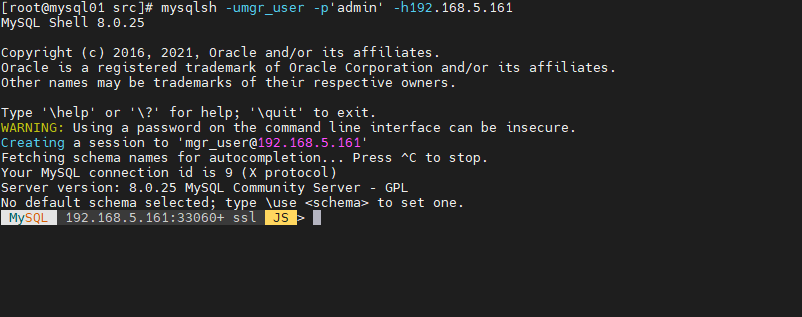
(1)MySQL Shell 连接MySQL
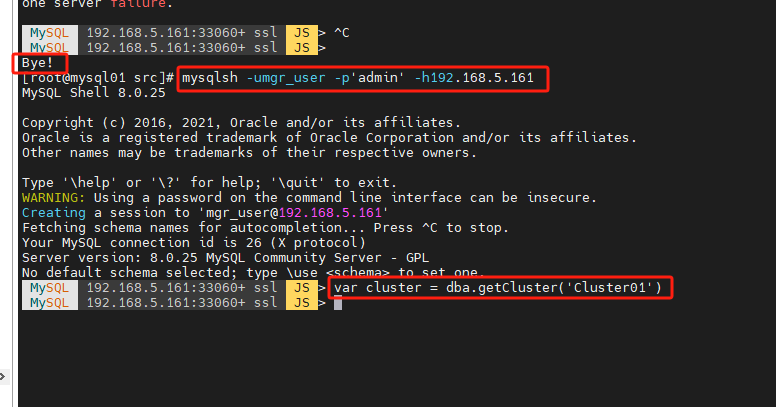
在mysql01节点使用MySQL Shell连接MySQL
mysqlsh -umgr_user -p'admin' -h192.168.5.161
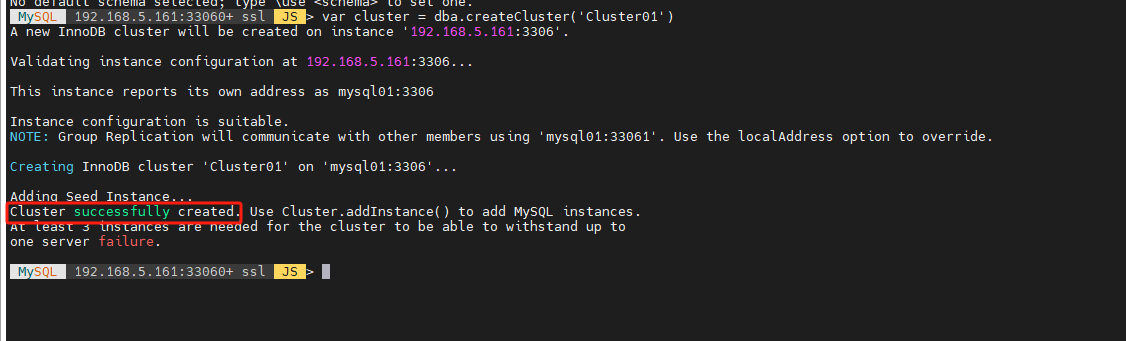
(2)创建集群
var cluster = dba.createCluster('Cluster01')
如果后续退出了MySQL Shell ,可以使用下面语句重新获取集群
var cluster = dba.getCluster('Cluster01');
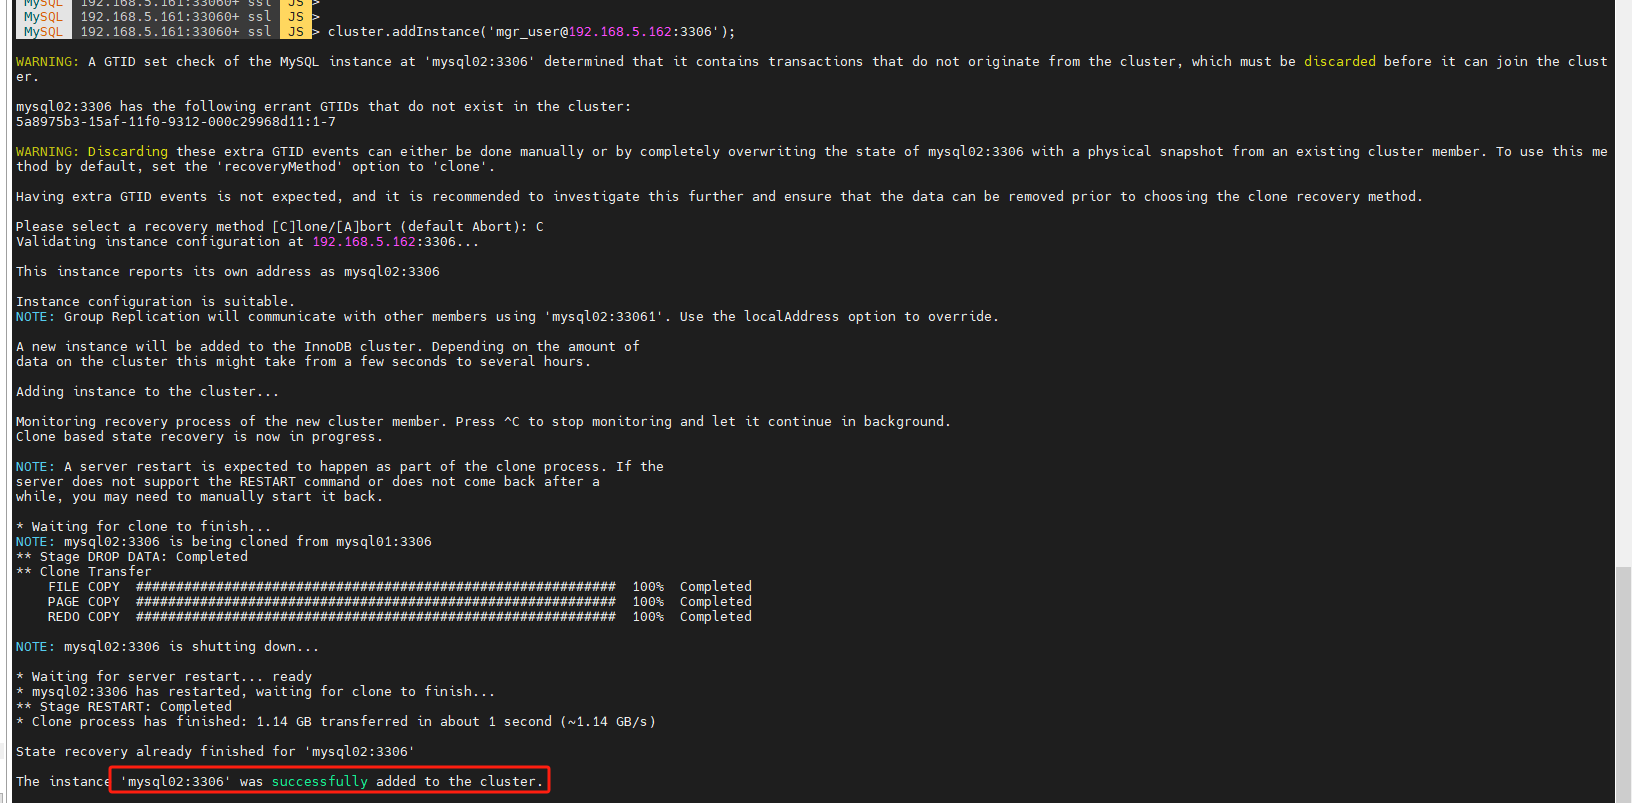
(3)添加其他的节点
首先加入第二个节点
cluster.addInstance('mgr_user@192.168.5.162:3306');

输入 C
加入第三个节点
cluster.addInstance('mgr_user@192.168.5.163:3306');
输入 C

注意!!如果这里出现如下的问题:重启超时
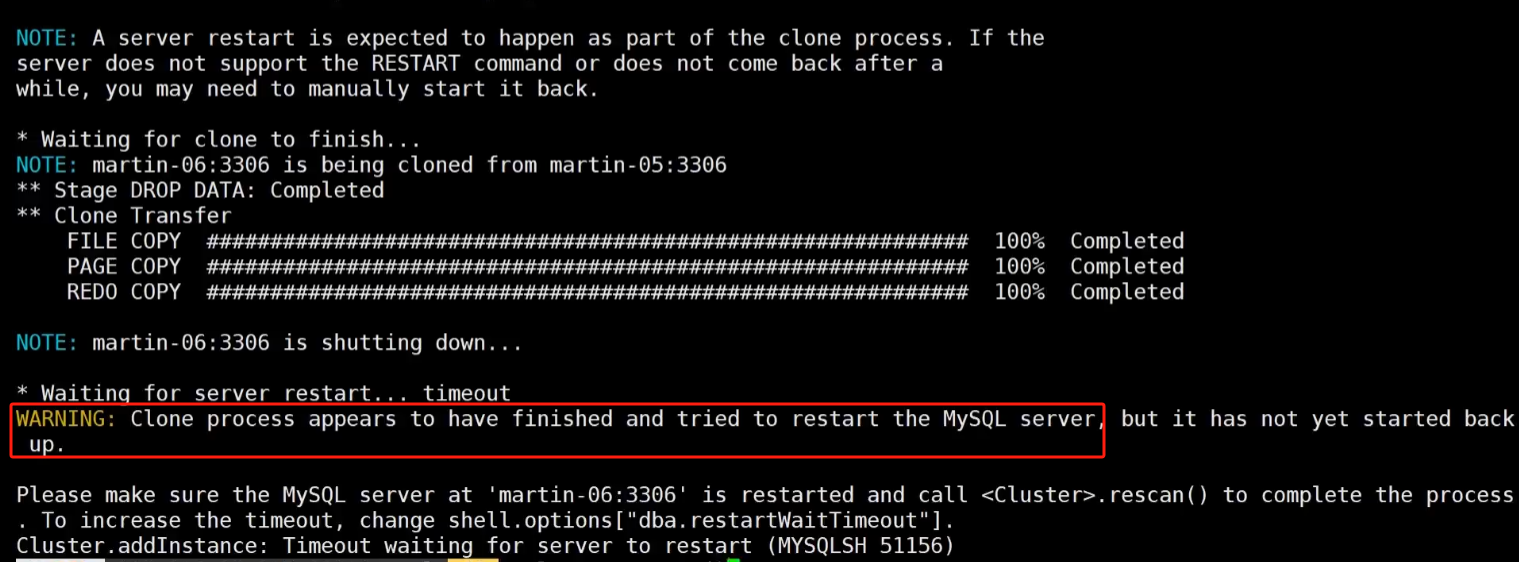
执行如下命令,输入Y,进行更新集群信息
cluster.rescan();
然后再查看集群的信息
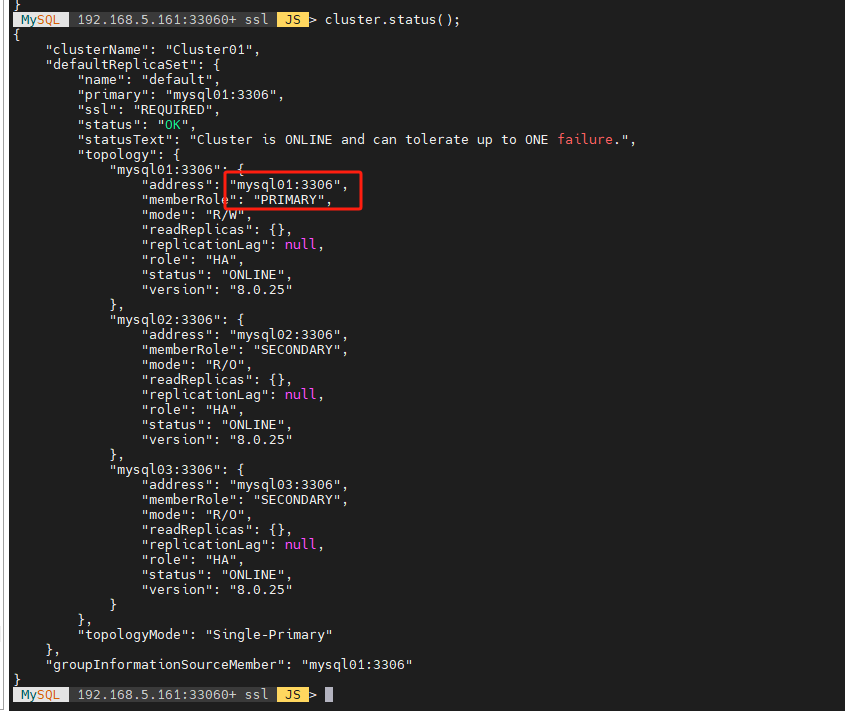
cluster.status();
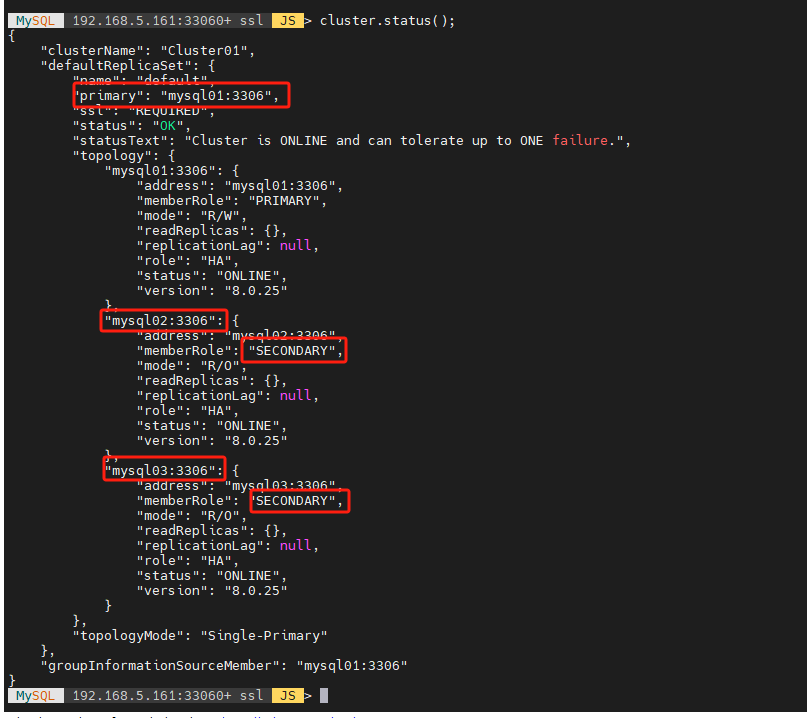
(4)查看集群状态
cluster.status();
6、安装MySQL Route
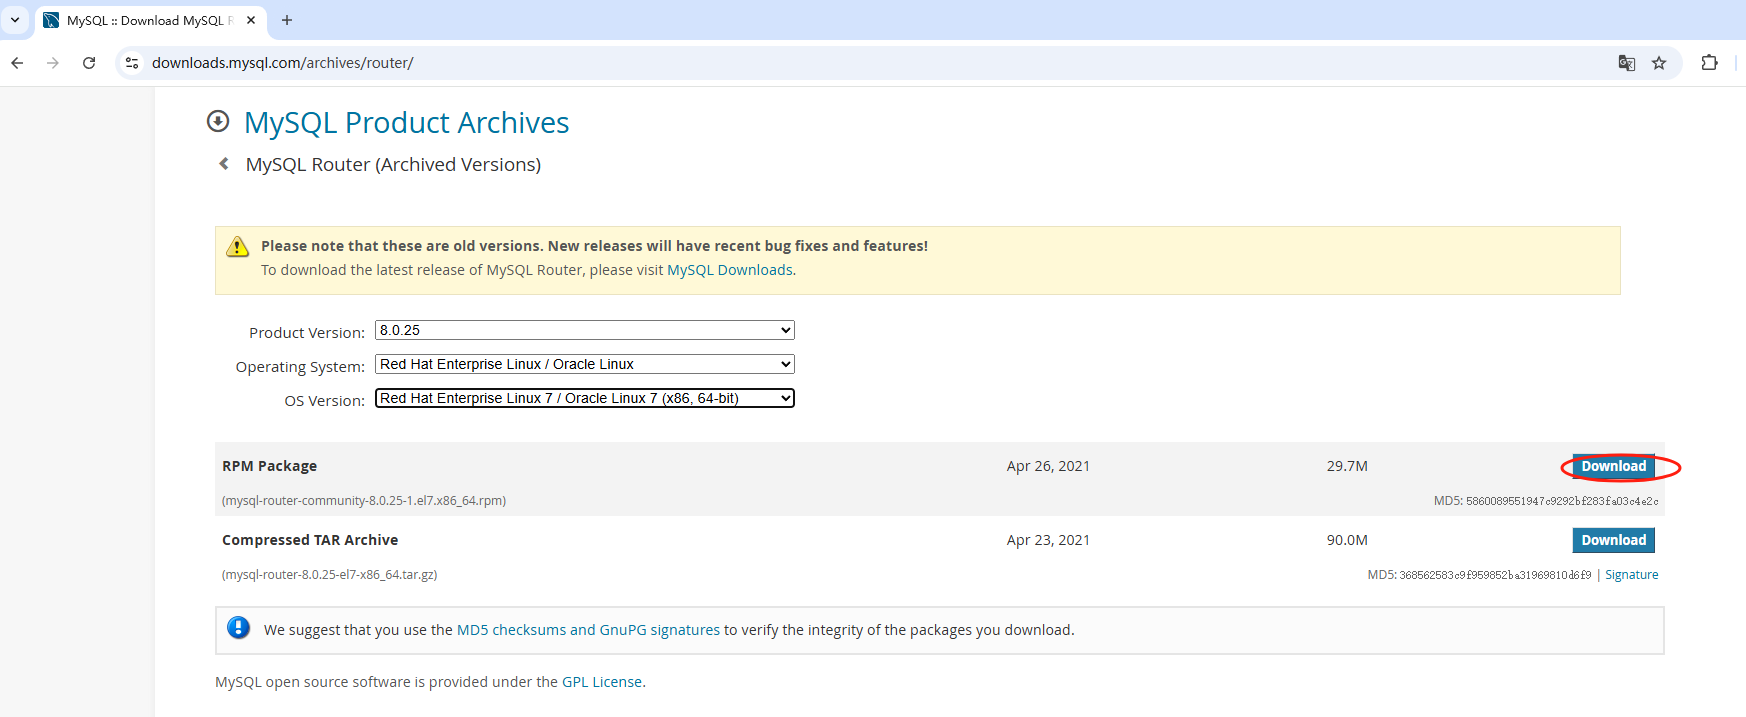
(1)官网获取下载链接
https://downloads.mysql.com/archives/router/
(2)进行下载安装
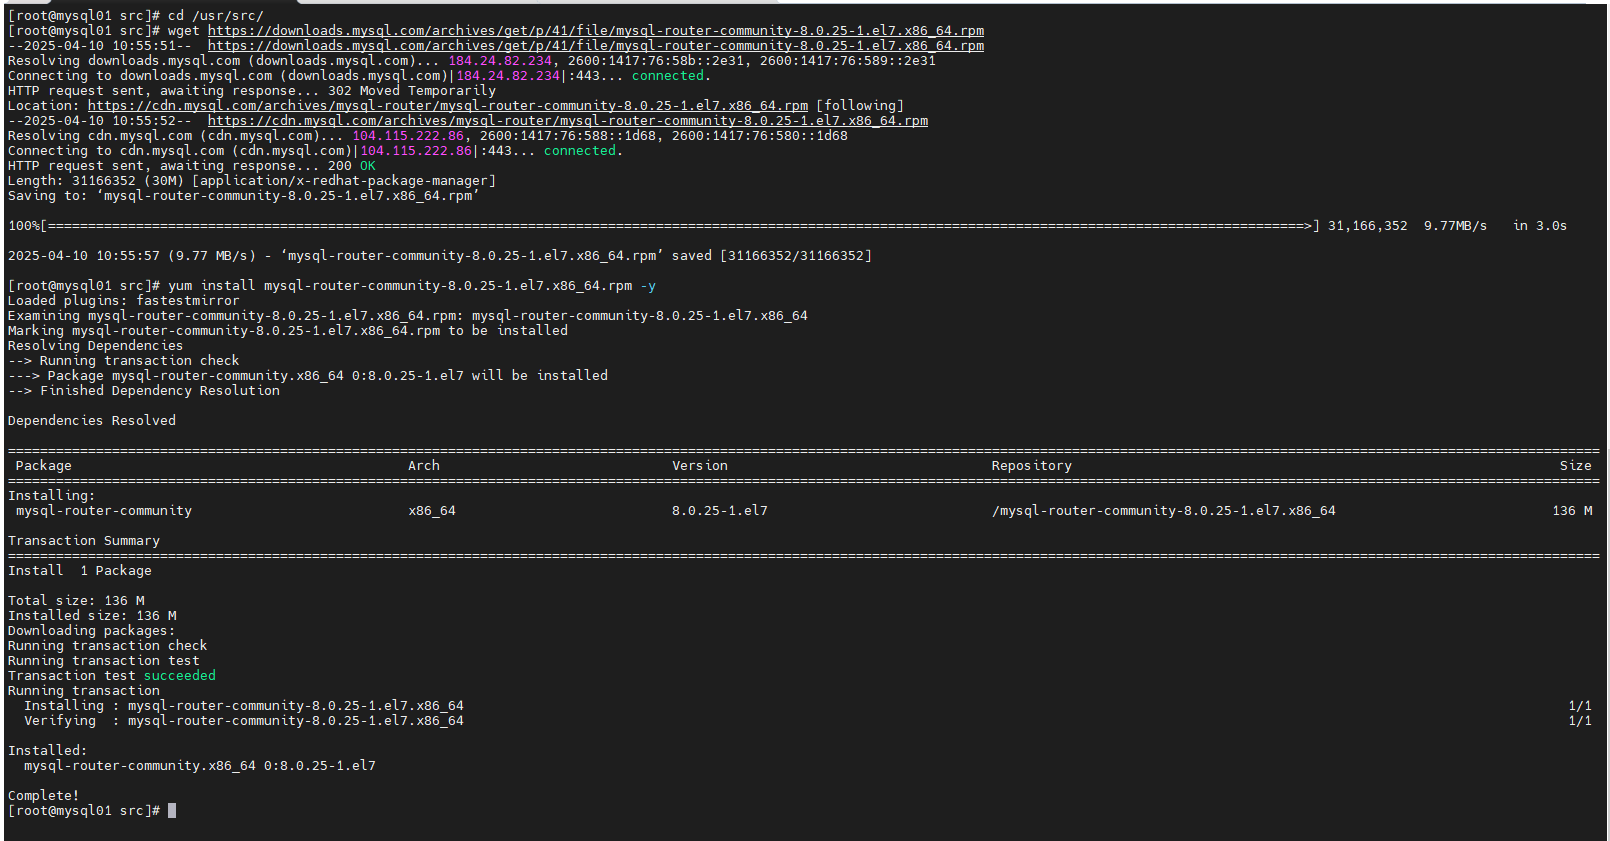
在161节点进行安装
cd /usr/src/
wget https://downloads.mysql.com/archives/get/p/41/file/mysql-router-community-8.0.25-1.el7.x86_64.rpm
yum install mysql-router-community-8.0.25-1.el7.x86_64.rpm -y
(3)生成Route的配置文件
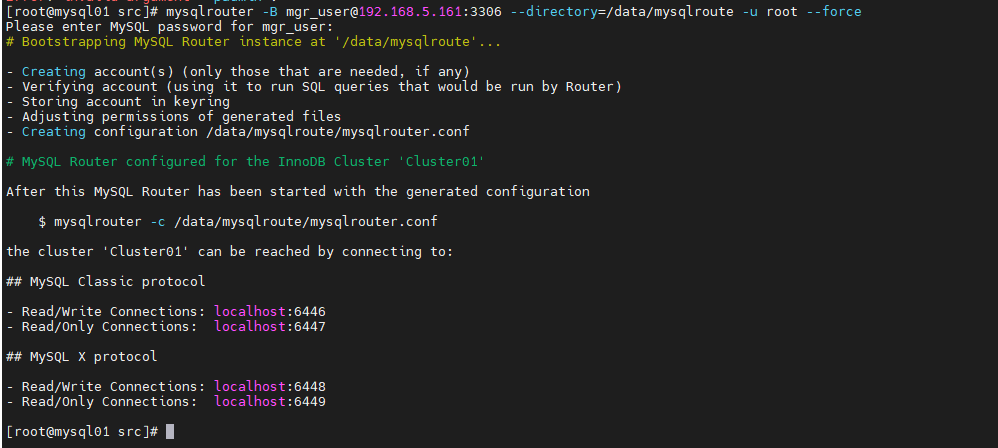
mkdir /data/mysqlroute
mysqlrouter -B mgr_user@192.168.5.161:3306 --directory=/data/mysqlroute -u root --force
输入密码:admin
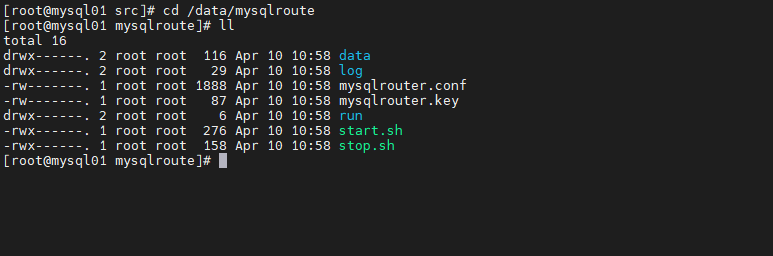
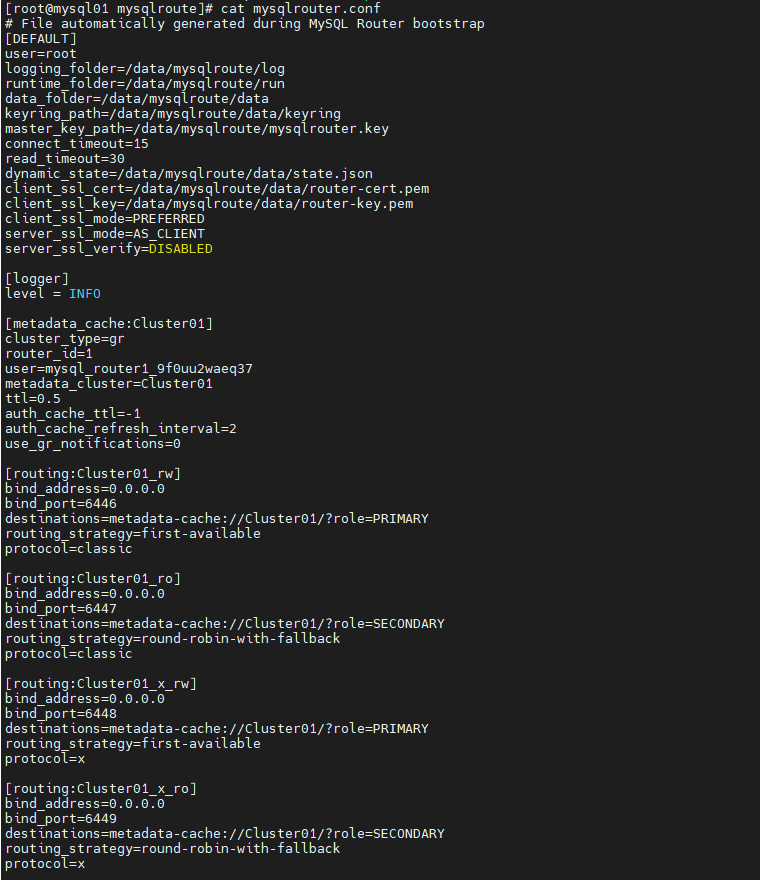
查看配置文件
cd /data/mysqlroute
ll
cat mysqlrouter.conf
(4)启动MySQL Router并测试
/data/mysqlroute/start.sh

(5)读写端口
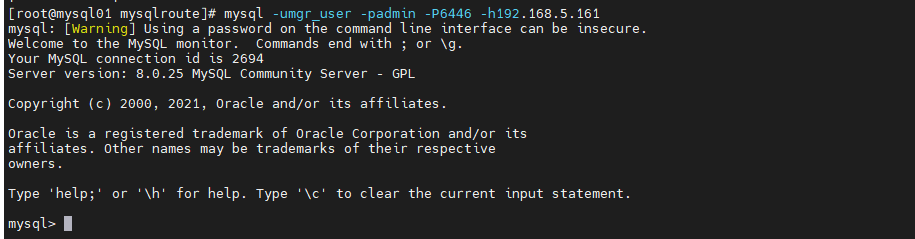
mysql -umgr_user -p'admin' -P6446 -h192.168.5.161 -e "select @@hostname"

mysql -umgr_user -p'admin' -P6446 -h192.168.5.161 -e "create database test_mgr"

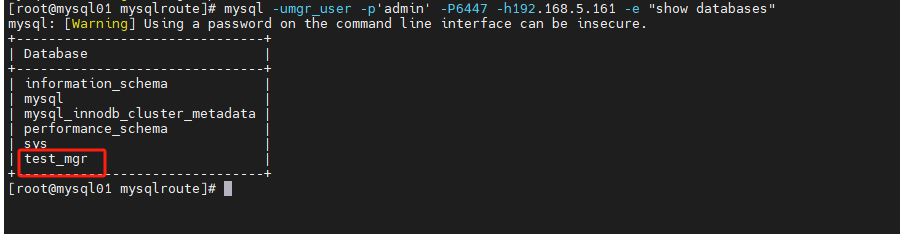
(6)只读端口
mysql -umgr_user -p'admin' -P6447 -h192.168.5.161 -e "select @@hostname"

mysql -umgr_user -p'admin' -P6447 -h192.168.5.161 -e "show databases"
三、InnoDB Cluster管理命令
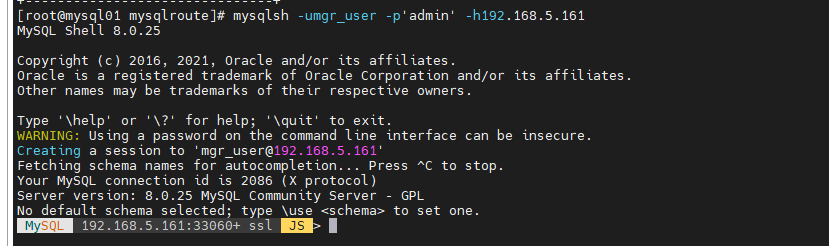
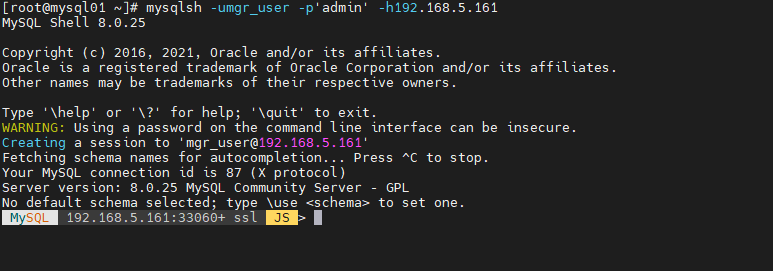
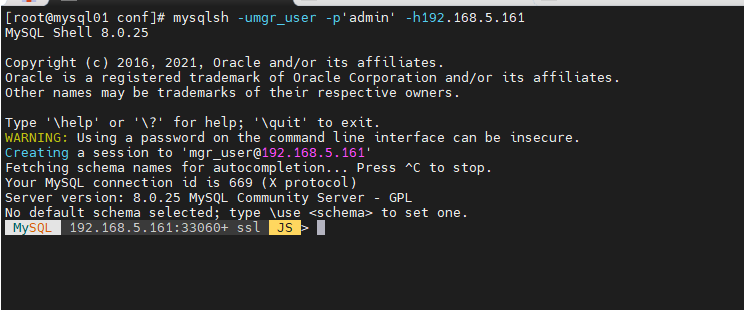
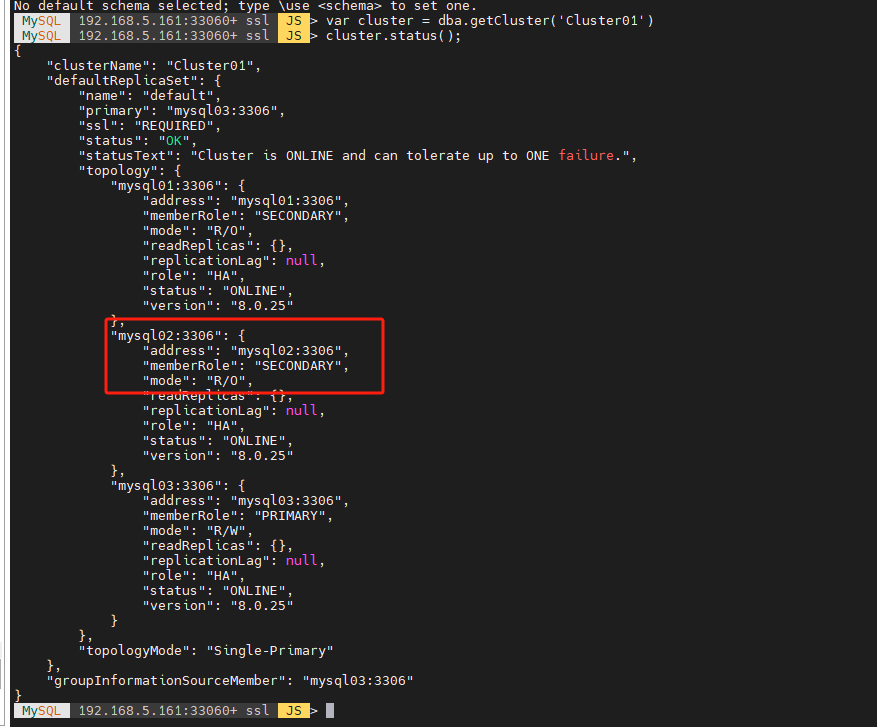
0、连接到MySQL Shell
mysqlsh -umgr_user -p'admin' -h192.168.5.161
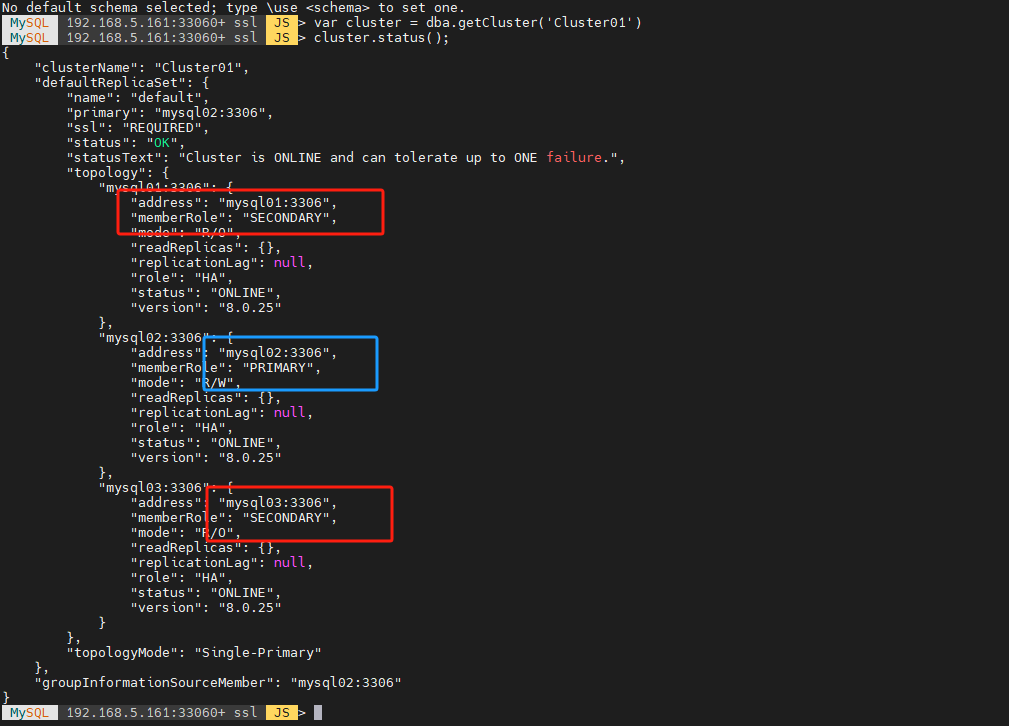
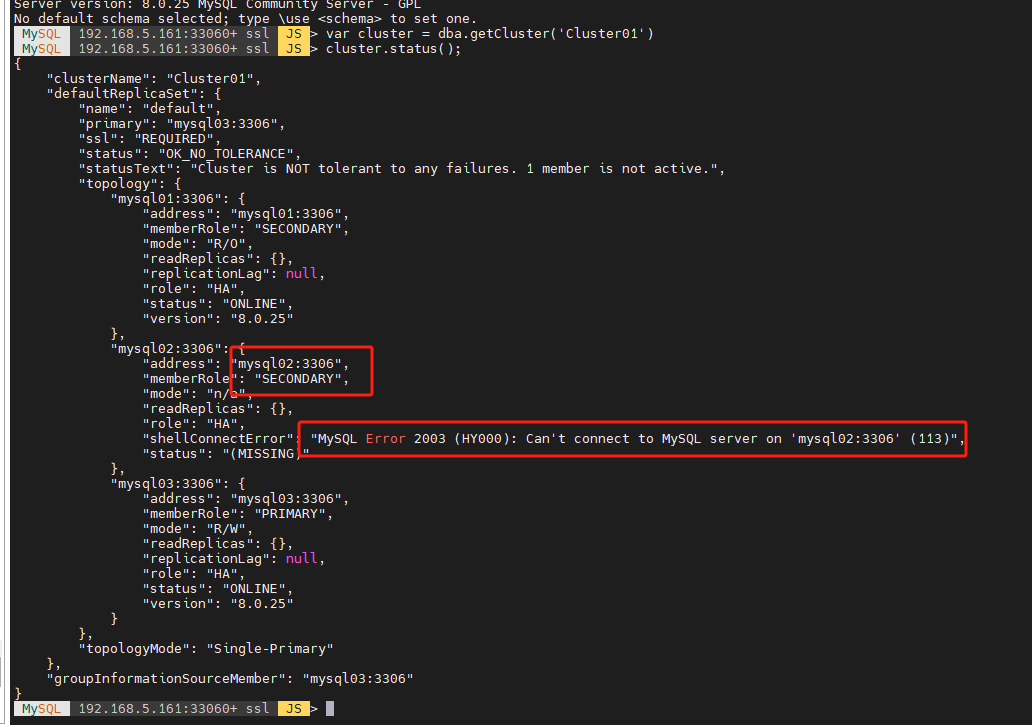
1、查看集群状态
var cluster = dba.getCluster('Cluster01')
cluster.status();

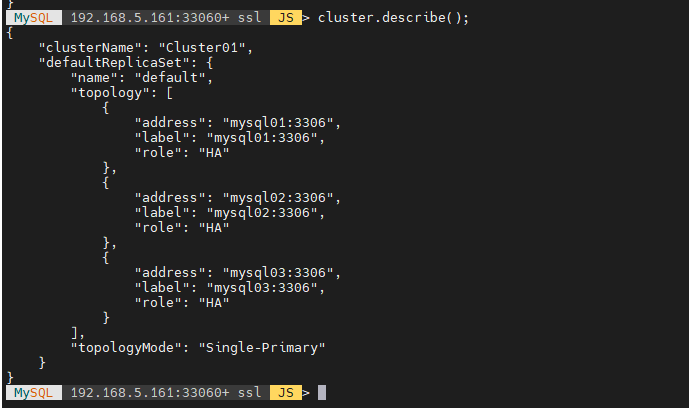
2、显示集群结构
cluster.describe();
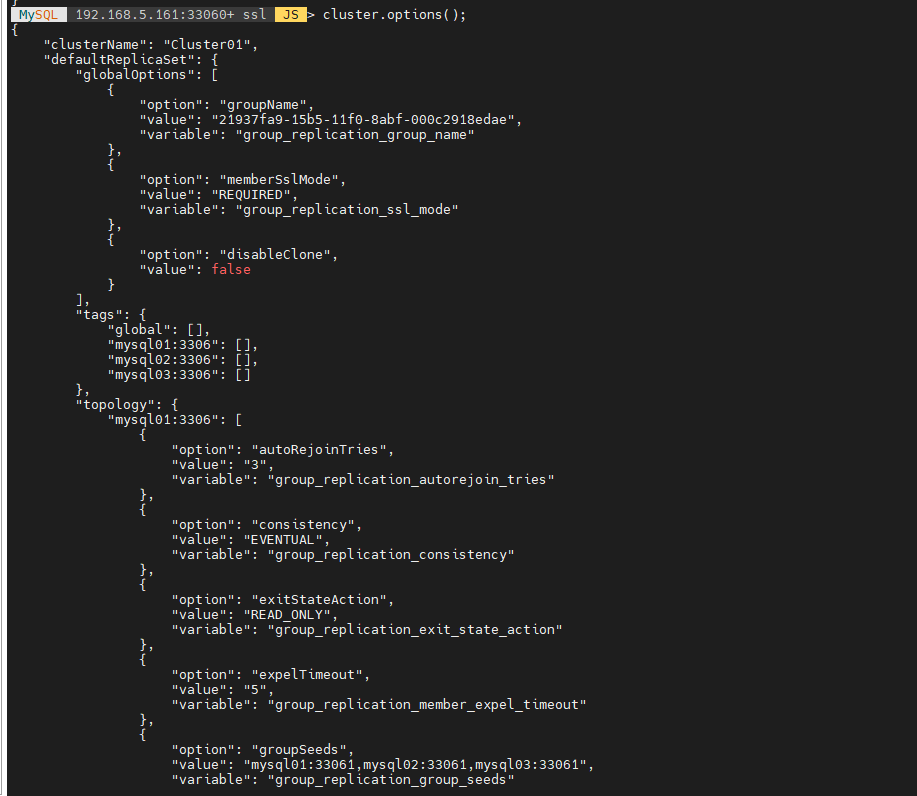
3、显示集群配置选项
cluster.options();
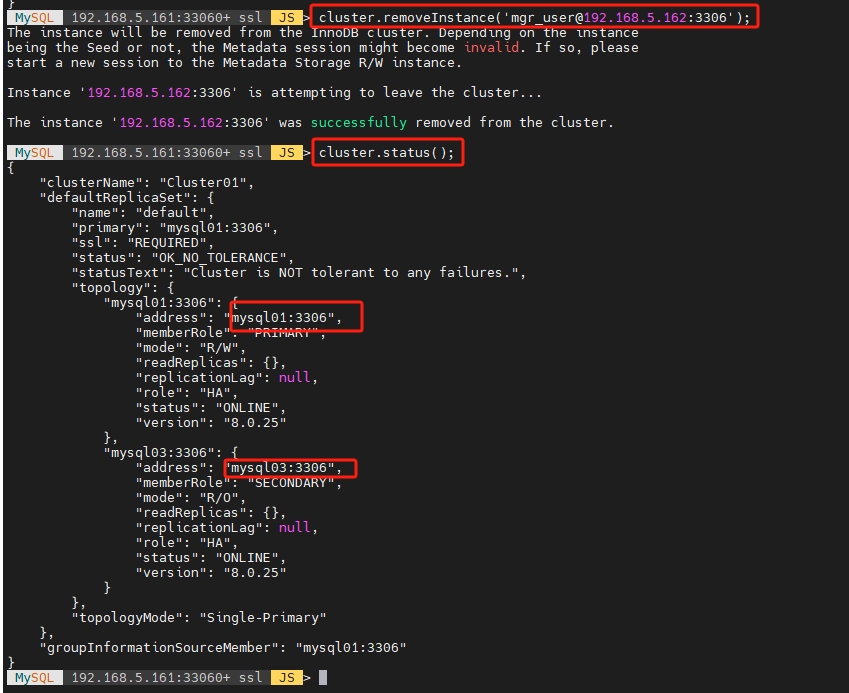
4、移除成员
cluster.removeInstance('mgr_user@192.168.5.162:3306');
cluster.status();
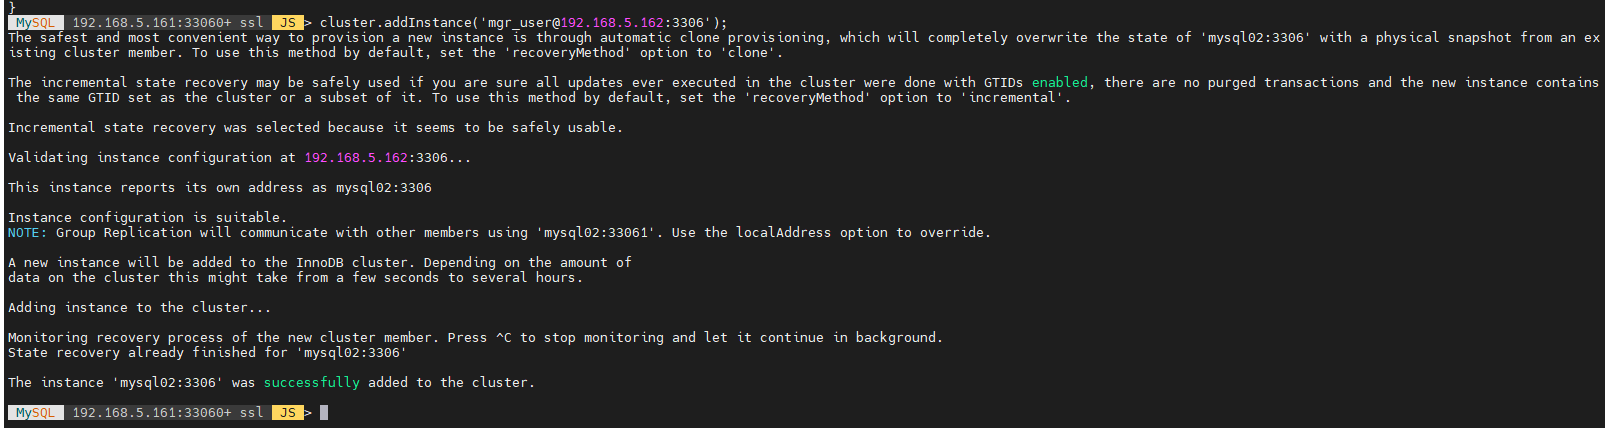
5、添加成员
cluster.addInstance('mgr_user@192.168.5.162:3306');
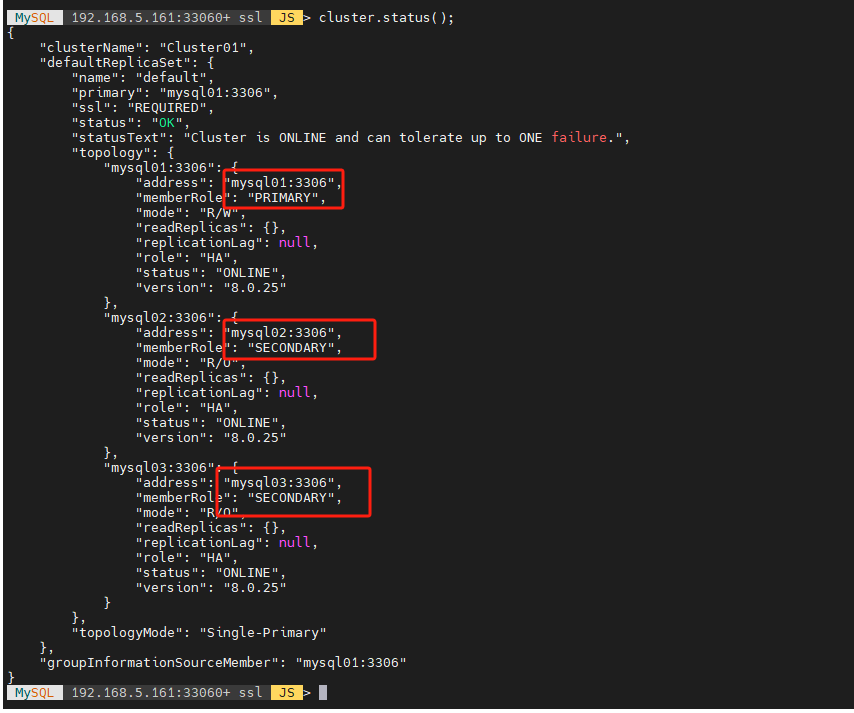
cluster.status();
注意!!! 如果遇到下面的问题:
Cluster.addInstance: error uninstalling plugin 'clone': mysql02:3306: Plugin 'clone' is force_plus_permanent and can not be unloaded (RuntimeError)
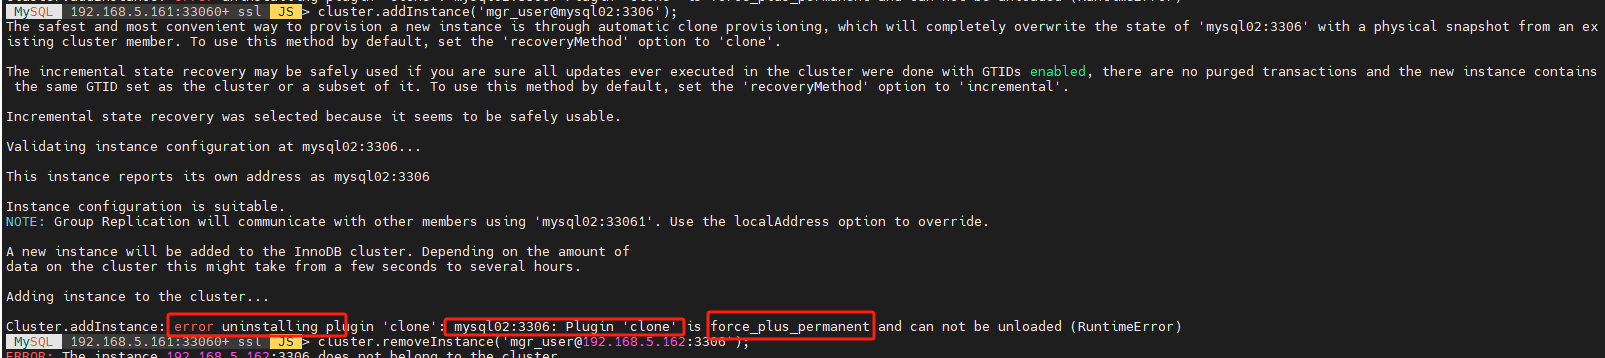
将三个节点中的MySQL配置文件中clone=FORCE_PLUS_PERMANENT注释掉,然后重启MySQL
cd /data/mysql/conf/
vim my.cnf
重启MySQL
/etc/init.d/mysql.server restart
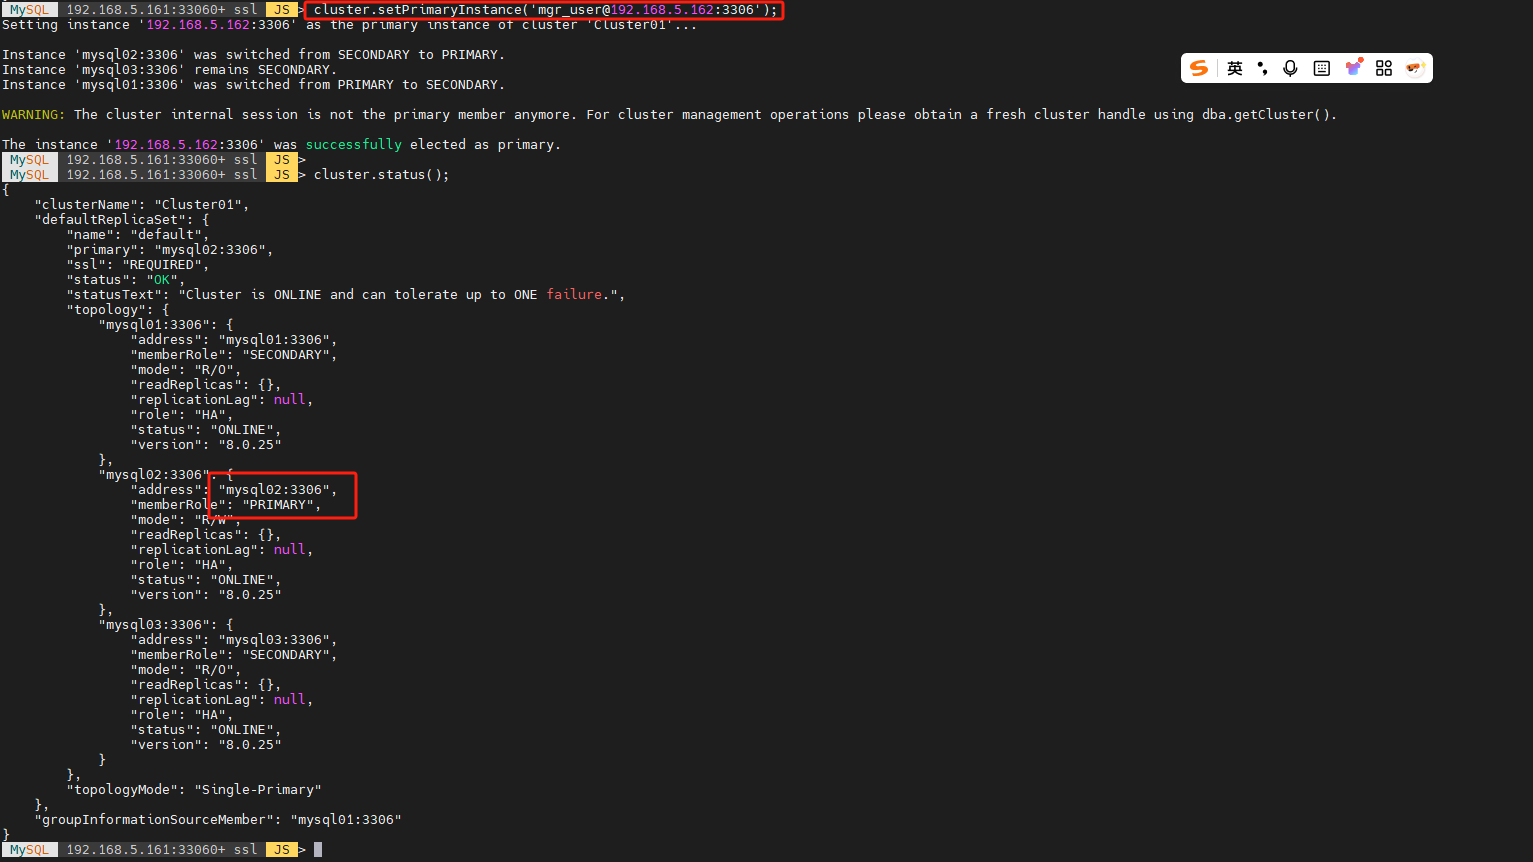
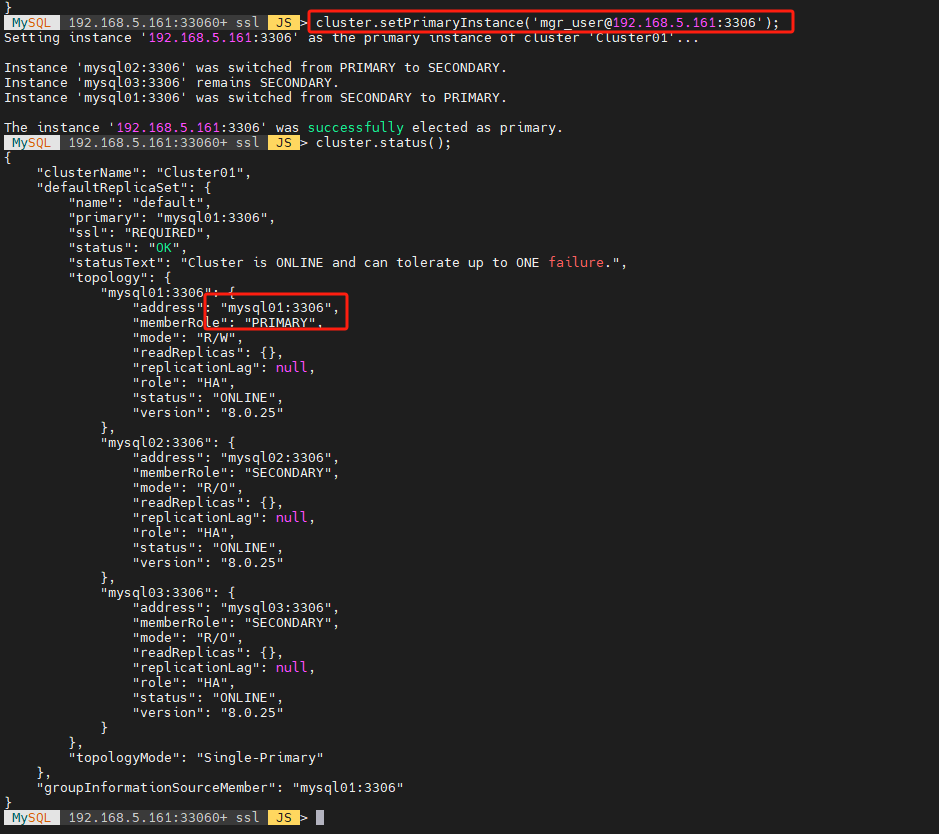
6、手动切换主节点
cluster.setPrimaryInstance('mgr_user@192.168.5.162:3306');
cluster.status();
再切换回来
cluster.setPrimaryInstance('mgr_user@192.168.5.161:3306');
cluster.status();
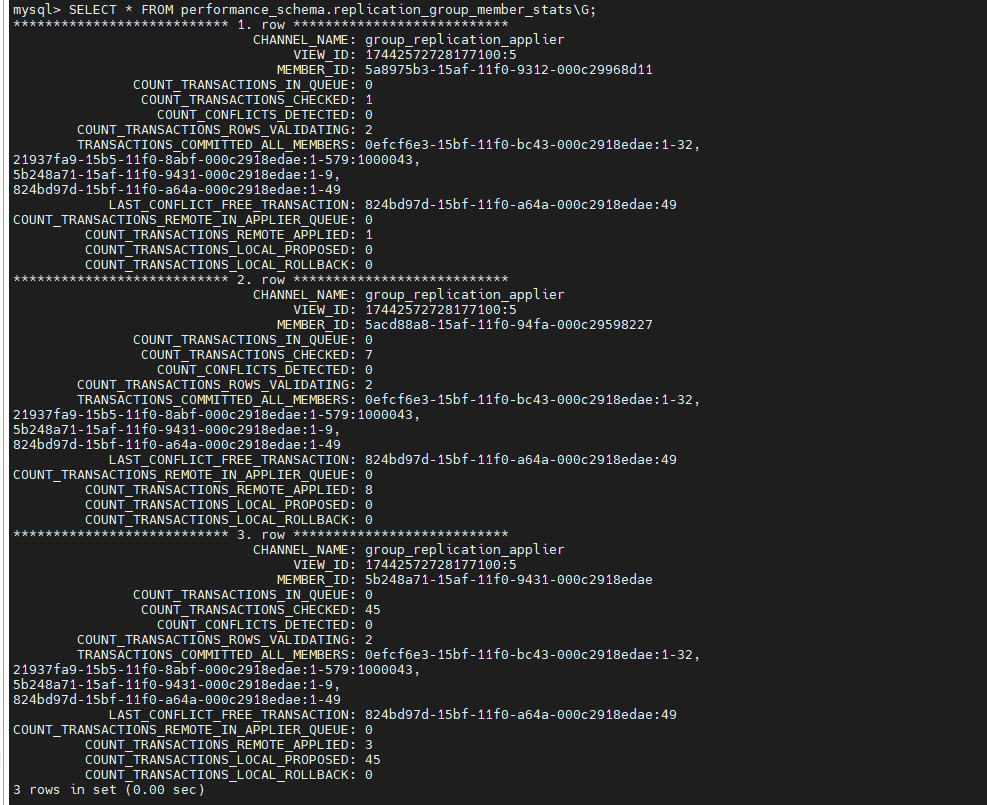
7、显示复制统计信息
在节点实例中进行查询
SELECT * FROM performance_schema.replication_group_member_stats\G;
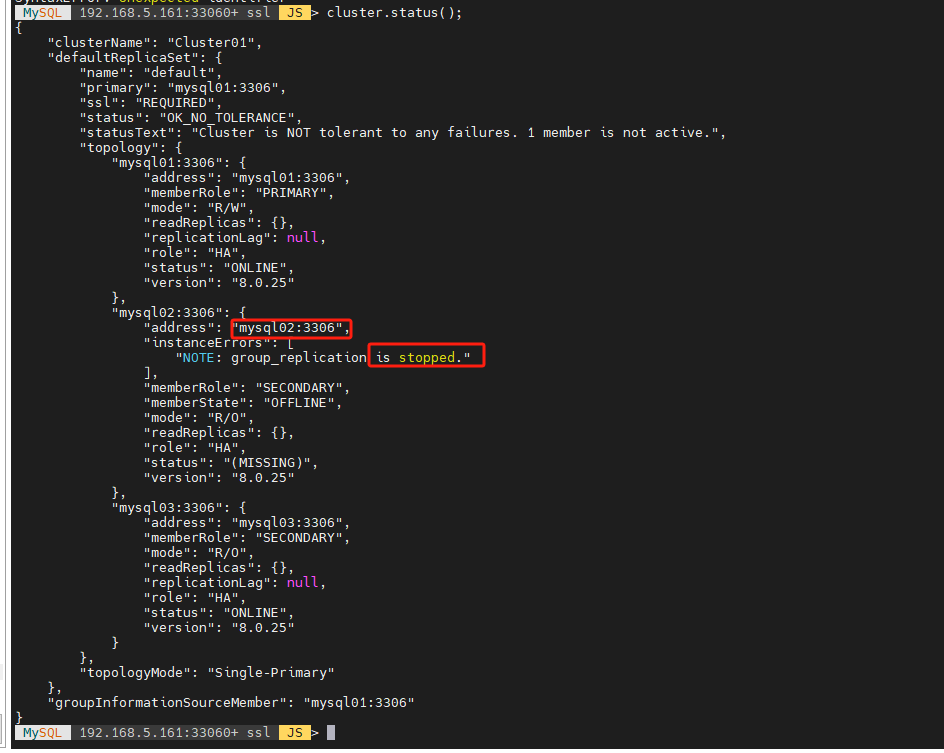
8、关闭组复制
登录到具体的节点上进行操作,例如,停掉162的组复制
STOP GROUP_REPLICATION;

再到MySQL Shell 查看集群状态
cluster.status();
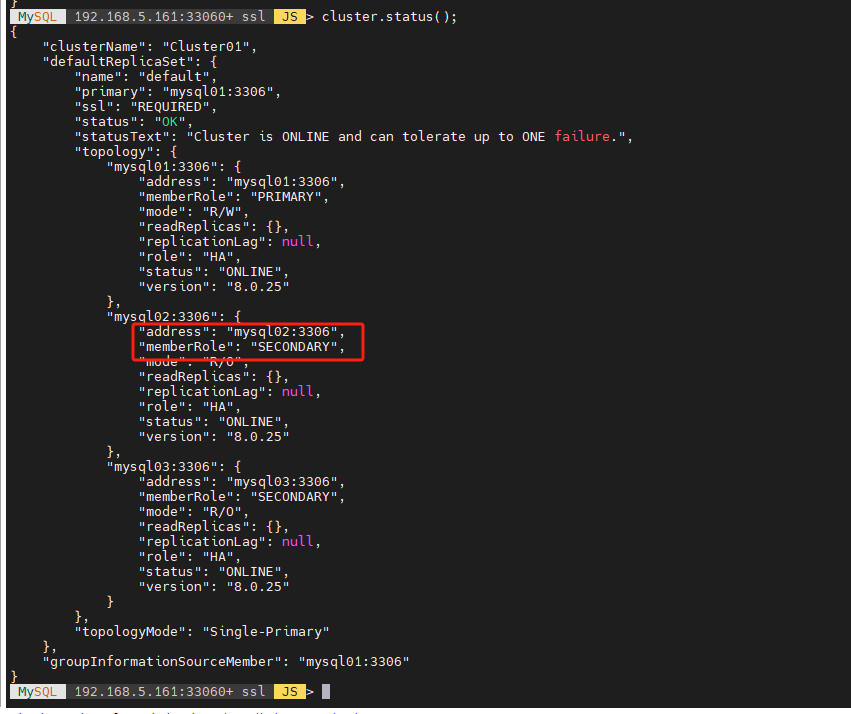
9、启动组复制
例如启动162的组复制
START GROUP_REPLICATION;

再到MySQL Shell 查看集群状态
cluster.status();
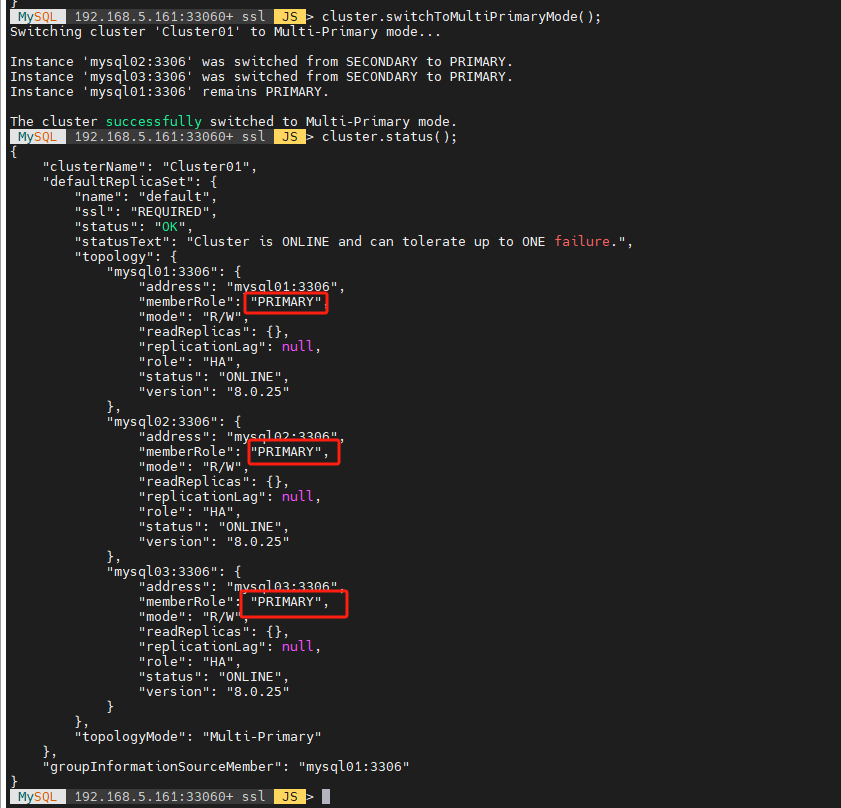
10、切换成多主模式
cluster.switchToMultiPrimaryMode();
cluster.status();
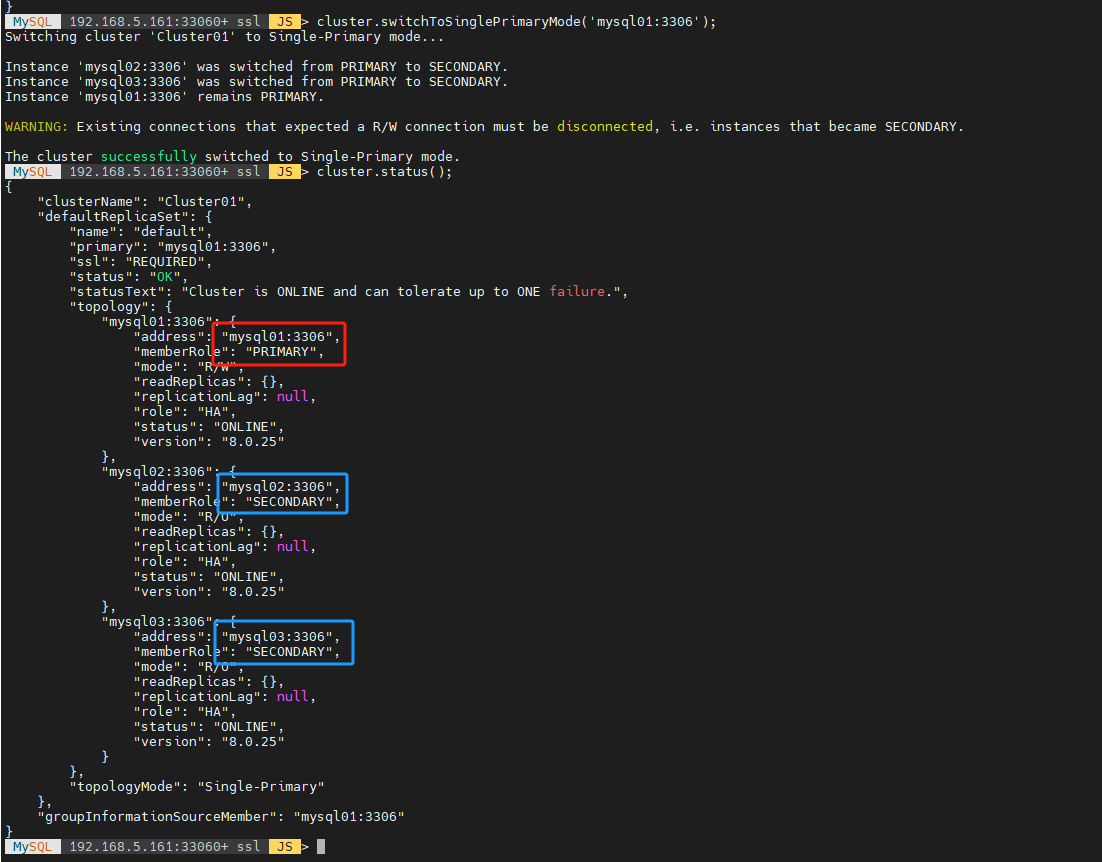
11、切换成单主模式
cluster.switchToSinglePrimaryMode('mysql01:3306');
cluster.status();
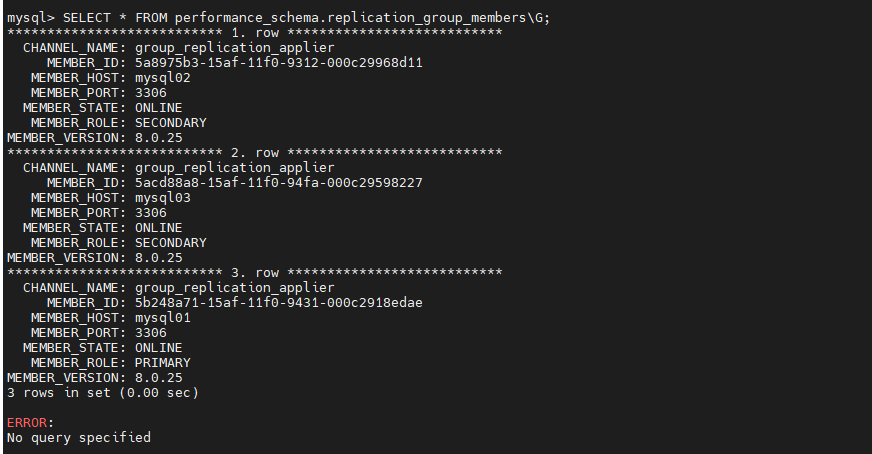
12、查询元数据表
SELECT * FROM performance_schema.replication_group_members\G;
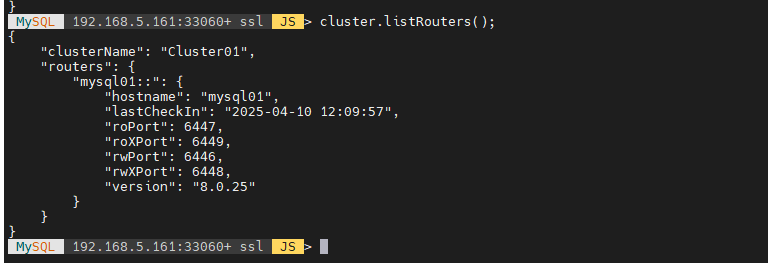
13、列出和集群相关的Router实例
cluster.listRouters();
四、InnoDB Cluster高可用测试
1、环境准备
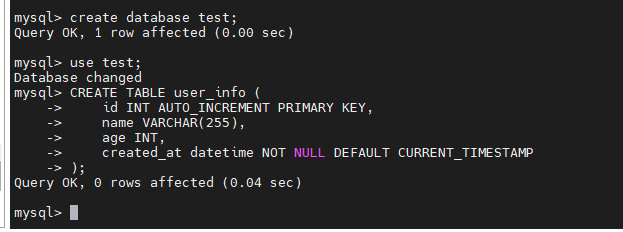
(1)创建测试表
mysql -umgr_user -padmin -P6446 -h192.168.5.161
create database test;
use test;
CREATE TABLE user_info (
    id INT AUTO_INCREMENT PRIMARY KEY,
    name VARCHAR(255),
    age INT,
    created_at datetime NOT NULL DEFAULT CURRENT_TIMESTAMP
);
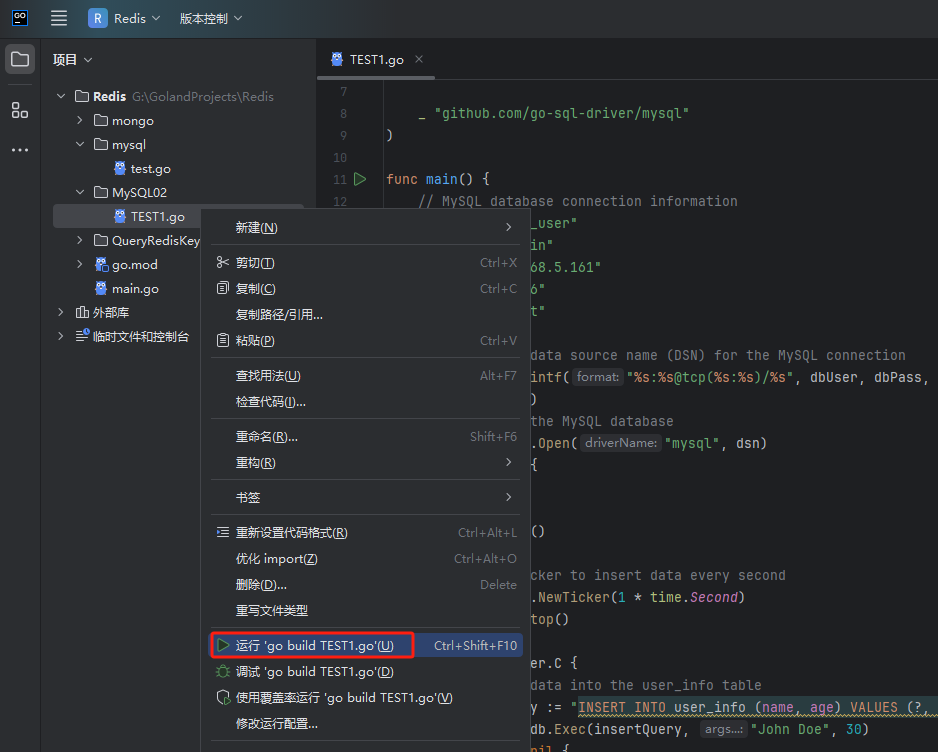
(2)数据写入程序
代码如下:
package main
import (
"database/sql"
"fmt"
"time"
_ "github.com/go-sql-driver/mysql"
)
func main() {
// MySQL database connection information
dbUser := "mgr_user"
dbPass := "admin"
dbIP := "192.168.5.161"
dbPort := "6446"
dbName := "test"
// Create the data source name (DSN) for the MySQL connection
dsn := fmt.Sprintf("%s:%s@tcp(%s:%s)/%s", dbUser, dbPass, dbIP, dbPort, dbName)
fmt.Printf(dsn)
// Connect to the MySQL database
db, err := sql.Open("mysql", dsn)
if err != nil {
panic(err)
}
defer db.Close()
// Create a ticker to insert data every second
ticker := time.NewTicker(1 * time.Second)
defer ticker.Stop()
for range ticker.C {
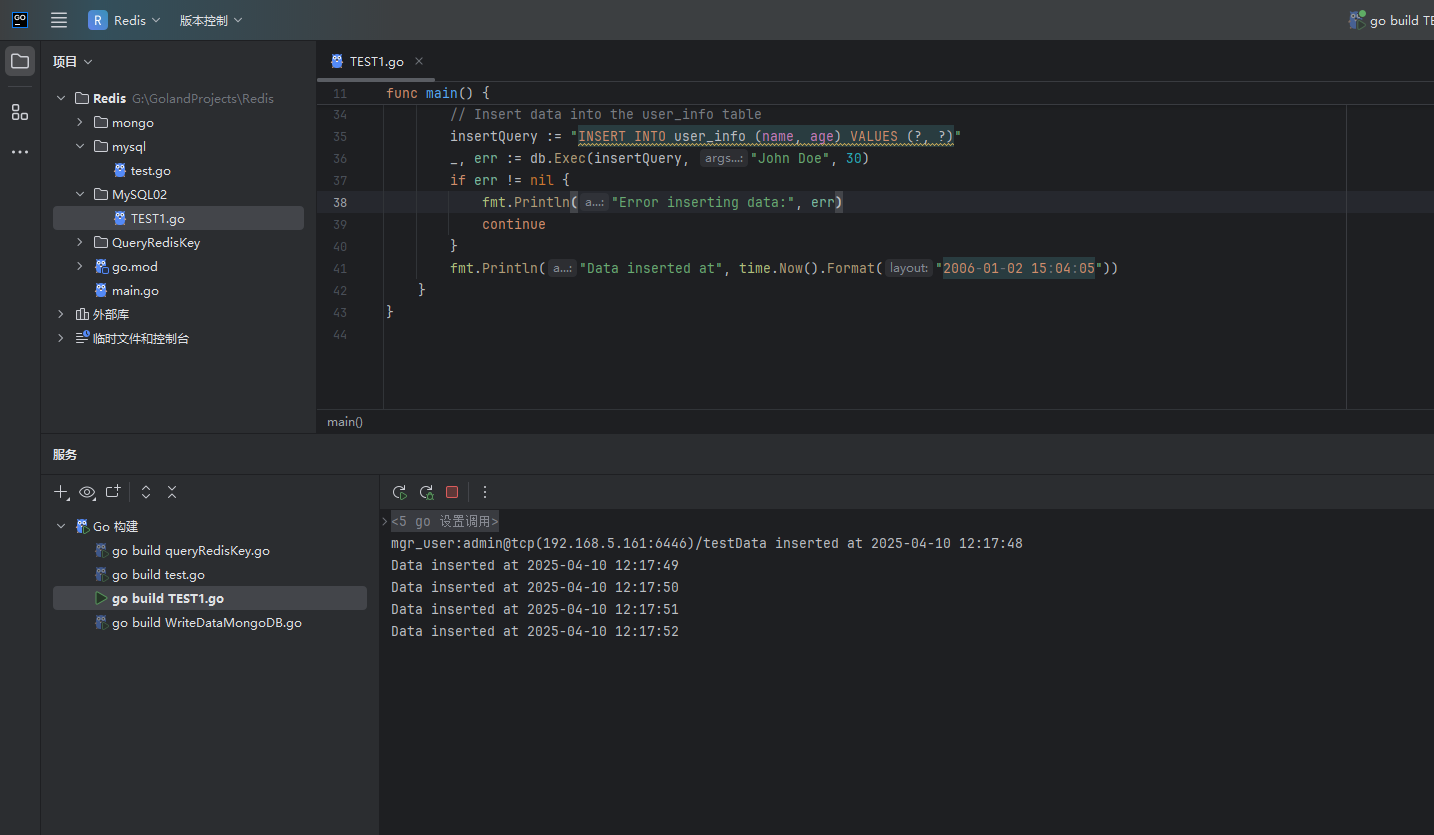
// Insert data into the user_info table
insertQuery := "INSERT INTO user_info (name, age) VALUES (?, ?)"
_, err := db.Exec(insertQuery, "John Doe", 30)
if err != nil {
fmt.Println("Error inserting data:", err)
continue
}
fmt.Println("Data inserted at", time.Now().Format("2006-01-02 15:04:05"))
}
}
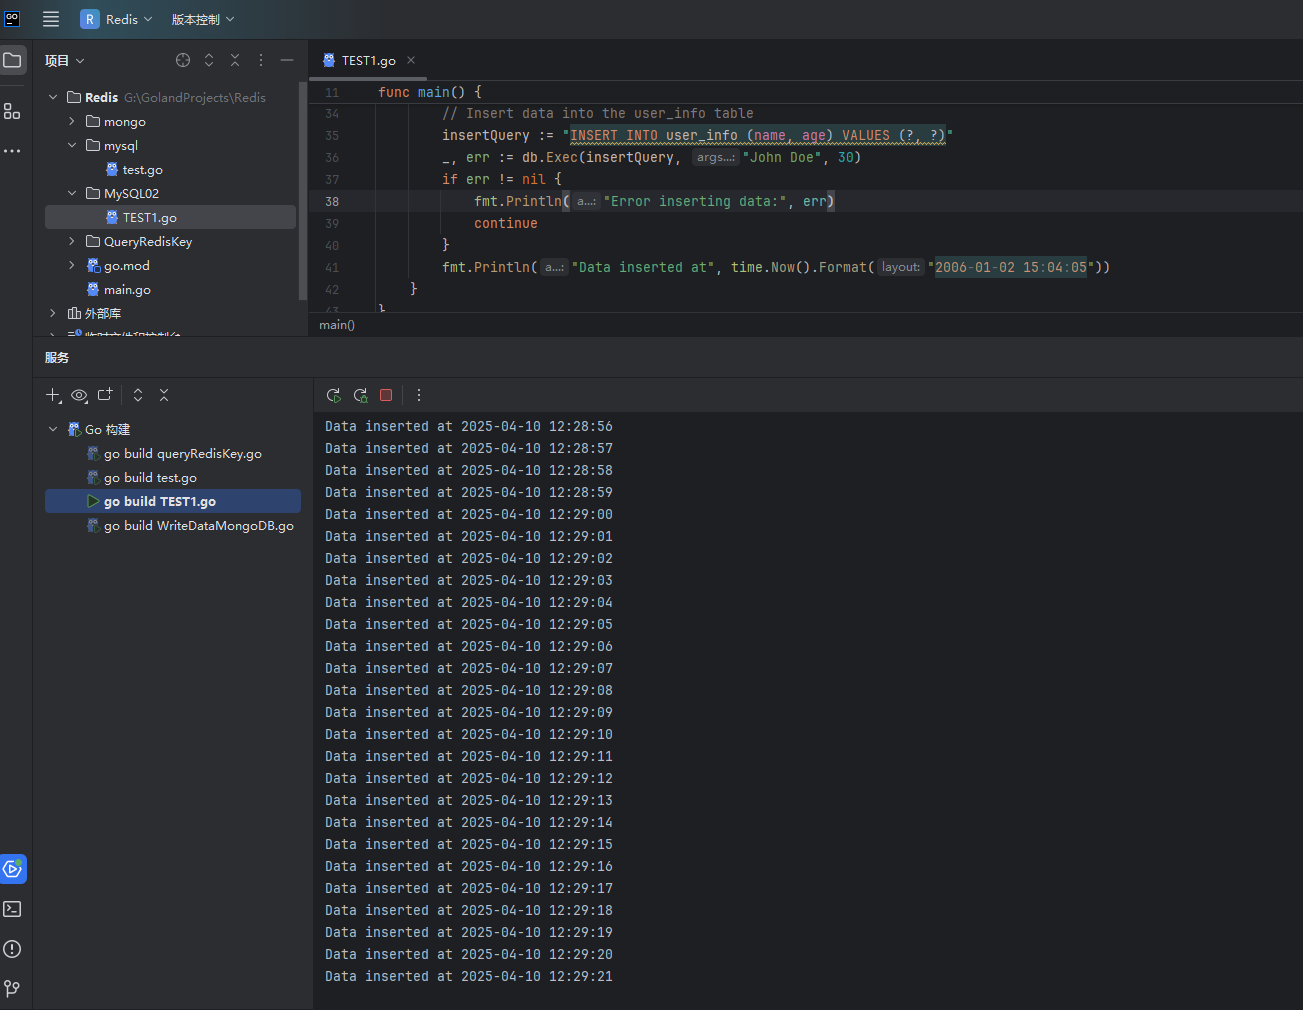
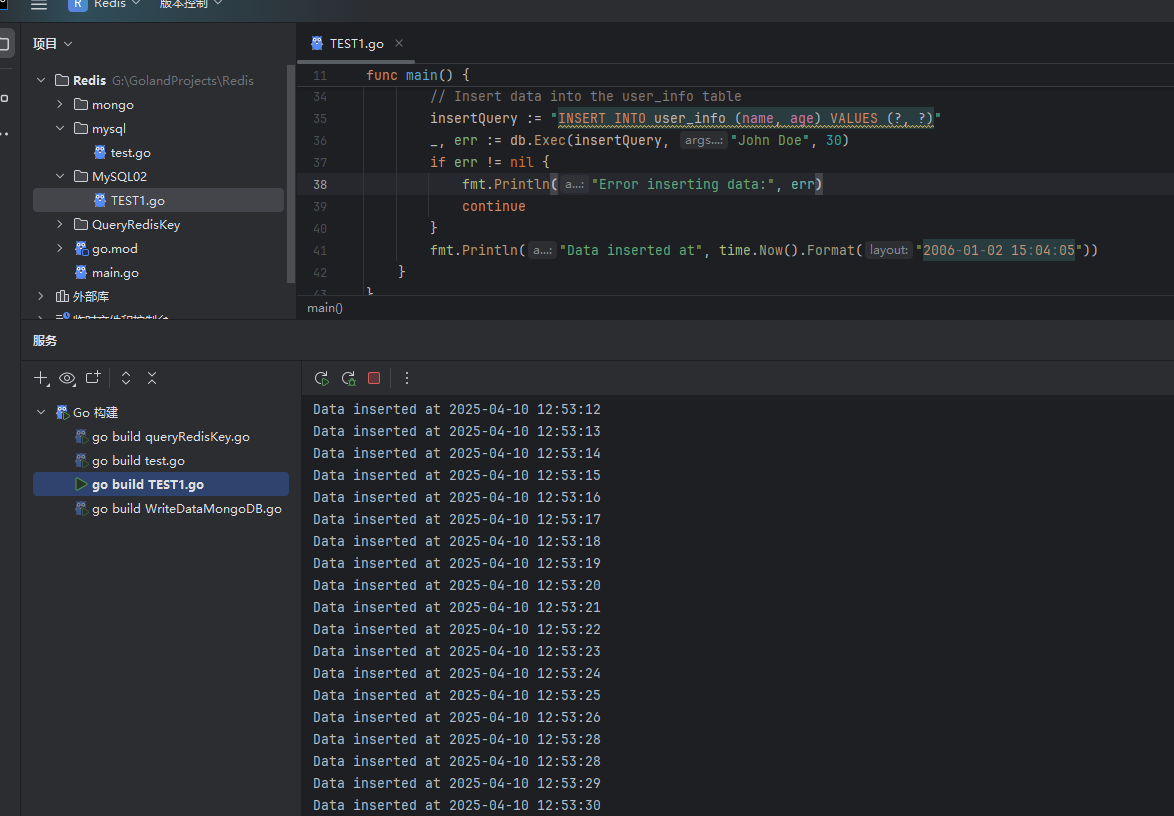
(3)运行程序
(4)查看数据
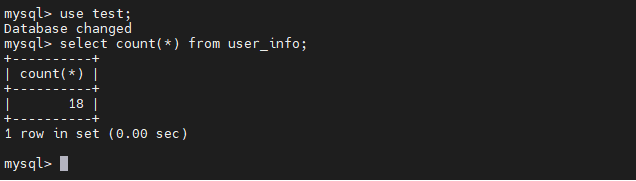
use test;
select count(*) from user_info;
2、测试一【停掉primary节点】
(1)查询集群信息
mysqlsh -umgr_user -p'admin' -h192.168.5.161
cluster.status();
(2)停掉mysql01节点的实例
/etc/init.d/mysql.server stop

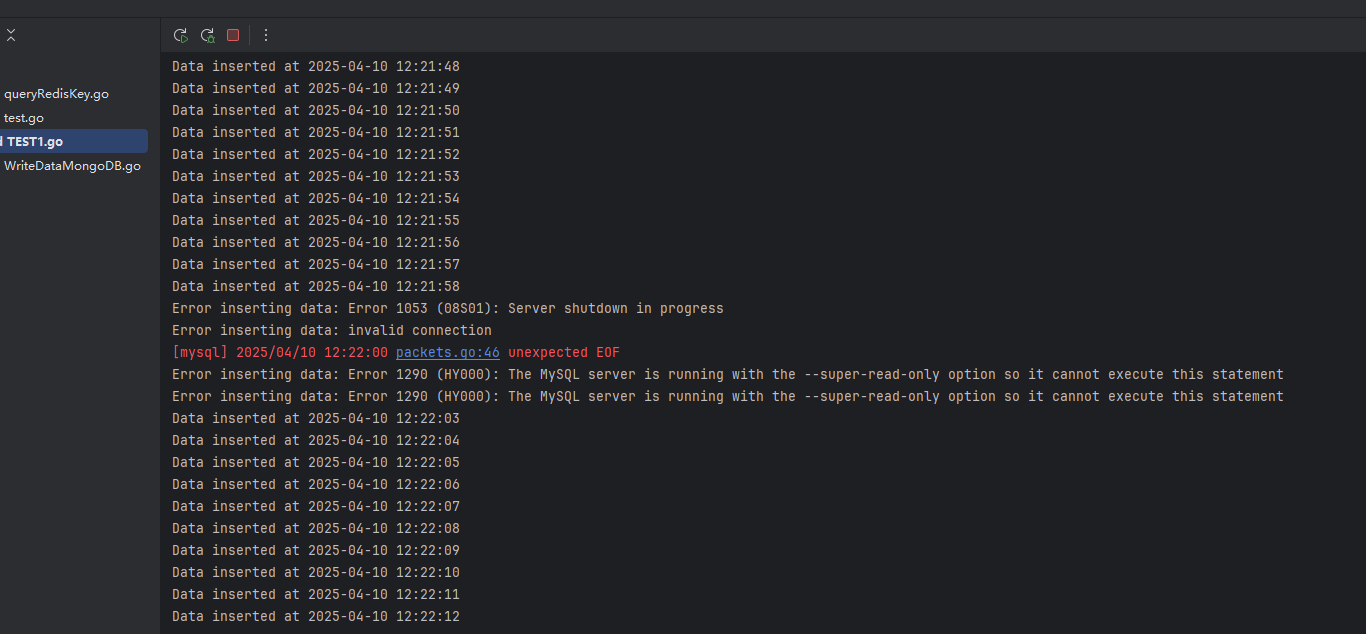
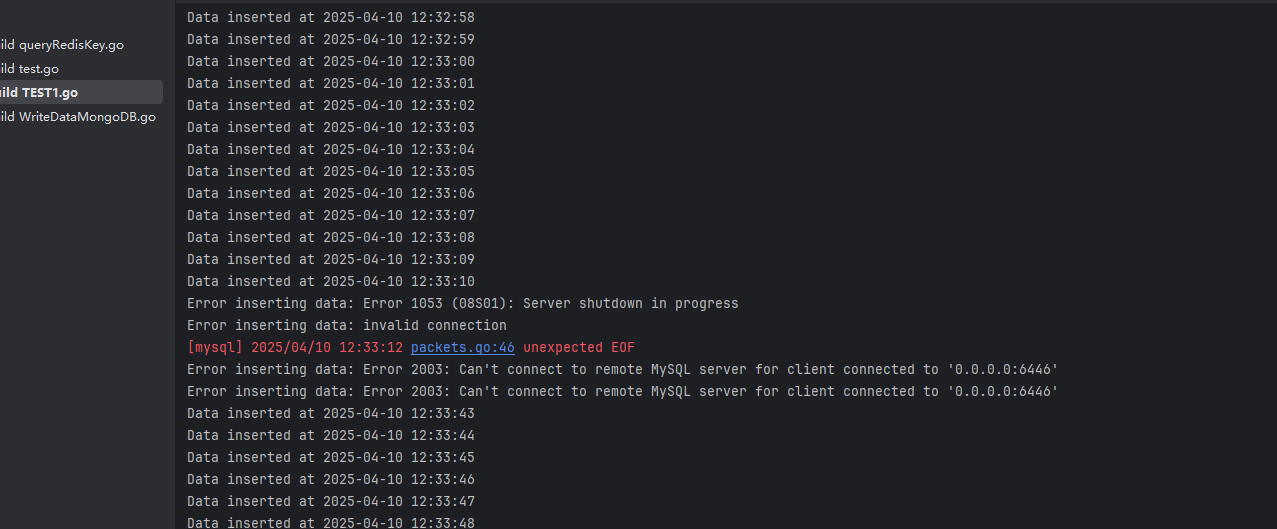
(3)观察程序输出
程序停止一段时间后又继续输出了
(4)查看集群状态
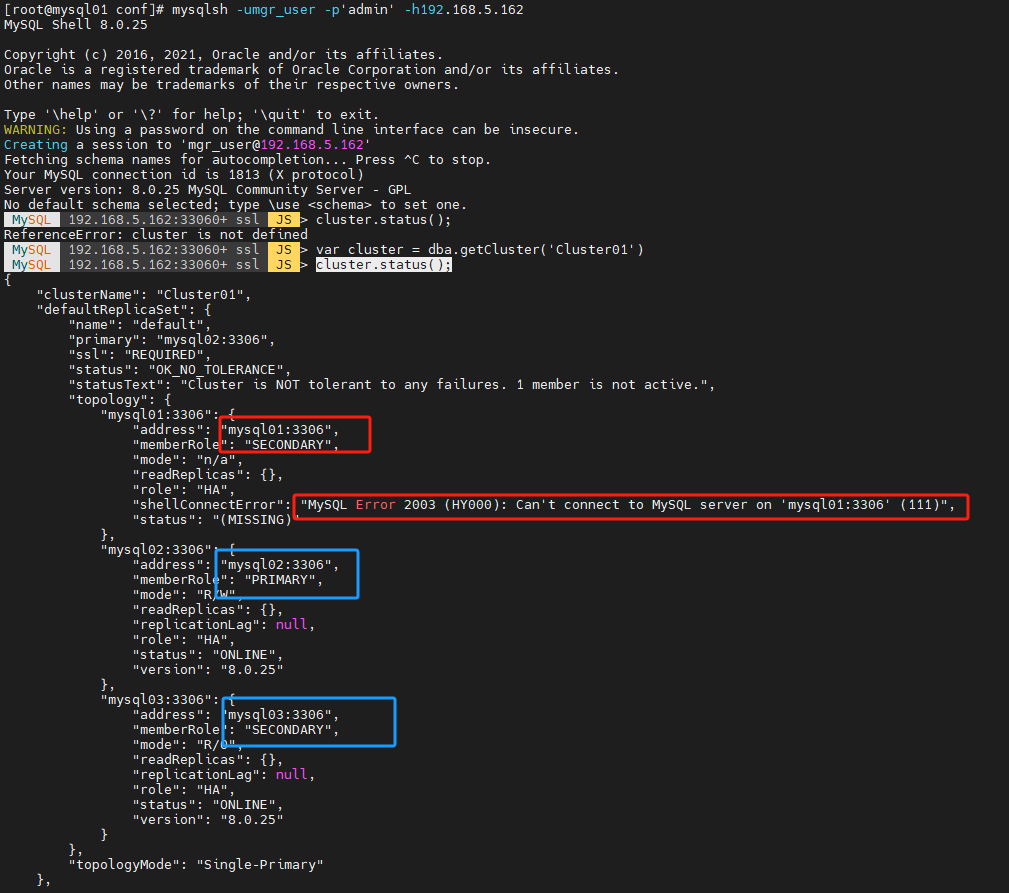
使用原来mysql01的mysql shell 进行连接发现是如下的信息,是因为主节点变了
cluster.status();

需要切换一个节点进行连接,使用如下的进行连接
mysqlsh -umgr_user -p'admin' -h192.168.5.162
或者
mysqlsh -umgr_user -p'admin' -h192.168.5.163
然后进行查询集群状态
var cluster = dba.getCluster('Cluster01')
cluster.status();
3、测试二【启动关闭的节点】
(1)重启mysql01节点的数据库实例
/etc/init.d/mysql.server start

(2)查看程序输出
无变化
(3)查看集群状态
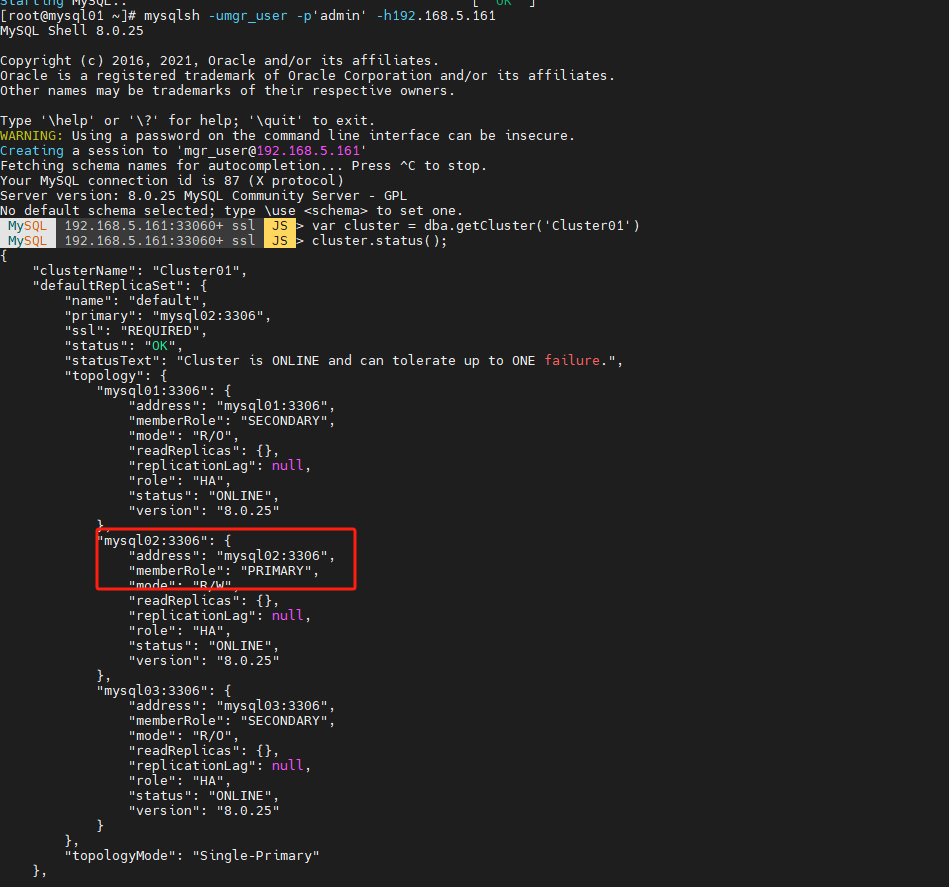
mysqlsh -umgr_user -p'admin' -h192.168.5.161
var cluster = dba.getCluster('Cluster01')
cluster.status();
4、测试三【关闭机器】
(1)查看集群信息
当前的主节点在mysql02节点,也就是162节点服务器
mysqlsh -umgr_user -p'admin' -h192.168.5.161
cluster.status();
(2)关闭162节点机器
shutdown -h now
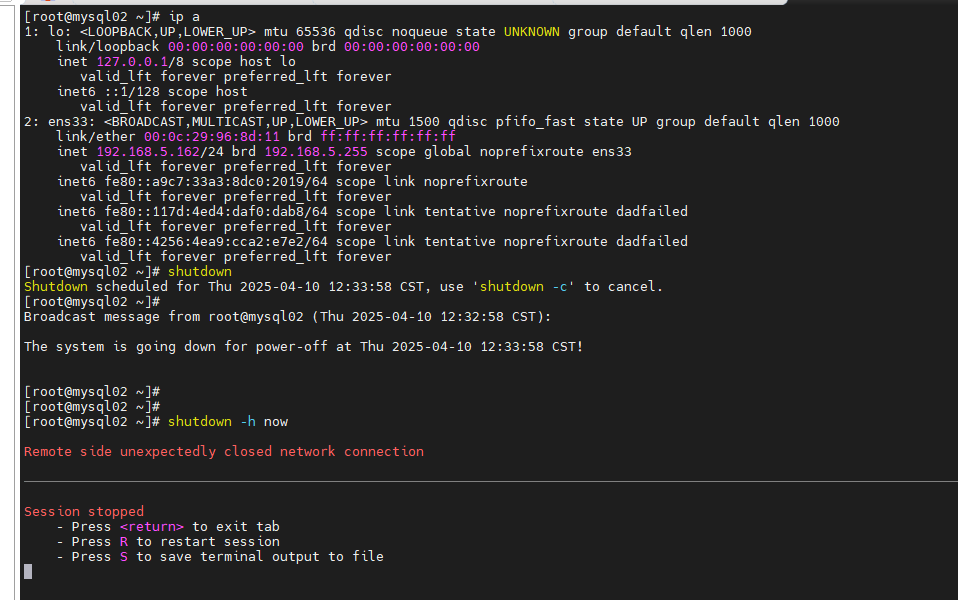
(3)查看程序输出
程序停止了30秒后继续输出了
(4)查看集群信息
mysqlsh -umgr_user -p'admin' -h192.168.5.161
var cluster = dba.getCluster('Cluster01')
cluster.status();
5、测试四【重启机器】
1、重启166节点机器
虚拟机通电
重启数据库实例
/etc/init.d/mysql.server start

2、查看程序输出
无变化,正常输出
3、查看节点状态
mysqlsh -umgr_user -p'admin' -h192.168.5.161
var cluster = dba.getCluster('Cluster01')
cluster.status();
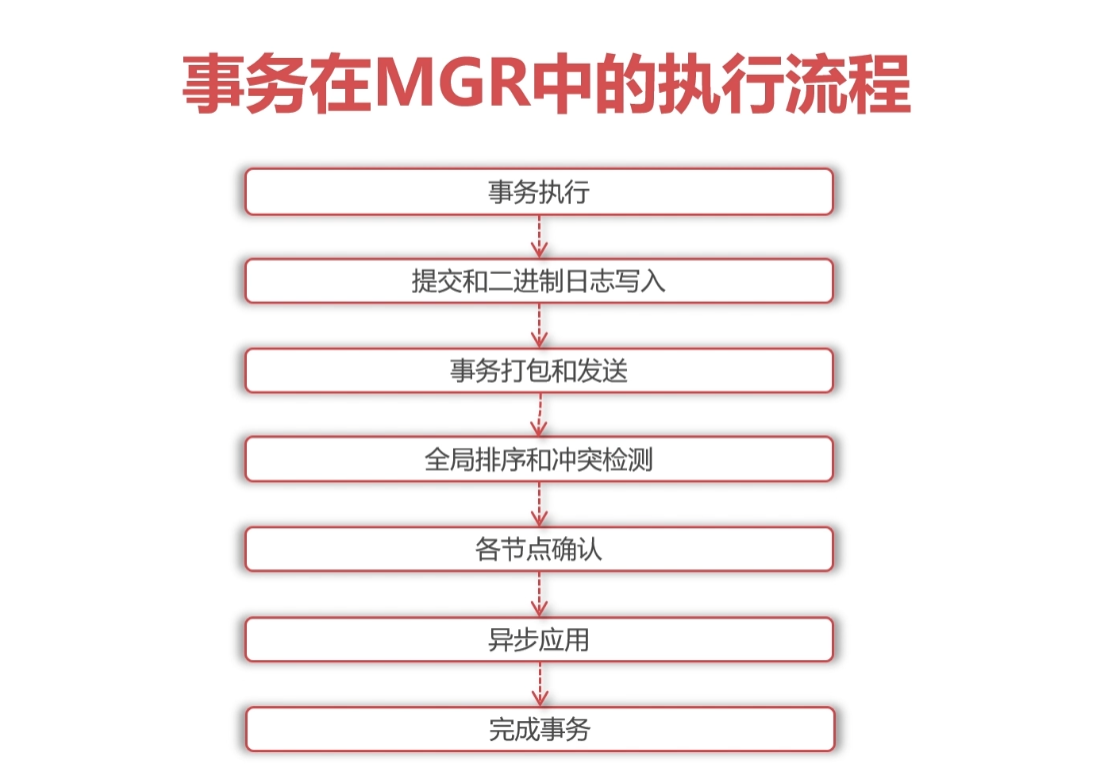
五、MGR事务同步的原理
1、事务在MGR中的执行流程
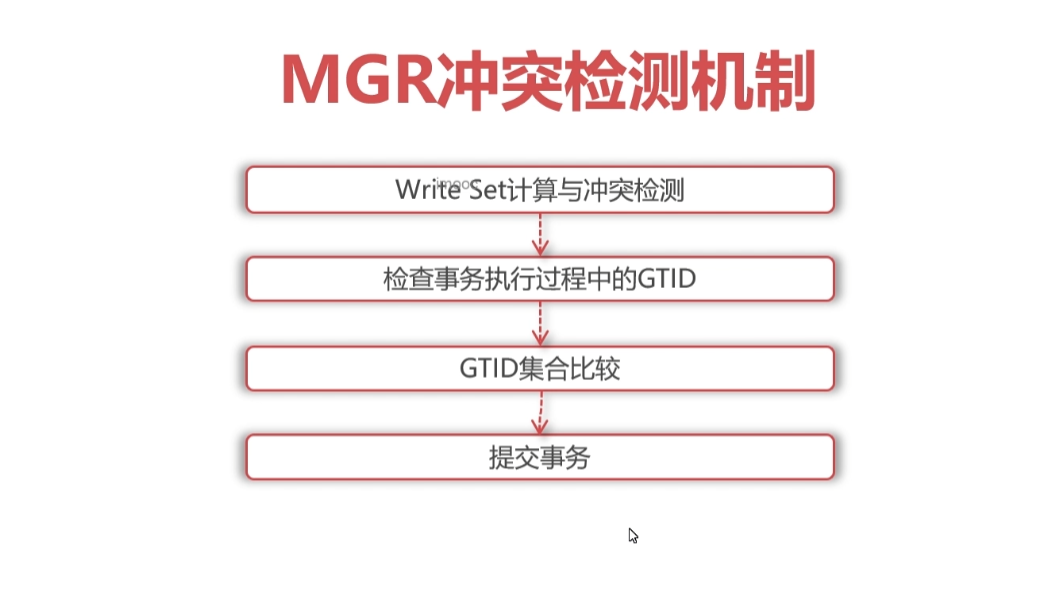
2、MGR冲突检测机制
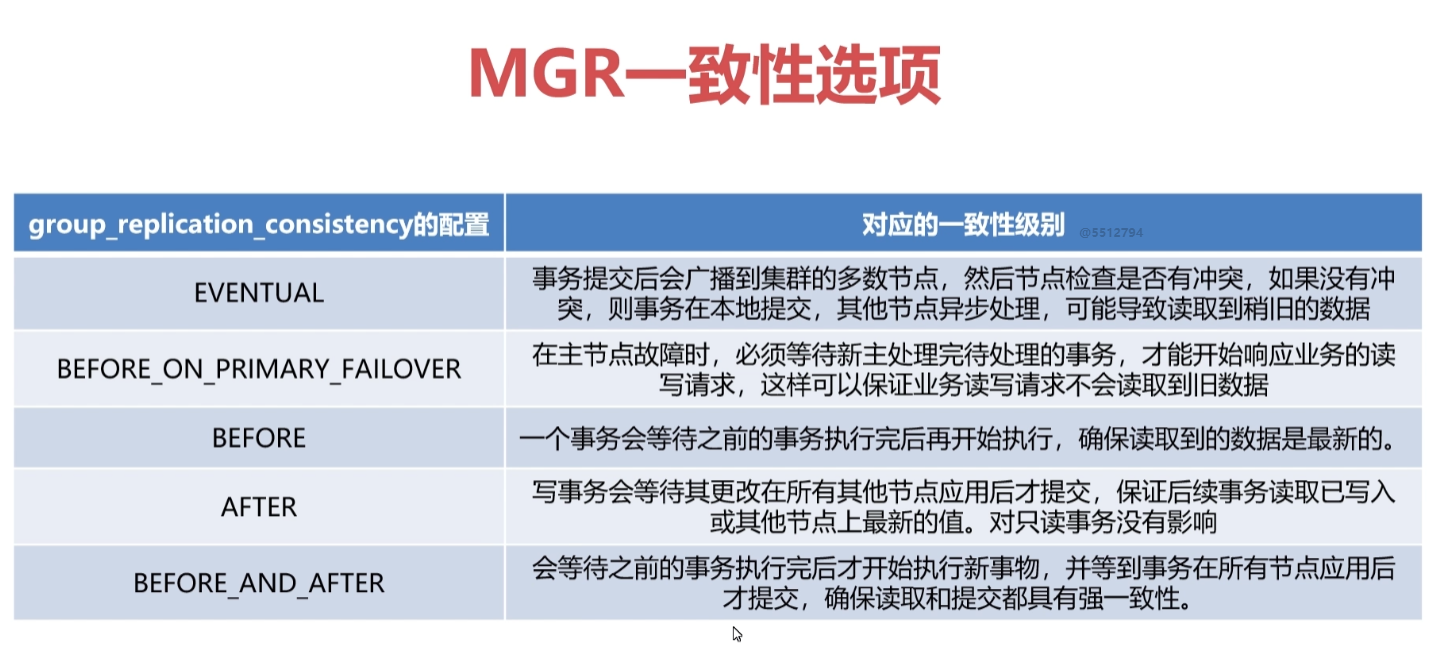
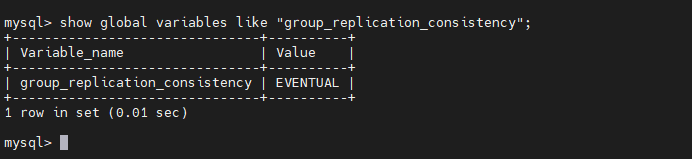
3、MGR一致性选项
4、MGR事务一致性的选择

5、MGR事务一致性的修改
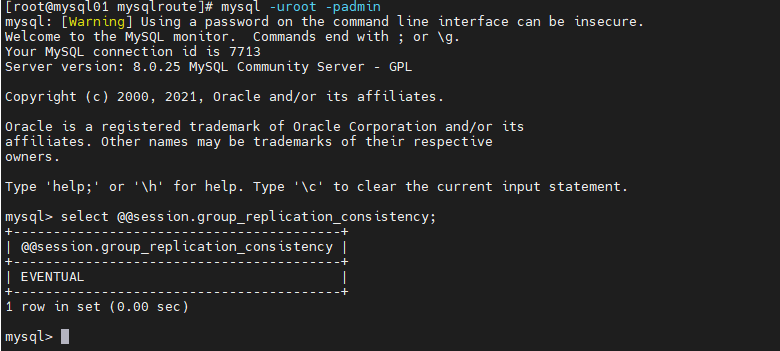
(1)查看当前会话的一致性级别
select @@session.group_replication_consistency;
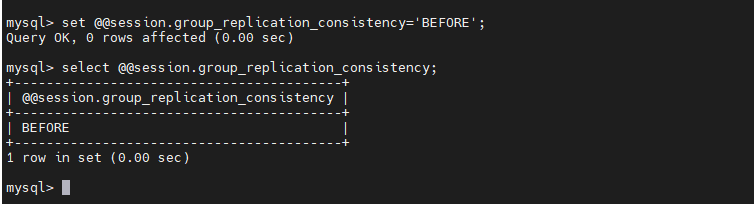
(2)修改当前会话的一致性级别
set @@session.group_replication_consistency='BEFORE';
(3)修改全局的一致性级别
set @@global.group_replication_consistency='BEFORE';

六、MGR故障检测和选主算法
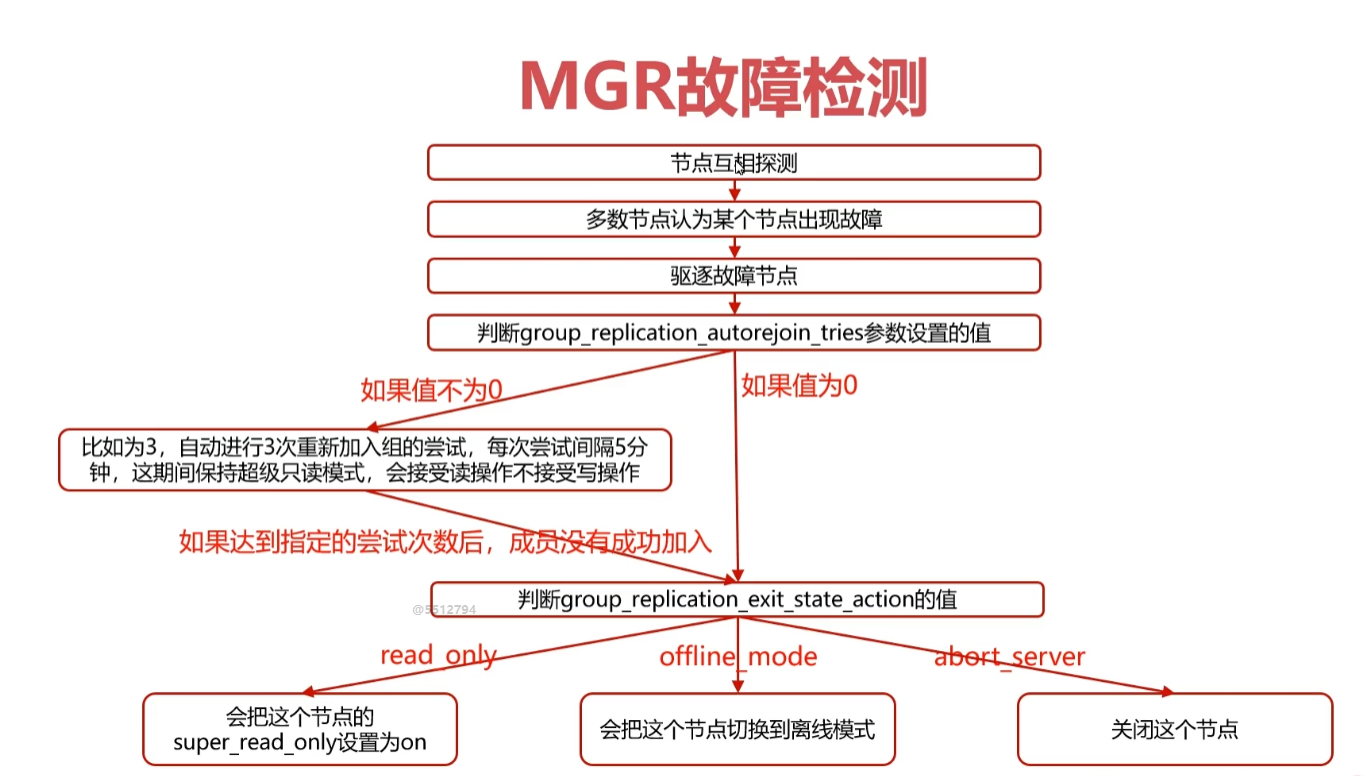
1、MGR故障检测
2、MGR的选主算法
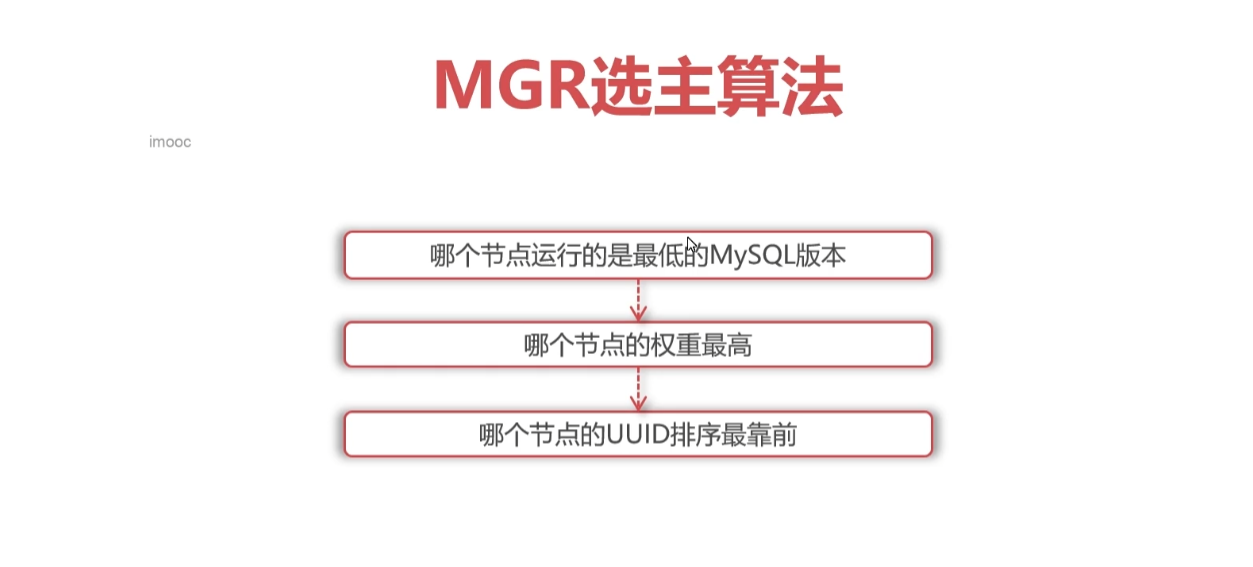
show global variables like "group_replication_member_weight";

3、MGR故障转移

show global variables like "group_replication_consistency";
七、MGR流控
1、流控的作用

2、开启流控
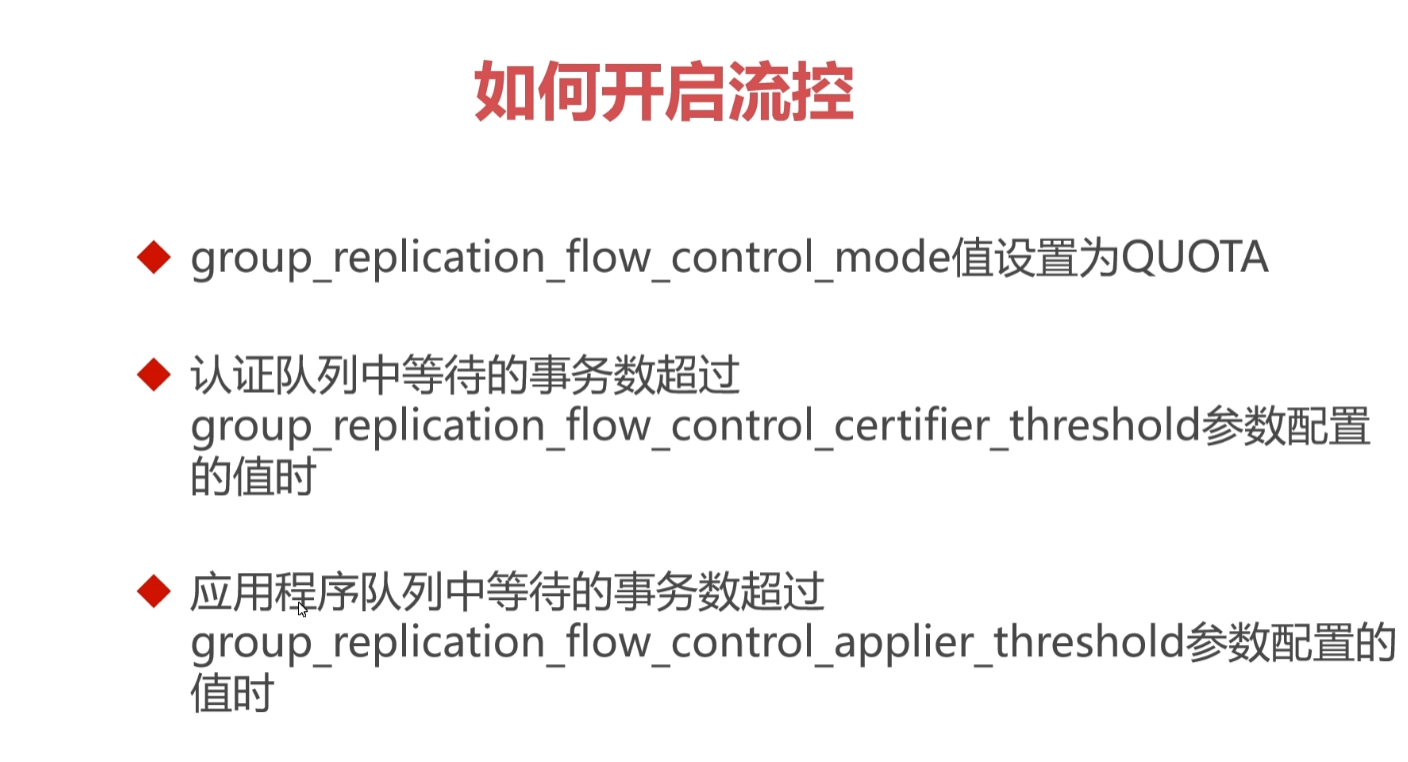
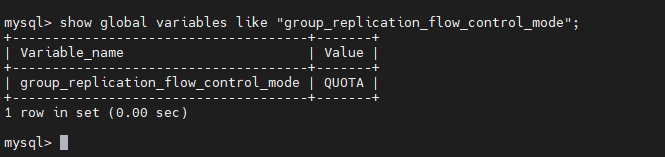
show global variables like "group_replication_flow_control_mode";
show global variables like "group_replication_flow_control_certifier_threshold";

show global variables like "group_replication_flow_control_applier_threshold";

认证队列中等待的事务数
select MEMBER_ID,COUNT_TRANSACTIONS_IN_QUEUE from performance_schema.replication_group_member_stats;

应用程序队列中等待的事务数,可以通过下面命令查看
select MEMBER_ID,COUNT_TRANSACTIONS_REMOTE_IN_APPLIER_QUEUE from performance_schema.replication_group_member_stats;


