
Spring AI实战初体验——实现可切换模型AI聊天助手

文章目录
- 一、Spring AI是什么
- 二、实战:可切换模型AI聊天助手
- 1.项目背景
- 2.创建spring-ai项目
- 3.接口
- 4.配置ollama模型
- 5.接口实现(重点)
- 6.AOP
- 7.前端
- 1.HTML版
- 2.VUE2版
一、Spring AI是什么
参考:
Spring Boot集成Spring Ai框架【详解 搭建Spring Ai项目,以及简单的ai大模型智能体应用,附有图文+示例代码】_springboot ai-CSDN博客
- 官网
Spring AI
-
简介
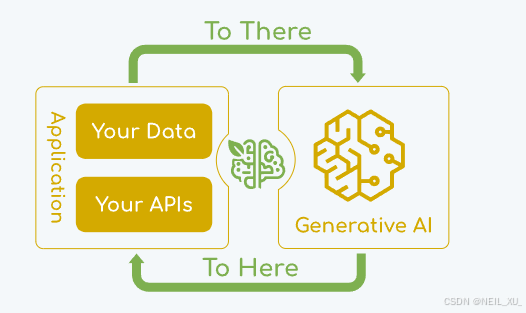
Spring AI 是一个用于 AI 工程的应用程序框架。 其目标是将Spring 生态系统设计原则(如可移植性和模块化设计)应用于 AI 领域,并将使用 POJO 作为应用程序的构建块推广到 AI 领域。
核心是解决AI集成问题,可以方便地将数据、API、AI模型连接起来
二、实战:可切换模型AI聊天助手
项目源码:spring_ai_test: 测试 spring-ai 的 demo
【前端文件在resource目录下】
1.项目背景
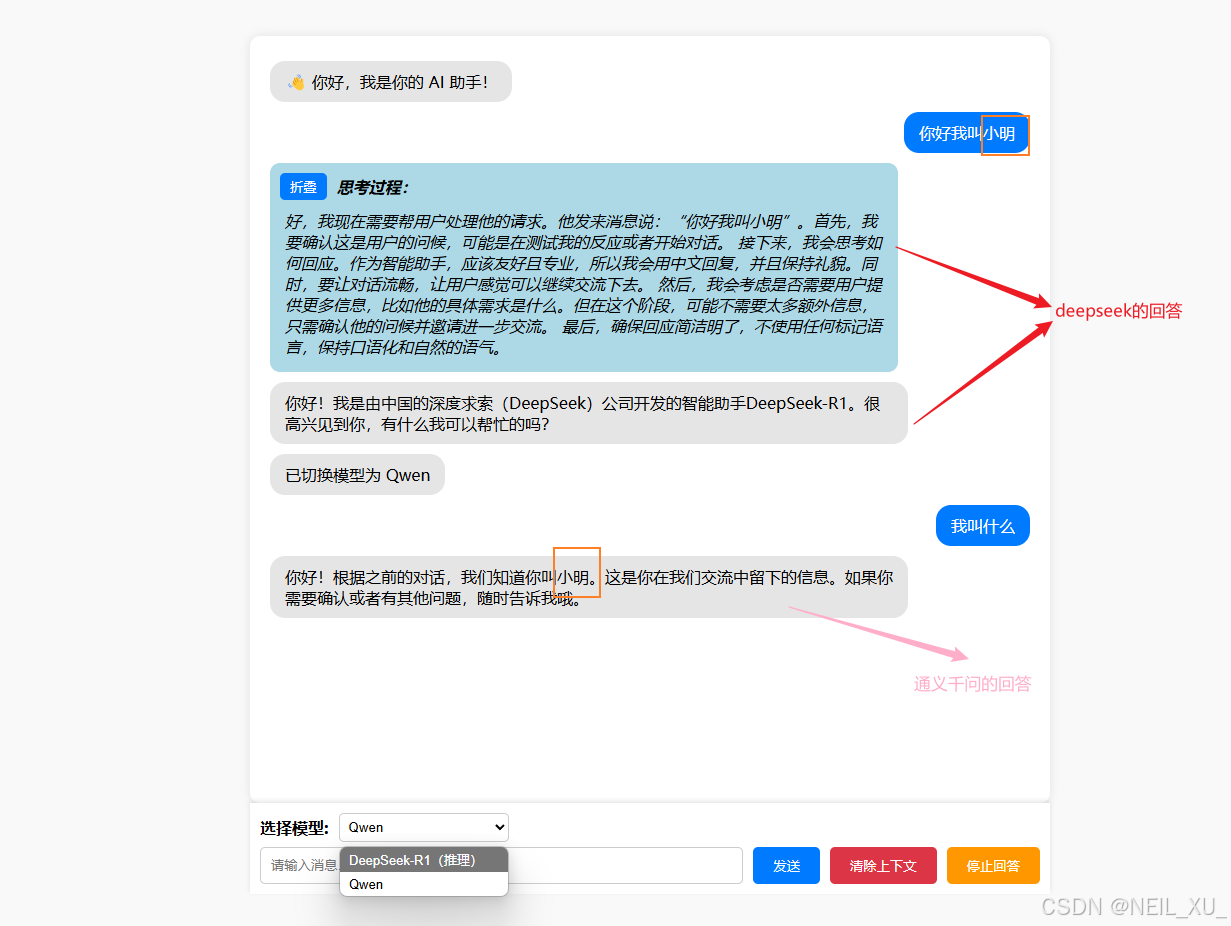
集成AI模型进行聊天的web应用,在市面上已经烂大街了,我们本篇也是做一个聊天助手,不过做了一定的升级,我们利用spring-ai集成多个模型,对于每个用户,多个模型共享一份聊天记录,并可以随时切换模型
最终效果如下(HTML版):
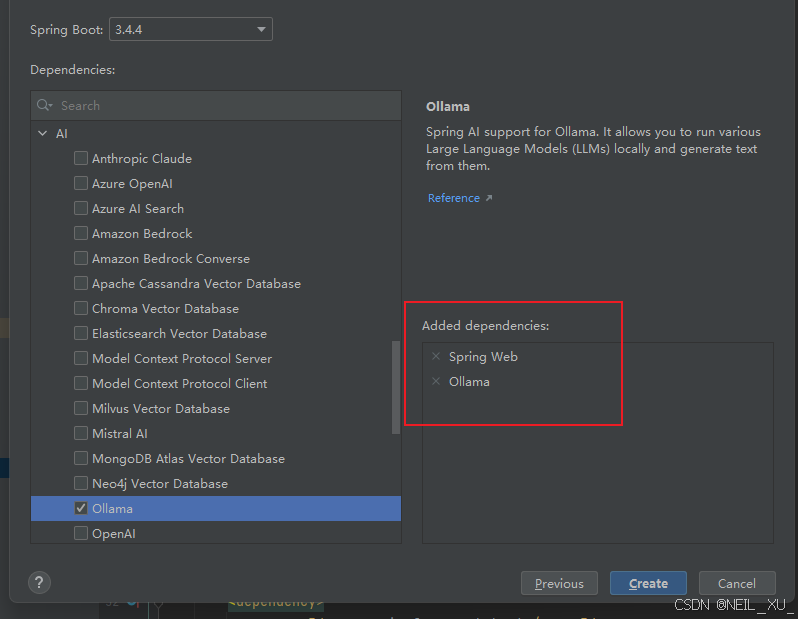
2.创建spring-ai项目
步骤和平时创建springboot项目相同,就是注意下勾选上springboot-ai相关的依赖,这里我们要对接的是ollama本地部署的ai模型,所以勾选ollama,
还有就是注意springboot版本选3以上,jdk选17以上
3.接口
接口总共有5个,为了方便调试,这里全都用GET类型
    /**
     * 无记忆聊天-非流式
     * @param message
     * @param model
     * @return
     */
    @GetMapping( "/chat")
    public String chat(@RequestParam String message, @RequestParam(required = false) String model) {
        return aiTestService.chat(message, model);
    }
    /**
     * 无记忆聊天-流式
     * @param response
     * @param message
     * @param model
     * @return
     */
    @GetMapping(value = "/chatStream")
    public Flux chatStream(HttpServletResponse response, @RequestParam String message,@RequestParam(required = false) String model) {
        // 避免返回乱码
        response.setCharacterEncoding("UTF-8");
        return aiTestService.chatStream(message, model);
    }
    /**
     * 带记忆聊天-流式
     * @param response
     * @param message
     * @param userId
     * @param model
     * @return
     */
    @GetMapping(value = "/chatStreamWithMemory")
    public Flux chatStreamWithMemory(HttpServletResponse response, @RequestParam String message, @RequestParam String userId, @RequestParam(required = false) String model) {
        // 避免返回乱码
        response.setCharacterEncoding("UTF-8");
        return aiTestService.chatStreamWithMemory(message,userId,model);
    }
    /**
     * 清除某用户的聊天记录
     * @param userId
     */
    @GetMapping(value = "/clearMemory")
    public void clearMemory(@RequestParam String userId) {
        aiTestService.clearUserChatMemory(userId);
    }
    /**
     * 停止某用户当前的AI回答
     * @param userId
     */
    @GetMapping(value = "/stopChat")
    public void stopChat(@RequestParam String userId) {
        aiTestService.stopChat(userId);
    }
4.配置ollama模型
用ollama本地部署AI模型的过程这里就不多讲述,可参考我之前的博客:DeepSeek本地部署并提供远程连接(小白教程)_deepseek本地部署远程访问-CSDN博客
application.yml
spring:
  application:
    name: spring_ai_test
#  ai:
#    ollama:
#      base-url: http://192.168.100.145:11434
#      chat:
#        options:
#          model: deepseek-r1:latest
#          temperature: 0.3
#          top-p: 0.6
server:
  port: 8081
ai:
  ollama:
    base-url:
      deepseek-r1-7b: http://192.168.100.145:11434
      qwen-7b: http://192.168.100.211:11434
引入spring-ai-ollama依赖,他会自带有一个配置,如上面注释掉的部分。但是这样只能配置一个模型,为了实现多模型对接,这里我们采用自定义配置,如上所示
配置类 com.neil.ai.config.OllamaConfig
@Configuration
public class OllamaConfig {
    @Value("${ai.ollama.base-url.deepseek-r1-7b}")
    private String deepSeekBaseUrl;
    @Value("${ai.ollama.base-url.qwen-7b}")
    private String qwenBaseUrl;
    @Bean
    @Primary
    public OllamaApi ollamaApiDeepSeek() {
        return new OllamaApi(deepSeekBaseUrl);
    }
    @Bean
    public OllamaApi ollamaApiQwen() {
        return new OllamaApi(qwenBaseUrl);
    }
}
5.接口实现(重点)
接口我们主要看比较复杂的——带记忆聊天-流式
com.neil.ai.service.AiTestService
    // Ollama 模型地址配置
    private final OllamaConfig ollamaConfig;
    // 存储用户 -> (模型 -> ChatClient)
    private final Map userChatClients = new ConcurrentHashMap();
    // 存储用户 -> 共享的聊天记忆
    private final Map userChatMemory = new ConcurrentHashMap();
    private final ObservationRegistry observationRegistry = ObservationRegistry.create();
    private final ModelManagementOptions modelManagementOptions = ModelManagementOptions.defaults();
    private final NoOpToolCallingManager toolCallingManager = new NoOpToolCallingManager();
    // 记录用户聊天状态,true 表示继续,false 表示终止
    private final Map userChatStatus = new ConcurrentHashMap();
/** * 带记忆的流式聊天(支持用户传入不同的模型) * * @param msg 用户输入 * @param userId 用户 ID * @param model AI 模型名称 * @return Flux AI 回复流 */ public Flux chatStreamWithMemory(String msg, String userId, String model) { // 初始化用户状态为 true(允许聊天) userChatStatus.put(userId, true); if (model == null || model.isEmpty()) { model = Model.DEEPSEEK_R1; // 默认模型 } // 确保用户有自己的聊天记忆 userChatMemory.putIfAbsent(userId, new InMemoryChatMemory()); InMemoryChatMemory memory = userChatMemory.get(userId); // 确保用户有对应的模型映射 userChatClients.putIfAbsent(userId, new ConcurrentHashMap()); Map modelChatClients = userChatClients.get(userId); // 获取或创建该模型的 ChatClient String finalModel = model; ChatClient chatClient = modelChatClients.computeIfAbsent(model, m -> { // 使用 OllamaOptions 设置动态模型 OllamaOptions options = OllamaOptions.builder() .model(m) .temperature(0.3) .topP(0.6) .build(); // 通过 OllamaApi 和 OllamaOptions 创建 OllamaChatModel OllamaChatModel ollamaChatModel = new OllamaChatModel(getOllamaApiForModel(finalModel), options, toolCallingManager, observationRegistry, modelManagementOptions); return ChatClient.builder(ollamaChatModel) .defaultSystem("你是一个智能助手。能帮助用户解决各种问题,你很有礼貌,回答问题条理清晰。你的首选语言是中文。") .defaultAdvisors(new MessageChatMemoryAdvisor(memory)) // 共享的记忆 .build(); }); // 进行流式对话 return chatClient.prompt() .user(msg) .stream() .chatResponse() .takeWhile(response -> Boolean.TRUE.equals(userChatStatus.get(userId))) .timeout(Duration.ofSeconds(10)) // 设置 10 秒超时 .map(response -> response.getResult().getOutput().getText()) .onErrorResume(e -> { userChatStatus.remove(userId); return Flux.just("网络异常,请重新提问"); }); }-
3个ConcurrentHashMap对象
- userChatClients,存储每个用户的【模型:客户端】,实现每个用户的聊天互相隔离
- userChatMemory,存储每个用户的聊天记录,这里注意如果要持久化聊天记录需要进一步存库或者redis
- userChatStatus,记录用户的聊天状态,主要用于停止回答按钮以及AI回复期间禁止再次提问的需求
-
temperature(0.3) 和 topP(0.6)
.temperature(0.3) 和 .topP(0.6) 是大模型生成文本时用于控制随机性的参数,通常用于调整模型的回答风格。
1. temperature(0.3)
- 作用:控制模型输出的随机性,数值越高,回答越随机;数值越低,回答越稳定(更确定)。
- 范围:通常取值 0.0 - 1.0(部分实现可超过 1)。
- 示例:
- temperature = 0:完全确定性,每次都输出相同答案(更倾向于最高概率的词)。
- temperature = 0.3(你当前的值):略微随机,但仍偏向稳定,适合专业性对话。
- temperature = 1.0:高度随机,生成的内容更加多样化,适合创意写作。
- temperature > 1.0(如 1.5):极端随机,可能会产生毫无意义的回答。
2. topP(0.6)
- 作用:控制模型生成时采样的概率范围,也称为 核采样(Nucleus Sampling)。
- 工作方式:
- topP = 1.0:考虑所有可能的词(完全不裁剪)。
- topP = 0.6(你当前的值):仅从累积概率 前 60% 的词中选取,去掉罕见、不太可能的词,减少胡言乱语。
- topP = 0.3:只选择可能性最高的 30% 词汇,回答更加确定。
- topP = 0.9:保留更多可能性,增加多样性。
-
.defaultAdvisors(new MessageChatMemoryAdvisor(memory))
这句话是实现带记忆聊天的关键语句
-
.takeWhile(response -> Boolean.TRUE.equals(userChatStatus.get(userId))).timeout(Duration.ofSeconds(10)) // 设置 10 秒超时
当用户不按下停止回答,AI就一直流式回复;如果超过10秒AI未回复,就直接返回异常
【我实测有时候切换完模型后会有卡主连不上模型导致这里异常的现象,暂时没详细排查,也可能是网络的问题】
6.AOP
这里加aop想处理的主要是同个用户频繁点击发送按钮导致AI进行多次回复的问题【我们现在看到市面上的AI聊天其实都是有做处理的,当一个问题AI还没回复完的时候,发送按钮是禁用的,你想重新提问只能先停止回答】
对于这个问题,我后面又改了前端,实现未回复完禁用发送按钮【HTML版还禁用了清除上下文】
然后这里的aop我本来是想做一个用户重复发送,第二次发送AI自动回复“请等待当前对话完成后再提问”,但是前面AI正在进行的回复不停止,继续回复的效果,
但是发现实现不了,一旦AI回复了“请等待当前对话完成后再提问”,前一个问题的回复也会直接停止。【我感觉可能是流式返回的问题,有大佬懂的可以解释下】
com.neil.ai.aop.ChatRequestAspect
@Slf4j
@Aspect
@Component
public class ChatRequestAspect {
    // 记录用户的请求状态(userId -> 是否有未完成的请求)
    private final Map userChatStatus = new ConcurrentHashMap();
    /**
     * 拦截 chatStreamWithMemory 方法,防止同一个用户并发请求
     */
    @Around("execution(* com.neil.ai.service.AiTestService.chatStreamWithMemory(..)) && args(msg, userId, model)")
    public Object aroundChatRequest(ProceedingJoinPoint joinPoint, String msg, String userId, String model) {
        // 如果该用户已经有未完成的请求,直接返回提示信息
        if (Boolean.TRUE.equals(userChatStatus.getOrDefault(userId, false))) {
            log.warn("用户 {} 的对话仍在进行中,拒绝新的提问", userId);
            return Flux.just("请等待当前对话完成后再提问");
        }
        // 记录该用户的请求状态
        userChatStatus.put(userId, true);
        try {
            // 执行原始方法
            Object result = joinPoint.proceed();
            if (result instanceof Flux) {
                return ((Flux) result)
                        .doFinally(signalType -> {
                            // 请求结束后,释放该用户的状态
                            userChatStatus.remove(userId);
                        });
            }
            return result;
        } catch (Throwable e) {
            log.error("处理 chatStreamWithMemory 失败", e);
            userChatStatus.remove(userId); // 发生异常时释放状态
            return Flux.just("网络异常,请重新提问");
        }
    }
}
7.前端
前端做了两个版本,一个是HTML版(样式比较完善),一个是VUE2版(主要用于集成到真实项目例如若依框架中)
代码基本是用GPT生成的,不得不说,作为后端人员,不懂前端开发,但是有了AI之后,写前端代码也变得容易很多
1.HTML版
AI 聊天 html, body { height: 100%; width: 100%; margin: 0; background-color: #f9f9f9; display: flex; align-items: center; justify-content: center; } .container { display: flex; flex-direction: column; height: 90vh; max-width: 800px; width: 100%; margin: auto; } .chat-container { flex: 1; display: flex; flex-direction: column; background: white; border-radius: 10px; padding: 20px; box-shadow: 0 0 10px rgba(0, 0, 0, 0.1); overflow-y: auto; /* 确保内容超出时显示滚动条 */ min-height: 0; /* 防止 flex 容器压缩子元素 */ } .chat-container::-webkit-scrollbar { width: 8px; } .chat-container::-webkit-scrollbar-track { background: #f1f1f1; border-radius: 4px; } .chat-container::-webkit-scrollbar-thumb { background: #888; border-radius: 4px; } .chat-container::-webkit-scrollbar-thumb:hover { background: #555; } .message { padding: 10px 15px; border-radius: 15px; margin: 5px 0; max-width: 80%; word-wrap: break-word; } .user-message { background-color: #007bff; color: white; align-self: flex-end; } .ai-message { background-color: #e5e5e5; color: black; align-self: flex-start; } .think-message { background-color: #add8e6; color: black; border-radius: 10px; padding: 10px; margin: 5px 0; max-width: 80%; align-self: flex-start; font-style: italic; } .think-content { flex: 1; /* 允许内容自由扩展 */ overflow-y: auto; /* 内容过多时显示滚动条 */ padding: 5px; } .think-title { font-weight: bold; margin-bottom: 5px; display: flex; align-items: center; } .toggle-button { padding: 5px 10px; background-color: #007bff; color: white; border: none; border-radius: 5px; cursor: pointer; margin-right: 10px; } .toggle-button:hover { background-color: #0056b3; } .input-container { display: flex; flex-direction: column; padding: 10px; background: white; box-shadow: 0 -2px 5px rgba(0, 0, 0, 0.1); } .model-container { display: flex; align-items: center; margin-bottom: 5px; } .model-label { margin-right: 10px; font-weight: bold; } .model-select { padding: 5px; border-radius: 5px; border: 1px solid #ccc; } .input-box-container { display: flex; align-items: center; } .input-box { flex: 1; padding: 10px; border: 1px solid #ccc; border-radius: 5px; } .send-button, .clear-button, .stop-button { padding: 10px 20px; margin-left: 10px; color: white; border: none; border-radius: 5px; cursor: pointer; } .send-button { background-color: #007bff; } .send-button:hover { background-color: #0056b3; } .send-button:disabled { background-color: #a0c4ff; cursor: not-allowed; } .clear-button { background-color: #dc3545; } .clear-button:hover { background-color: #a71d2a; } .clear-button:disabled { background-color: #f5a6a6; cursor: not-allowed; } .stop-button { background-color: #ff9800; } .stop-button:hover { background-color: #e68900; }const chatContainer = document.getElementById('chatContainer'); const userInput = document.getElementById('userInput'); const modelSelect = document.getElementById('modelSelect'); const sendButton = document.getElementById('sendButton'); const clearButton = document.getElementById('clearButton'); let userId = '1'; let currentModel = modelSelect.value; let eventSource = null; function sendMessage() { let message = userInput.value.trim(); if (!message) return; appendMessage(message, 'user-message'); streamAIResponse(userId, message); userInput.value = ''; } function appendMessage(text, type) { const messageElement = document.createElement('div'); messageElement.classList.add('message', type); messageElement.textContent = text; chatContainer.appendChild(messageElement); chatContainer.scrollTop = chatContainer.scrollHeight; } function streamAIResponse(userId, message) { // 先终止可能存在的旧 eventSource if (eventSource) { eventSource.close(); } eventSource = new EventSource(`http://192.168.100.145:8081/ai/chatStreamWithMemory?userId=${encodeURIComponent(userId)}&message=${encodeURIComponent(message)}&model=${encodeURIComponent(currentModel)}`); let aiMessage = null; let thinkMode = false; let thinkMessage = null; eventSource.onmessage = event => { let response = event.data; if (response.includes('') && currentModel === 'deepseek-r1:latest') { thinkMode = true; response = response.replace('', ''); // 创建思考过程气泡 thinkMessage = document.createElement('div'); thinkMessage.classList.add('think-message'); thinkMessage.innerHTML = ` 折叠 思考过程: `; chatContainer.appendChild(thinkMessage); } if (thinkMode) { const thinkContent = thinkMessage.querySelector('.think-content'); if (response.includes('')) { response = response.replace('', ''); thinkMode = false; aiMessage = document.createElement('div'); aiMessage.classList.add('message', 'ai-message'); chatContainer.appendChild(aiMessage); } thinkContent.innerHTML += response; } else { if (!aiMessage) { aiMessage = document.createElement('div'); aiMessage.classList.add('message', 'ai-message'); chatContainer.appendChild(aiMessage); } aiMessage.textContent += response; } chatContainer.scrollTop = chatContainer.scrollHeight; }; eventSource.onerror = () => { eventSource.close(); toggleButtons(true); }; eventSource.onopen = () => { toggleButtons(false); }; eventSource.addEventListener("close", () => { toggleButtons(true); }); } function toggleButtons(enabled) { sendButton.disabled = !enabled; clearButton.disabled = !enabled; } function toggleThinkMessage(button) { const thinkMessage = button.closest('.think-message'); const thinkContent = thinkMessage.querySelector('.think-content'); if (thinkContent.style.display === 'none') { thinkContent.style.display = 'block'; button.textContent = '折叠'; } else { thinkContent.style.display = 'none'; button.textContent = '展开'; } } function stopAIResponse() { if (eventSource) { eventSource.close(); eventSource = null; } fetch(`http://192.168.100.145:8081/ai/stopChat?userId=${userId}`, { method: 'GET' }) .then(() => appendMessage('AI 回答已停止。', 'ai-message')) .catch(error => console.error(error)); } function clearMemory() { fetch(`http://192.168.100.145:8081/ai/clearMemory?userId=${userId}`, { method: 'GET' }) .then(() => appendMessage('上下文已清除。', 'ai-message')) .catch(error => console.error(error)); } function changeModel() { currentModel = modelSelect.value; let currentModelName = modelSelect.options[modelSelect.selectedIndex].text; appendMessage(`已切换模型为 ${currentModelName}`, 'ai-message'); } userInput.addEventListener('keypress', event => { if (event.key === 'Enter') { sendMessage(); } });选择模型: DeepSeek-R1(推理) Qwen发送 清除上下文 停止回答注意
直接用静态html文件访问后端项目接口会报错跨域,这里后端需要加一个配置类
com.neil.ai.config.CorsConfig
@Configuration
public class CorsConfig {
    @Bean
    public WebMvcConfigurer corsConfigurer() {
        return new WebMvcConfigurer() {
            @Override
            public void addCorsMappings(CorsRegistry registry) {
                registry.addMapping("/**") // 允许所有接口
                        .allowedOrigins("*") // 允许所有来源(包括 file://)
                        .allowedMethods("GET", "POST", "PUT", "DELETE", "OPTIONS")
                        .allowedHeaders("*")
                        .allowedOriginPatterns("*"); // 关键:允许 file://
            }
        };
    }
}
2.VUE2版
export default { data() { return { messages: [], userInput: '', currentModel: 'deepseek-r1:latest', userId: this.$store.state.user.id, eventSource: null, isSending: false }; }, methods: { sendMessage() { if (!this.userInput.trim() || this.isSending) return; // 禁止发送按钮在 AI 响应期间重复点击 this.messages.push({ text: this.userInput, type: 'user-message' }); this.streamAIResponse(this.userInput.trim()); this.userInput = ''; }, scrollToBottom() { this.$nextTick(() => { const chatContainer = this.$refs.chatContainer; if (chatContainer) { chatContainer.scrollTop = chatContainer.scrollHeight; } }); }, streamAIResponse(message) { if (this.eventSource) this.eventSource.close(); this.eventSource = new EventSource(`http://192.168.100.145:8081/ai/chatStreamWithMemory?userId=${this.userId}&message=${encodeURIComponent(message)}&model=${this.currentModel}`); this.isSending = true; // 开始发送,禁用按钮 let aiMessage = { text: '', type: 'ai-message' }; this.messages.push(aiMessage); this.$nextTick(() => this.scrollToBottom()); // 发送消息后立即滚动到底部 this.eventSource.onmessage = (event) => { aiMessage.text += event.data; this.$nextTick(() => this.scrollToBottom()); }; this.eventSource.onerror = () => { this.eventSource.close(); this.eventSource = null; this.isSending = false; // 发生错误,恢复按钮状态 }; this.eventSource.onend = () => { this.isSending = false; // 服务器正常结束流式输出,解锁发送按钮 }; }, stopAIResponse() { if (this.eventSource) { this.eventSource.close(); this.eventSource = null; } fetch(`http://192.168.100.145:8081/ai/stopChat?userId=${this.userId}`) .then(() => { this.messages.push({ text: 'AI 回答已停止。', type: 'ai-message' }); this.isSending = false; // 允许重新发送 this.$nextTick(() => this.scrollToBottom()); }) .catch(console.error); }, clearMemory() { fetch(`http://192.168.100.145:8081/ai/clearMemory?userId=${this.userId}`) .then(() => { this.messages.push({ text: '上下文已清除。', type: 'ai-message' }); this.isSending = false; // 清除后允许发送 this.$nextTick(() => this.scrollToBottom()); }) .catch(console.error); }, changeModel(event) { const modelName = event.target.options[event.target.selectedIndex].text; this.messages.push({ text: `已切换模型为 ${modelName}`, type: 'ai-message' }); this.$nextTick(() => this.scrollToBottom()); } } }; .container { display: flex; flex-direction: column; height: 90vh; max-width: 800px; width: 100%; margin: auto; } .chat-container { flex: 1; display: flex; flex-direction: column; background: white; border-radius: 10px; padding: 20px; box-shadow: 0 0 10px rgba(0, 0, 0, 0.1); overflow-y: auto; min-height: 0; } .message { padding: 10px 15px; border-radius: 15px; margin: 5px 0; max-width: 80%; word-wrap: break-word; } .user-message { background-color: #007bff; color: white; align-self: flex-end; } .ai-message { background-color: #e5e5e5; color: black; align-self: flex-start; } .input-container { display: flex; flex-direction: column; padding: 10px; background: white; box-shadow: 0 -2px 5px rgba(0, 0, 0, 0.1); } .model-container { display: flex; align-items: center; margin-bottom: 5px; } .model-label { margin-right: 10px; font-weight: bold; } .model-select { padding: 5px; border-radius: 5px; border: 1px solid #ccc; } .input-box-container { display: flex; align-items: center; } .input-box { flex: 1; padding: 10px; border: 1px solid #ccc; border-radius: 5px; } .send-button, .clear-button, .stop-button { padding: 10px 20px; margin-left: 10px; color: white; border: none; border-radius: 5px; cursor: pointer; } .send-button { background-color: #007bff; } .send-button:hover { background-color: #0056b3; } .send-button:disabled { background-color: #a0c4ff; cursor: not-allowed; } .clear-button { background-color: #dc3545; } .clear-button:hover { background-color: #a71d2a; } .stop-button { background-color: #ff9800; } .stop-button:hover { background-color: #e68900; }选择模型: DeepSeek-R1(推理) Qwen发送 清除上下文 停止回答VUE2版的区别主要是deepseek的推理过程的气泡样式没了,由于我前端不是很懂,所以没继续研究,效果如下

集成到若依就是建目录、放文件、加菜单,这里就不多讲述,可以参考:若依如何新建一个菜单并显示菜单页面(超详细图文教程)_若依添加菜单-CSDN博客
-
-
-
- 官网


