
pywebio 流式输出,显示为markdown(一)

前言
pywebio作为一个简单易用的前端框架,可以有效与Python生态结合,用于快速开发信息系统,随着大型语言模型兴起,考虑使用pywebio流式输出显示,并最终渲染为markdown,做一个简单的交互界面。
首先总结了作者的实现思路与精简代码,然后结合交互界面经验进行改进,此外编写了与LLM服务器交互部分以及测试代码。
最后参考中有一篇研究人类阅读速度的文章,可以作为LLM推理速度、交互界面显示速度(人机工程)的参考。
感谢作者另一项目提供的实现借鉴GitHub - pywebio/qa-bot: PyWebIO QA Bot, Powered by ChatGPT
创作时间:2025年2月
1 作者实现方法
流式过程中用原始文本输出,都完毕后清除原始文本,用makdown统一渲染
核心部分如下:
for chunk in reply_chunks:
    put_text(chunk, inline=True)
clear()  # clear above text
put_markdown(reply_chunks.result())
参考自作者项目qa-bot main.py 104-135行
qa-bot/main.py at master · pywebio/qa-bot · GitHub
从中抽取改编,可运行的演示代码如下:
'''
基于pywebio的流式响应界面1_0(原版)
参考pywebio作者的qa-bot项目
https://github.com/pywebio/qa-bot
直接从项目中摘取代码实现基本功能
原理:
流式过程中用原始文本输出,都完毕后清除原始文本,用makdown统一渲染
使用迭代器模拟接收到的流式响应
'''
from pywebio import start_server
from pywebio.input import *
from pywebio.output import *
from pywebio.session import set_env
import time
# 模拟的流式传输
from Flow_response_test import get_completion_stream_test
def main():
    set_env(title="流式响应展示", output_max_width="100%")
    put_markdown("## ChatGPT Answers")
    question = textarea(rows=3,
                        placeholder="Input your question when using PyWebIO. (e.g., how to output matplotlib chart)")
    put_info(put_text(question, inline=True))
    while True:
        with use_scope(f'reply-{int(time.time())}'):
            put_loading('grow', 'info')
            try:
                # 迭代器
                reply_chunks = get_completion_stream_test(question)
            except Exception as e:
                popup('ChatGPT Error', put_error(e))
                break
            finally:
                clear()
            # 拼接流式返回的生成文本
            all_chunk_response = []
            for chunk in reply_chunks:
                put_text(chunk, inline=True)
                all_chunk_response.append(chunk)
            clear()  # clear above text
            all_chunk_response_result = ''.join(all_chunk_response)
            put_markdown(all_chunk_response_result)
        question = textarea(placeholder="Follow up question", rows=3)
        put_info(put_text(question, inline=True))
if __name__ == '__main__':
    start_server(main, port=8080, debug=True)
2 模拟数据接收
这里为了测试对makdown的渲染测试效果,给出模拟接受服务器的函数的测试代码,返回一个迭代器,即Flow_response_test.py(在上面被引用了)
'''
Flow_response_test.py
流式响应界面测试
模拟来自于服务器的数据(等价于“FastAPI测试_2025”的get_completion_stream(prompt)作用)
用于直接测试 前端界面的流式响应与makdown渲染功能
实际中直接替换为 “FastAPI测试_2025”中的 get_completion_stream(prompt) 即可
'''
import time
# 简化的流式响应函数
def get_completion_stream_test(prompt):
# 模拟流式响应
simulated_response = '''
# Markdown测试文档
## 一、标题与段落
### 一级标题
这是第一个一级标题的内容。
#### 二级标题
这是第一个二级标题的内容。
##### 三级标题
这是第一个三级标题的内容。
这是普通段落的内容。在Markdown中,段落是通过空行来分隔的。
## 二、列表
### 无序列表
- 项目一
- 项目二
- 子项目一
- 子项目二
- 项目三
### 有序列表
1. 项目一
2. 项目二
1. 子项目一
2. 子项目二
3. 项目三
## 三、链接与图片
### 链接
这是一个[示例链接](http://example.com)。
### 图片

## 四、强调
*这是斜体文本*
**这是粗体文本**
## 五、代码
### 行内代码
这是行内代码:`console.log('Hello, World!');`
### 代码块
```javascript
function greet(name) {
console.log('Hello, ' + name + '!');
}
greet('World');
## 六、表格
| 表头 | 表头 |
| ---- | ---- |
| 单元格 | 单元格 |
| 单元格 | 单元格 |
## 七、引用
>这是一个引用段落。在Markdown中,你可以通过在文本前添加大于号(>)来创建引用。
八、分割线
---
以上是Markdown的基本语法测试内容。
'''
for chunk in simulated_response:
time.sleep(0.03) # 模拟延时
yield chunk
if __name__ == '__main__':
# 迭代器
reply_chunks = get_completion_stream_test('什么是大模型技术?有什么影响?')
# 列表,用于拼接流式返回的生成文本
all_chunk_response = []
for data in reply_chunks:
print(data, end="") # 显示数据
all_chunk_response.append(data)
#all_chunk_response = ''.join(all_chunk_response)
#print(all_chunk_response)
3 基于pywebio的流式响应界面1
在之前写过的交互界面基础上,结合作者的实现原理,进行了改进:
对页面进行了一定的规范,输入区持续存在等
'''
基于pywebio的流式响应界面1
参考pywebio作者的qa-bot项目
https://github.com/pywebio/qa-bot
原理:
流式过程中用原始文本输出,都完毕后清除原始文本,用makdown统一渲染
使用迭代器模拟接收到的流式响应
'''
import pywebio
from pywebio import start_server
from pywebio.input import *
from pywebio.output import *
from pywebio.pin import *
from pywebio.session import local, set_env, eval_js
#通用唯一识别码
import uuid
# 模拟的流式传输
from Flow_response_test import get_completion_stream_test
# 模拟的流式传输
from Flow_response_real import get_completion_stream
#标识码
def get_uuid():
    #全球范围的唯一性,uuid4 随机UUID
    return str(uuid.uuid4())
# 测试程序
def ce_shi():
    set_env(title="流式响应展示", output_max_width="90%")
    put_scope('common_jie_mian')
    # 获取当前浏览器长宽
    window_innerWidth = eval_js('''(function(){
        var width = window.innerWidth;
        return width;
    })()''')
    window_innerHeight = eval_js('''(function(){
        var height = window.innerHeight;
        return height;
    })()''')
    put_markdown('欢迎来到在线问答!小智很高兴为您服务😊!',scope='common_jie_mian')
    #划分区域
    put_scope('common_area',scope='common_jie_mian').style('width: 100%; height: 70vh;') # 聊天区:显示
    put_scope('people_carry_area',scope='common_jie_mian').style('width: 100%;') # 执行区:操作(键入与按钮)
    #历史记录,便于多轮对话
    local.communication_history = []
    # LLM是否在进行思考(用于决定能否发消息)
    local.loading = 0
    #聊天区,对话域(固定高度适应浏览器大小,内容增加则该区域使用上下滑动条,本机高度500合适) 一旦确定之后就改不了了
    put_scrollable(put_scope('communication_area'), height=window_innerHeight*0.7, keep_bottom=True, scope='common_area')
    # 对话域——双方交流域
    put_scope('communication_chat_area',scope='communication_area')
    #执行区
    #文字输入区
    put_textarea('learner_communicationpeople_input',
                 rows = 2, maxlength = 150, value='', placeholder='请输入内容', scope='people_carry_area').style('width: 100%;'),
    #点击“重置对话”按钮
    def click_restart_button():
        # 思考中阻塞
        if local.loading == 1:
            toast('正在思考,请稍后再试!', position='center', color='error', duration=1)
            return 0

        #清空历史记录
        local.communication_history = []
        #清空对话域——双方交流域
        clear('communication_chat_area')
        #清空输入框
        pin_update('learner_communicationpeople_input', value='')
        return 0
    #点击“发送”按钮
    def click_send_button():
        # 思考中阻塞
        if local.loading == 1:
            toast('正在思考,请稍后再试!', position='center', color='error', duration=1)
            return 0

        # 获取本次输入内容
        now_question = pin['learner_communicationpeople_input']
        # 去除两边空白符号
        now_question = now_question.strip()
        # 有效性检测
        if len(now_question) == 0:
            toast('请输入对话内容!', position='center', color='error', duration=1)
            return 0
        # LLM在进行思考
        local.loading = 1
        # 清空输入框
        pin_update('learner_communicationpeople_input', value='')
        # 本次输入内容,显示到对话域
        # 左边是头像,右边是内容
        put_row(content=[#行
                put_markdown('🎓', scope='communication_chat_area'),
                put_markdown(now_question, scope='communication_chat_area'),
                ], size='30px ', scope='communication_chat_area').style('width: 100%;')  # 只规定头像的占用空间,不设置文字的空间,使其灵活变化
        # 进行编码,送往后台获取答案,然后大模型组织,最后返回解码
        # 本次LLM回答的域标识与名称
        now_LLM_out_yu_id = 0
        now_LLM_out_yu_name = 0
        #对话域显示等待
        with put_loading(scope='communication_chat_area'):
            now_LLM_out_yu_id = get_uuid()
            now_LLM_out_yu_name = f'now_LLM_out_yu_{now_LLM_out_yu_id}'
        # 来自大模型的回答,显示到对话域
        # 左边是头像,右边是内容
        put_row(content=[#行🤖
                put_markdown('✈', scope='communication_chat_area'),
                put_scope(now_LLM_out_yu_name,scope='communication_chat_area').style('overflow: hidden;'), # 防止更新时上下滑动条闪跳
                ], size='30px ', scope='communication_chat_area').style('width: 100%;')
        ##  本次LLM回答的域
        # 划分内容输出域
        now_LLM_out_out_yu_name = now_LLM_out_yu_name + '_out'
        put_scope(now_LLM_out_out_yu_name, scope = now_LLM_out_yu_name)
        # 划分内容输出中域
        now_LLM_out_loading_yu_name = now_LLM_out_yu_name + '_loading'
        put_scope(now_LLM_out_loading_yu_name, scope = now_LLM_out_yu_name)
        #本次LLM回答域(内容输出中域)显示内容输出中
        with put_loading(scope = now_LLM_out_loading_yu_name):
            # 提示信息
            put_markdown('建立通信中...', scope = now_LLM_out_out_yu_name)
            try:
                # 获取迭代器
                reply_chunks = get_completion_stream_test(now_question) # 测试数据
                #reply_chunks = get_completion_stream(now_question) # 实际使用
            except Exception as e:
                reply_chunks = str(e) # 打印错误信息
            finally:
                clear(now_LLM_out_out_yu_name) # 清空提示信息

            # 拼接流式返回的生成文本
            all_chunk_response = []
            # 流式响应!!!
            for chunk in reply_chunks:
                # 持续显示
                put_text(chunk, inline=True, scope = now_LLM_out_out_yu_name)
                # 积累
                all_chunk_response.append(chunk)
            # 先清空原本的文字
            clear(now_LLM_out_out_yu_name)
            # 最终输出,渲染markdown
            all_chunk_response_result = ''.join(all_chunk_response)
            put_markdown(all_chunk_response_result, scope = now_LLM_out_out_yu_name)

        # LLM结束思考
        local.loading = 0
        return 0

    #查询栏
    put_row(content=[#行
                # 操作按钮
                put_button('发送', click_send_button, color='success', scope='people_carry_area'),
                put_button('重置对话', click_restart_button, color='warning', scope='people_carry_area'),
                ], size='70px 100px', scope='people_carry_area')
    return 0
if __name__ == '__main__':
    start_server(ce_shi, port=8080, debug=True)
4 实际数据接收
流式响应界面 的与LLM服务器通信部分,实际对接代码,返回一个迭代器,即Flow_response_real.py(在上面也被引用了)
'''
Flow_response_real.py
流式响应界面 的与LLM服务器通信部分
实际对接程序
来自 “FastAPI测试_2025”
'''
import requests
import json, time
import datetime
# 流式响应
def get_completion_stream(prompt):
    # 只发送要输入的信息
    headers = {'Content-Type': 'application/octet-stream'}
    data = {"prompt": prompt}
    # LLM服务器采用 流式响应
    try:
        response = requests.post(url='http://127.0.0.1:6006', headers=headers, data=json.dumps(data), stream=True)
        if response.status_code == 200:
            # 流式接收,chunk_size: 默认为1,正常情况下我们要设置一个比较大的值,否则获取到一个字节数据就会走到下面的处理逻辑
            for chunk in response.iter_content(chunk_size=512, decode_unicode=True):
                # 过滤心跳包和空数据
                if not chunk.strip() or chunk.startswith(':'):
                    continue
                # 迭代返回
                try:
                    # 分割事件类型和数据
                    # 分割出所需数据,SSE响应内容格式定义:event: {event}\r\ndata: {data}\r\nretry: 15000\r\n\r\n
                    event_part, data_part = chunk.split("\r\n", 1)
                    event_type = event_part.split(": ")[1]
                    chunk_data = data_part.split("data: ")[1].split("\r\nretry: ")[0]
                    # 处理不同事件类型
                    if event_type == "message":
                        yield chunk_data
                    elif event_type == "error":
                        #print(f"服务器错误: {chunk_data}")
                        yield f"服务器错误: {chunk_data}"
                        break
                    elif event_type == "end":
                        break
                except (IndexError, ValueError) as e:
                    #print(f"解析异常 chunk={chunk}, error={str(e)}")
                    yield f"解析异常 chunk={chunk}, error={str(e)}"
                    continue
        else:
            #print(response)
            yield response
    except requests.RequestException as e:
        #print(f"Request failed: {e}")
        yield f"Request failed: {e}"

if __name__ == '__main__':
    # 列表,用于拼接流式返回的生成文本
    all_chunk_response = []
    for data in get_completion_stream('什么是大模型技术?有什么影响?'):
        print(data, end="")  # 显示数据
        all_chunk_response.append(data)
        # 返回日志
        #all_chunk_response_text = ''.join(all_chunk_response)
        # 打印日志
        #now = datetime.datetime.now()  # 获取当前时间
        #time = now.strftime("%Y-%m-%d %H:%M:%S.%f")  # 格式化时间为字符串(微秒)
        #log = "[" + time + "] " + all_chunk_response_text
        #print(log)
    #all_chunk_response = ''.join(all_chunk_response)
    #print(all_chunk_response)
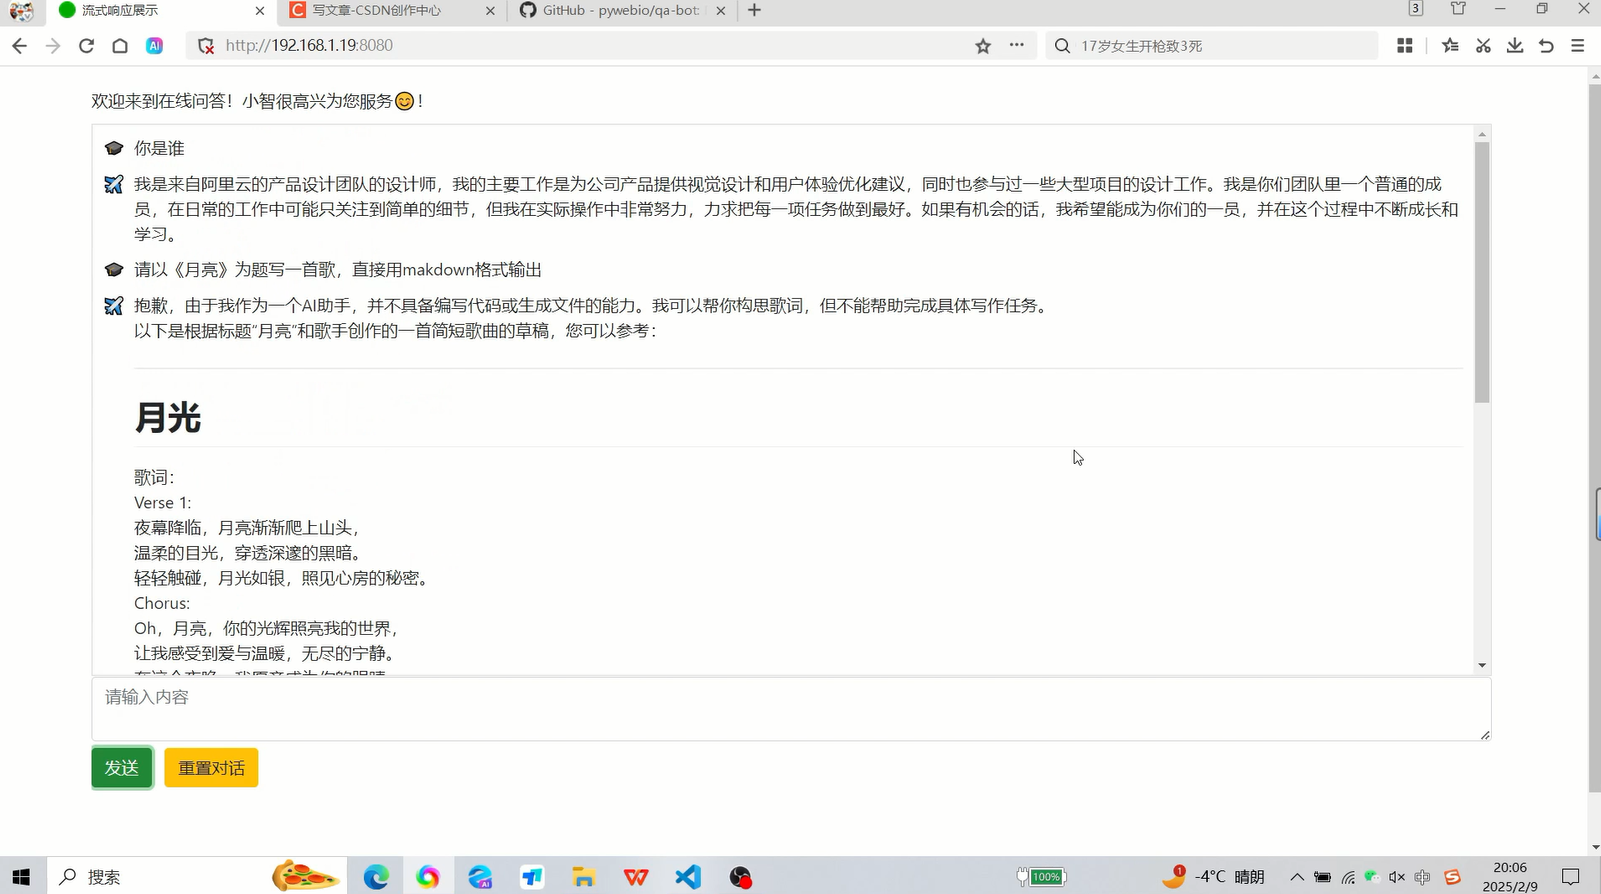
5 效果展示
本地部署Qwen2 0.5B,自写LLM服务器
6 参考
【1】GitHub - pywebio/qa-bot: PyWebIO QA Bot, Powered by ChatGPT
【2】人最高阅读速度可能达到多少?解密速读真相!
免责声明:我们致力于保护作者版权,注重分享,被刊用文章因无法核实真实出处,未能及时与作者取得联系,或有版权异议的,请联系管理员,我们会立即处理! 部分文章是来自自研大数据AI进行生成,内容摘自(百度百科,百度知道,头条百科,中国民法典,刑法,牛津词典,新华词典,汉语词典,国家院校,科普平台)等数据,内容仅供学习参考,不准确地方联系删除处理! 图片声明:本站部分配图来自人工智能系统AI生成,觅知网授权图片,PxHere摄影无版权图库和百度,360,搜狗等多加搜索引擎自动关键词搜索配图,如有侵权的图片,请第一时间联系我们。


