Spring AI 实现 STDIO和SSE MCP Server

Spring AI 实现 STDIO和SSE MCP Server
Java MCP 三层架构中,传输的方式有STDIO和SSE两种,如下图所示。

STDIO方式是基于进程间通信,MCP Client和MCP Server运行在同一主机,主要用于本地集成、命令行工具等场景。
SSE方式是基于HTTP协议,MCP Client远程调用MCP Server提供的SSE服务。实现客户端和服务端远程通信。
SSE Server
spring-ai-starter-mcp-server-webflux 基于WebFlux SSE 实现SSE Server。
org.springframework.ai
spring-ai-starter-mcp-server-webflux
MCP 服务端功能支持基于 Spring WebFlux 的 SSE(服务器发送事件)服务器传输和可选的 STDIO 传输。
1.新建Spring Boot项目
使用https://start.spring.io/新建项目,引入以下依赖。
	4.0.0

		org.springframework.boot
		spring-boot-starter-parent
		3.4.4


	com.mcp.example
	mcp-webflux-server-example
	0.0.1-SNAPSHOT
	mcp-webflux-server-example
	mcp-webflux-server-example


				org.springframework.ai
				spring-ai-bom
				1.0.0-SNAPSHOT
				pom
				import


			org.springframework.ai
			spring-ai-starter-mcp-server-webflux


			org.springframework.boot
			spring-boot-starter-test


				org.springframework.boot
				spring-boot-maven-plugin


			Central Portal Snapshots
			central-portal-snapshots
			https://central.sonatype.com/repository/maven-snapshots/

				false


				true


			spring-milestones
			Spring Milestones
			https://repo.spring.io/milestone

				false


			spring-snapshots
			Spring Snapshots
			https://repo.spring.io/snapshot

				false
2.application.yaml配置
spring:
  ai:
    mcp:
      server:
        name: webflux-mcp-server
        version: 1.0.0
        type: ASYNC  # Recommended for reactive applications
        sse-message-endpoint: /mcp/messages
定义MCP名称和版本号以及同步或异步配置。
3.定义工具类
@Service
public class DateTimeService {
    @Tool(description = "Get the current date and time in the user's timezone")
    String getCurrentDateTime() {
        return LocalDateTime.now().atZone(LocaleContextHolder.getTimeZone().toZoneId()).toString();
    }
    @Tool(description = "Set a user alarm for the given time, provided in ISO-8601 format")
     String setAlarm(String time) {
        LocalDateTime alarmTime = LocalDateTime.parse(time, DateTimeFormatter.ISO_DATE_TIME);
        return "Alarm set for " + alarmTime;
    }
}
定义二个工具:
1.获取当前日期和时间
2.设置提醒功能
4.暴露工具
@Configuration
public class McpWebFluxServiceExampleConfig {
    @Bean
    public ToolCallbackProvider dateTimeTools(DateTimeService dateTimeService) {
        return MethodToolCallbackProvider.builder().toolObjects(dateTimeService).build();
    }
}
5.启动MCP Server项目

启动项目发现注册的两个工具成功,可以端可以发现两个工具。到此MCP Server服务完成,SSE的端点路径:http://localhost:9090,接下来是客户端连接使用服务端提供的工具。
6.MCP Client连接MCP Server
1.新建Spring Boot项目,然后引入starter
            org.springframework.ai
            spring-ai-starter-mcp-client
完整pom.xml
    4.0.0

        org.springframework.boot
        spring-boot-starter-parent
        3.4.4


    com.mcp.example
    mcp-client-example
    0.0.1-SNAPSHOT
    mcp-client-example
    mcp-client-example


                org.springframework.ai
                spring-ai-bom
                1.0.0-SNAPSHOT
                pom
                import


            org.springframework.ai
            spring-ai-openai-spring-boot-starter
            1.0.0-SNAPSHOT


            org.springframework.boot
            spring-boot-starter-web


            org.springframework.ai
            spring-ai-starter-mcp-client


            org.springframework.boot
            spring-boot-starter-test


                org.springframework.boot
                spring-boot-maven-plugin


            Central Portal Snapshots
            central-portal-snapshots
            https://central.sonatype.com/repository/maven-snapshots/

                false


                true


            spring-milestones
            Spring Milestones
            https://repo.spring.io/milestone

                false


            spring-snapshots
            Spring Snapshots
            https://repo.spring.io/snapshot

                false
2.配置
spring:
  ai:
    openai:
      api-key: 你自己密钥
      base-url: https://api.siliconflow.cn
      chat:
        options:
          model: Qwen/Qwen2.5-72B-Instruct
    mcp:
      client:
        sse:
          connections:
            server1:
              url: http://localhost:9090
        toolcallback:
          enabled: true
server:
  port: 9091
配置文件内容,大模型配置方便测试工具使用,mcp服务端设置就是mcp server提供的sse端点。
toolcalback.enable=true 自动注入Spring AI ToolCallbackProvider。
3.测试
package com.mcp.example.mcpclientexample;
import io.modelcontextprotocol.client.McpAsyncClient;
import jakarta.annotation.Resource;
import org.springframework.ai.chat.client.ChatClient;
import org.springframework.ai.mcp.SyncMcpToolCallbackProvider;
import org.springframework.ai.tool.ToolCallback;
import org.springframework.ai.tool.ToolCallbackProvider;
import org.springframework.beans.factory.annotation.Autowired;
import org.springframework.boot.CommandLineRunner;
import org.springframework.boot.SpringApplication;
import org.springframework.boot.autoconfigure.SpringBootApplication;
import java.util.Arrays;
import java.util.List;
@SpringBootApplication
public class McpClientExampleApplication implements CommandLineRunner {
    @Resource
    private ToolCallbackProvider tools;
    @Resource
    ChatClient.Builder chatClientBuilder;
    public static void main(String[] args) {
        SpringApplication.run(McpClientExampleApplication.class, args);
    }
    @Override
    public void run(String... args) throws Exception {
        var chatClient = chatClientBuilder
                .defaultTools(tools)
                .build();
        String content = chatClient.prompt("10分钟后,设置一个闹铃。").call().content();
        System.out.println(content);
        String content1 = chatClient.prompt("明天星期几?").call().content();
        System.out.println(content1);
    }
}
运行客户端项目:
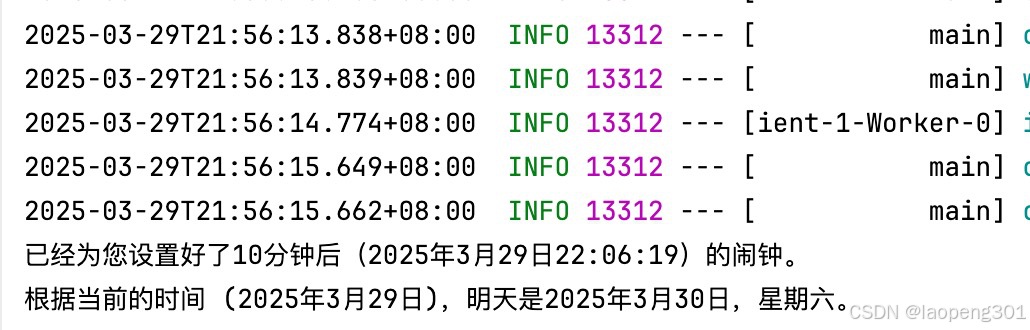
结果表明定义的工具大模型根据用户的提问,选择了合适的工具进行回答。
STDIO Server
标准 MCP 服务器,通过 STDIO 服务器传输支持完整的 MCP 服务器功能。
    org.springframework.ai
    spring-ai-starter-mcp-server
1.创建Server项目
新建Spring Boot项目引入以下依赖
	4.0.0

		org.springframework.boot
		spring-boot-starter-parent
		3.4.4


	com.mcp.example
	mcp-stdio-server-example
	0.0.1-SNAPSHOT
	mcp-stdio-server-example
	mcp-stdio-server-example


				org.springframework.ai
				spring-ai-bom
				1.0.0-SNAPSHOT
				pom
				import


			org.springframework.ai
			spring-ai-starter-mcp-server


				org.springframework.boot
				spring-boot-maven-plugin


			Central Portal Snapshots
			central-portal-snapshots
			https://central.sonatype.com/repository/maven-snapshots/

				false


				true


			spring-milestones
			Spring Milestones
			https://repo.spring.io/milestone

				false


			spring-snapshots
			Spring Snapshots
			https://repo.spring.io/snapshot

				false
配置文件application.yaml
spring:
  ai:
    mcp:
      server:
        name: stdio-mcp-server
        version: 1.0.0
        stdio: true
  main:
    banner-mode: off
    web-application-type: none
logging:
  pattern:
    console:
server:
  port: 9090
main:
banner-mode: off
web-application-type: none 这个配置非常关键,否则client与server通信会提示json解析有问题。这个必须关掉。
2.新建工具
与sse server一样,新建DateTimeTool并注册。
3.打包项目
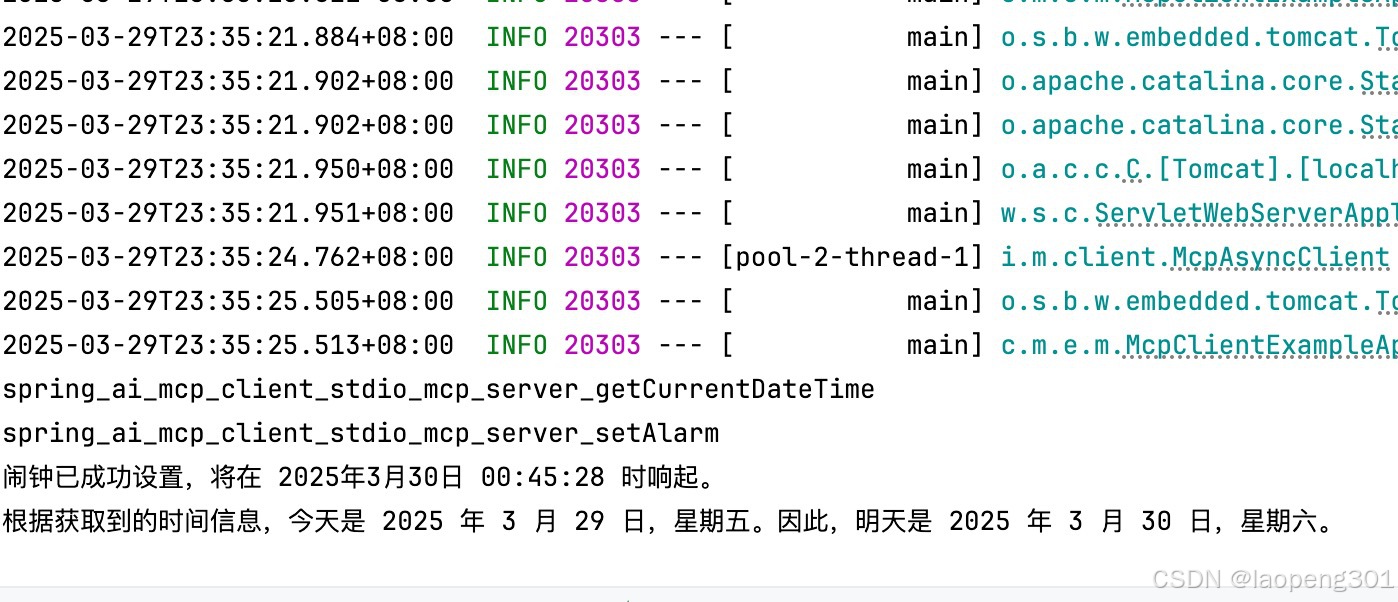
STDIO方式server和client之间是进程间通信,所以需要把server打包成jar,以便client命令启动执行,或者三方客户端命令启动执行。将server jar放到一个指定目录,如下所示:
target/mcp-stdio-server-example.jar
4.创建client项目
直接使用上面sse server使用的 Clinet,修改对应配置文件application.yaml和新建mcp-server配置json。
mcp-servers-config.json。
{
  "mcpServers": {
    "stdio-mcp-server": {
      "command": "java",
      "args": [
        "-Dspring.ai.mcp.server.stdio=true",
        "-Dspring.main.web-application-type=none",
        "-jar",
        "mcp server正确的路径 ../mcp-stdio-server-example-0.0.1-SNAPSHOT.jar"
      ],
      "env": {}
    }
  }
}
application.yaml
spring:
  ai:
    openai:
      api-key: sk-qwkegvacbfpsctyhfgakxlwfnklinwjunjyfmonnxddmcixr
      base-url: https://api.siliconflow.cn
      chat:
        options:
          model: Qwen/Qwen2.5-72B-Instruct
    mcp:
      client:
#        sse:
#          connections:
#            server1:
#              url: http://localhost:9090
         stdio:
           root-change-notification: false
           servers-configuration: classpath:/mcp-servers-config.json
         toolcallback:
          enabled: true
server:
  port: 9091
5.启动客户端