
【HarmonyOS Next之旅】基于ArkTS开发(三) -> 兼容JS的类Web开发(四) -> 常见组件(二) -> swiper

目录
1 -> 创建Swiper组件
2 -> 添加属性
3 -> 设置样式
4 -> 绑定事件
5 -> 场景示例

1 -> 创建Swiper组件
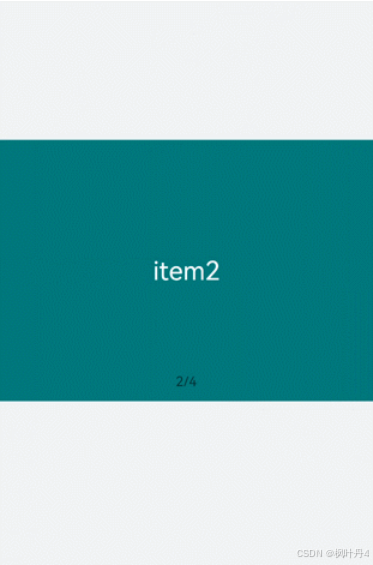
在pages/index目录下的hml文件中创建一个Swiper组件。
      item1


      item2


      item3
/* test.css */
.container{
  width: 100%;
  height: 100%;
  flex-direction: column;
  background-color: #F1F3F5;
  align-items: center;
  justify-content: center;
  width: 100%;
}
swiper{
  height: 30%;
}
.item{
  width: 100%;
  height: 500px;
}
text{
  width: 100%;
  height: 100%;
  text-align: center;
  font-size: 50px;
  color: white;
}

说明
Swiper组件支持除之外的子组件。
2 -> 添加属性
Swiper组件当不开启循环播放(loop="false")时添加自动播放属性(autoplay),设置自动播放时播放时间间隔(interval),页面会自动切换并停留在最后一个子组件页面。添加digital属性启用数字导航点,设置切换时为渐隐滑动效果(scrolleffect="fade")。
      item1


      item2


      item3


      item4
/* test.css */
.container{
  width: 100%;
  height: 100%;
  flex-direction: column;
  background-color: #F1F3F5;
  align-items: center;
  justify-content: center;
}
swiper{
  height: 30%;
}
.item{
  width: 100%;
  height: 500px;
}
text{
  width: 100%;
  height: 100%;
  text-align: center;
  font-size: 50px;
  color: white;
}
说明
-
设置indicator(是否启用导航点指示器)属性为true时digital(是否启用数字导航点)属性才会生效。
-
Swiper子组件的个数大于等于2时设置的loop属性才会生效。
-
scrolleffect属性仅在loop属性值为false时生效。
3 -> 设置样式
设置Swiper组件的宽高,导航点指示器的直径大小(indicator-size)、颜色(indicator-color)、相对位置(ndicator-top)及选中时的颜色(indicator-selected-color)。
      item1


      item2


      item3
/* test.css */ .container{ width: 100%; height: 100%; flex-direction: column; background-color: #F1F3F5; align-items: center; justify-content: center; } swiper{ width: 500px; height: 500px; border-radius: 250px; indicator-color: white; indicator-selected-color: blue; indicator-size: 40px; indicator-top: 100px; overflow: hidden ; } .item{ width: 100%; height: 500px; } text{ width: 100%; text-align: center; margin-top: 150px; font-size: 50px; color: white; }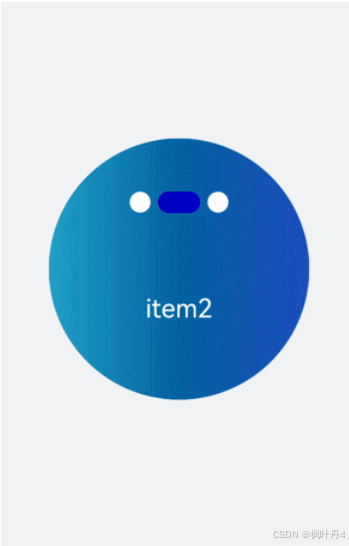
4 -> 绑定事件
创建两个text组件添加点击事件,当点击后就调用showPrevious(显示上一个子组件)或showNext(显示下一个子组件)方法。添加select组件下拉选择时触发change事件后调用swiperTo方法跳转到指定轮播页面。Swiper组件绑定change(当前显示的组件索引变化时触发)和finish(切换动画结束时触发)事件。
      item1


      item2


      item3


      item4


      Previous

          swipeTo 1
          swipeTo 2
          swipeTo 3
          swipeTo 4

    Next
/* test.css */ .container{ width: 100%; height: 100%; flex-direction: column; background-color: #F1F3F5; align-items: center; justify-content: center; } swiper{ height: 30%; } .item{ width: 100%; height: 500px; } text{ width: 100%; height: 100%; text-align: center; font-size: 50px; color: white; } select{ background-color: white; width: 250px; height: 80px; } .content{ margin-top: 100px; justify-content: space-around; } .pnbtn{ width: 200px; height: 80px; font-size: 30px; }import prompt from '@system.prompt'; export default{ change(e){ prompt.showToast({duration:2000,message:"current index:"+e.index}); }, finish(){ prompt.showToast({duration:2000,message:"切换动作结束"}); }, selectChange(e){ this.$element('swiper').swipeTo({index: Number(e.newValue)}); }, previous(){ this.$element('swiper').showPrevious(); }, next(){ this.$element('swiper').showNext(); } }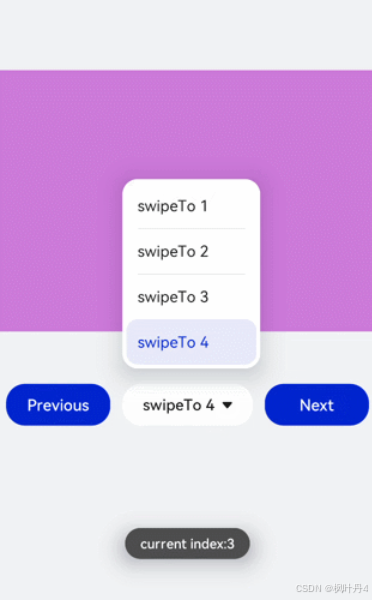
5 -> 场景示例
本场景中使用Swiper创建一个轮播图,在轮播图底部制作一个缩略图,点击缩略图后调用swipeTo方法切换到对应的轮播图。
免责声明:我们致力于保护作者版权,注重分享,被刊用文章因无法核实真实出处,未能及时与作者取得联系,或有版权异议的,请联系管理员,我们会立即处理! 部分文章是来自自研大数据AI进行生成,内容摘自(百度百科,百度知道,头条百科,中国民法典,刑法,牛津词典,新华词典,汉语词典,国家院校,科普平台)等数据,内容仅供学习参考,不准确地方联系删除处理! 图片声明:本站部分配图来自人工智能系统AI生成,觅知网授权图片,PxHere摄影无版权图库和百度,360,搜狗等多加搜索引擎自动关键词搜索配图,如有侵权的图片,请第一时间联系我们。


