
Ollama+open-webui搭建私有本地大模型详细教程

Ollama+open-webui搭建私有本地大模型详细教程
1. 什么是 Ollama?
1.1. Ollama 简介
Ollama 是一个轻量级的 AI 模型运行时,专注于简化 AI 模型的部署和使用。它支持多种预训练模型(如 Llama、Vicuna、Dolly 等),并且可以在本地运行,无需复杂的基础设施。Ollama 的设计理念是让 AI 模型的使用变得像运行普通程序一样简单,同时确保数据和隐私的安全性。
Ollama 正在不断优化和扩展,未来会支持更多模型类型、更高效的性能优化,以及更友好的用户界面。Ollama的目标是成为 AI 模型部署领域的标准工具,让更多人能够轻松使用 AI 技术。
1.2. 核心特点
-
轻量化:Ollama 的资源占用非常低,适合在本地或小型服务器上运行,即使硬件配置有限也能流畅使用。
-
多模型支持:支持多种主流的预训练模型,用户可以根据需求选择适合的模型。
-
本地运行:所有模型和数据完全在本地运行,无需上传到云端,保护用户隐私。
-
易于部署:安装和启动流程简单,支持 Docker 和二进制文件部署,适合不同环境。
-
交互式使用:提供命令行工具,用户可以通过简单的命令与模型交互,快速获取结果。
-
隐私保护:模型和数据完全在本地运行,无需上传到云端。
1.3. 应用场景
- 个人开发者:快速测试和实验 AI 模型,无需复杂的环境配置。
- 企业用户:在本地运行 AI 模型,确保数据安全,同时满足业务需求。
2. Ollama安装与部署
ollama官方网站:https://ollama.com
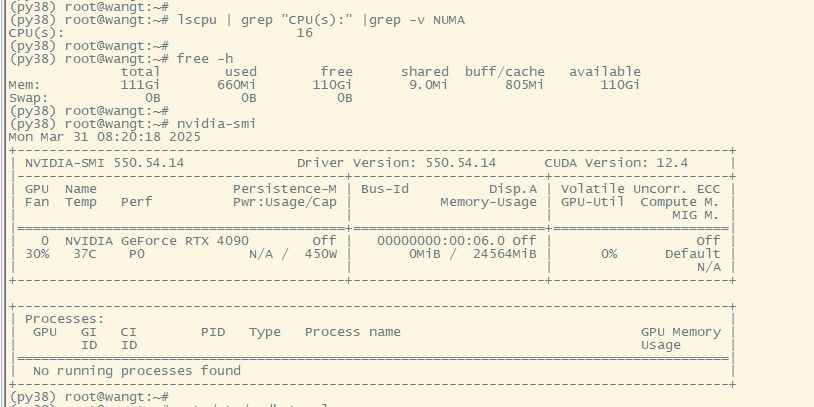
服务器资源准备(GPU服务器)
以实验环境,操作环境为 ubuntu20.04,显卡RTX 4090,配置16C/128G
2.1. 使用官方提供的安装方式(推荐)
官方推荐方式
(py38) root@wangt:~# mkdir ollama
(py38) root@wangt:~# cd ollama/
(py38) root@wangt:~# curl -fsSL https://ollama.com/install.sh | sh
# 等待安装结束即可,非常简单(执行过程中下载安装包比较耗时)
# 更改服务默认端口(可选)
(py38) root@wangt:~/ollama# vim /etc/systemd/system/ollama.service
[Unit]
Description=Ollama Service
After=network-online.target
[Service]
ExecStart=/usr/local/bin/ollama serve
User=ollama
Group=ollama
Restart=always
RestartSec=3
Environment="PATH=/usr/local/cuda-11.8/bin:/root/miniconda3/envs/py38/bin:/root/miniconda3/condabin:/usr/local/sbin:/usr/local/bin:/usr/sbin:/usr/bin:/sbin:/bin:/snap/bin"
Environment="OLLAMA_HOST=0.0.0.0:8890"
[Install]
WantedBy=default.target
Environment=“OLLAMA_HOST=0.0.0.0:8890”
可以自定义端口,和访问控制,0.0.0.0表示任何网段和环境均可进行访问,8890表示用8890端口启动,不加则默认为11434
(py38) root@wangt:~/ollama# systemctl daemon-reload
(py38) root@wangt:~/ollama# systemctl restart ollama
(py38) root@wangt:~/ollama# netstat -tnlpu|grep 8890
tcp6       0      0 :::8890                 :::*                    LISTEN      3073/ollama
2.2. 手动安装详细介绍(备选项)
官方提供的安装方式,仅适合网络下载速度较快的情况,否则安装容易失败,因为下载包速度慢,很可能下载失败导致脚本运行异常,如果上面安装总是不成功,以下提供下载包手动安装的方式
# 下载安装包可以用梯子下载,传到服务器(windows下载后上传服务器)
(py38) root@wangt:~/ollama# wget https://gh-proxy.com/github.com/ollama/ollama/releases/latest/download/ollama-linux-amd64.tgz
# 拉取脚本但不执行
(py38) root@wangt:~# curl -fsSL https://ollama.com/install.sh > install.sh
(py38) root@wangt:~/ollama# chmod +x install.sh
(py38) root@wangt:~/ollama# vim install.sh
需要将脚本中原本下载安装包的相关内容注释,并把tar命令修改到正确位置
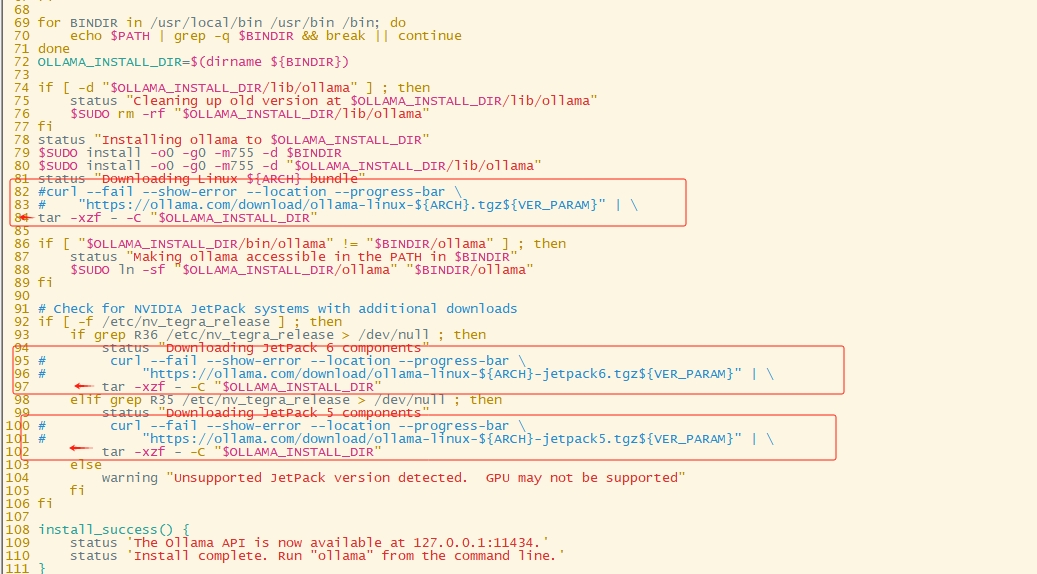
如果担心脚本改错,可以直接复制下面已经改好的脚本内容
#!/bin/sh
# This script installs Ollama on Linux.
# It detects the current operating system architecture and installs the appropriate version of Ollama.
set -eu
red="$( (/usr/bin/tput bold || :; /usr/bin/tput setaf 1 || :) 2>&-)"
plain="$( (/usr/bin/tput sgr0 || :) 2>&-)"
status() { echo ">>> $*" >&2; }
error() { echo "${red}ERROR:${plain} $*"; exit 1; }
warning() { echo "${red}WARNING:${plain} $*"; }
TEMP_DIR=$(mktemp -d)
cleanup() { rm -rf $TEMP_DIR; }
trap cleanup EXIT
available() { command -v $1 >/dev/null; }
require() {
    local MISSING=''
    for TOOL in $*; do
        if ! available $TOOL; then
            MISSING="$MISSING $TOOL"
        fi
    done
    echo $MISSING
}
[ "$(uname -s)" = "Linux" ] || error 'This script is intended to run on Linux only.'
ARCH=$(uname -m)
case "$ARCH" in
    x86_64) ARCH="amd64" ;;
    aarch64|arm64) ARCH="arm64" ;;
    *) error "Unsupported architecture: $ARCH" ;;
esac
IS_WSL2=false
KERN=$(uname -r)
case "$KERN" in
    *icrosoft*WSL2 | *icrosoft*wsl2) IS_WSL2=true;;
    *icrosoft) error "Microsoft WSL1 is not currently supported. Please use WSL2 with 'wsl --set-version  2'" ;;
    *) ;;
esac
VER_PARAM="${OLLAMA_VERSION:+?version=$OLLAMA_VERSION}"
SUDO=
if [ "$(id -u)" -ne 0 ]; then
    # Running as root, no need for sudo
    if ! available sudo; then
        error "This script requires superuser permissions. Please re-run as root."
    fi
    SUDO="sudo"
fi
NEEDS=$(require curl awk grep sed tee xargs)
if [ -n "$NEEDS" ]; then
    status "ERROR: The following tools are required but missing:"
    for NEED in $NEEDS; do
        echo "  - $NEED"
    done
    exit 1
fi
for BINDIR in /usr/local/bin /usr/bin /bin; do
    echo $PATH | grep -q $BINDIR && break || continue
done
OLLAMA_INSTALL_DIR=$(dirname ${BINDIR})
if [ -d "$OLLAMA_INSTALL_DIR/lib/ollama" ] ; then
    status "Cleaning up old version at $OLLAMA_INSTALL_DIR/lib/ollama"
    $SUDO rm -rf "$OLLAMA_INSTALL_DIR/lib/ollama"
fi
status "Installing ollama to $OLLAMA_INSTALL_DIR"
$SUDO install -o0 -g0 -m755 -d $BINDIR
$SUDO install -o0 -g0 -m755 -d "$OLLAMA_INSTALL_DIR/lib/ollama"
status "Downloading Linux ${ARCH} bundle"
#curl --fail --show-error --location --progress-bar \
#    "https://ollama.com/download/ollama-linux-${ARCH}.tgz${VER_PARAM}" | \
tar -xzf /root/ollama/ollama-linux-amd64.tgz -C "$OLLAMA_INSTALL_DIR"
if [ "$OLLAMA_INSTALL_DIR/bin/ollama" != "$BINDIR/ollama" ] ; then
    status "Making ollama accessible in the PATH in $BINDIR"
    $SUDO ln -sf "$OLLAMA_INSTALL_DIR/ollama" "$BINDIR/ollama"
fi
# Check for NVIDIA JetPack systems with additional downloads
if [ -f /etc/nv_tegra_release ] ; then
    if grep R36 /etc/nv_tegra_release > /dev/null ; then
        status "Downloading JetPack 6 components"
        #curl --fail --show-error --location --progress-bar \
        #    "https://ollama.com/download/ollama-linux-${ARCH}-jetpack6.tgz${VER_PARAM}" | \
        tar -xzf /root/ollama/ollama-linux-amd64.tgz -C "$OLLAMA_INSTALL_DIR"
    elif grep R35 /etc/nv_tegra_release > /dev/null ; then
        status "Downloading JetPack 5 components"
        #curl --fail --show-error --location --progress-bar \
        #    "https://ollama.com/download/ollama-linux-${ARCH}-jetpack5.tgz${VER_PARAM}" | \
        tar -xzf /root/ollama/ollama-linux-amd64.tgz -C "$OLLAMA_INSTALL_DIR"
    else
        warning "Unsupported JetPack version detected.  GPU may not be supported"
    fi
fi
install_success() {
    status 'The Ollama API is now available at 127.0.0.1:11434.'
    status 'Install complete. Run "ollama" from the command line.'
}
trap install_success EXIT
# Everything from this point onwards is optional.
configure_systemd() {
    if ! id ollama >/dev/null 2>&1; then
        status "Creating ollama user..."
        $SUDO useradd -r -s /bin/false -U -m -d /usr/share/ollama ollama
    fi
    if getent group render >/dev/null 2>&1; then
        status "Adding ollama user to render group..."
        $SUDO usermod -a -G render ollama
    fi
    if getent group video >/dev/null 2>&1; then
        status "Adding ollama user to video group..."
        $SUDO usermod -a -G video ollama
    fi
    status "Adding current user to ollama group..."
    $SUDO usermod -a -G ollama $(whoami)
    status "Creating ollama systemd service..."
    cat  $SUDO systemctl restart ollama; }
            trap start_service EXIT
            ;;
        *)
            warning "systemd is not running"
            if [ "$IS_WSL2" = true ]; then
                warning "see https://learn.microsoft.com/en-us/windows/wsl/systemd#how-to-enable-systemd to enable it"
            fi
            ;;
    esac
}
if available systemctl; then
    configure_systemd
fi
# WSL2 only supports GPUs via nvidia passthrough
# so check for nvidia-smi to determine if GPU is available
if [ "$IS_WSL2" = true ]; then
    if available nvidia-smi && [ -n "$(nvidia-smi | grep -o "CUDA Version: [0-9]*\.[0-9]*")" ]; then
        status "Nvidia GPU detected."
    fi
    install_success
    exit 0
fi
# Don't attempt to install drivers on Jetson systems
if [ -f /etc/nv_tegra_release ] ; then
    status "NVIDIA JetPack ready."
    install_success
    exit 0
fi
# Install GPU dependencies on Linux
if ! available lspci && ! available lshw; then
    warning "Unable to detect NVIDIA/AMD GPU. Install lspci or lshw to automatically detect and install GPU dependencies."
    exit 0
fi
check_gpu() {
    # Look for devices based on vendor ID for NVIDIA and AMD
    case $1 in
        lspci)
            case $2 in
                nvidia) available lspci && lspci -d '10de:' | grep -q 'NVIDIA' || return 1 ;;
                amdgpu) available lspci && lspci -d '1002:' | grep -q 'AMD' || return 1 ;;
            esac ;;
        lshw)
            case $2 in
                nvidia) available lshw && $SUDO lshw -c display -numeric -disable network | grep -q 'vendor: .* \[10DE\]' || return 1 ;;
                amdgpu) available lshw && $SUDO lshw -c display -numeric -disable network | grep -q 'vendor: .* \[1002\]' || return 1 ;;
            esac ;;
        nvidia-smi) available nvidia-smi || return 1 ;;
    esac
}
if check_gpu nvidia-smi; then
    status "NVIDIA GPU installed."
    exit 0
fi
if ! check_gpu lspci nvidia && ! check_gpu lshw nvidia && ! check_gpu lspci amdgpu && ! check_gpu lshw amdgpu; then
    install_success
    warning "No NVIDIA/AMD GPU detected. Ollama will run in CPU-only mode."
    exit 0
fi
if check_gpu lspci amdgpu || check_gpu lshw amdgpu; then
    status "Downloading Linux ROCm ${ARCH} bundle"
    #curl --fail --show-error --location --progress-bar \
    #    "https://ollama.com/download/ollama-linux-${ARCH}-rocm.tgz${VER_PARAM}" | \
    tar -xzf /root/ollama/ollama-linux-amd64.tgz -C "$OLLAMA_INSTALL_DIR"
    install_success
    status "AMD GPU ready."
    exit 0
fi
CUDA_REPO_ERR_MSG="NVIDIA GPU detected, but your OS and Architecture are not supported by NVIDIA.  Please install the CUDA driver manually https://docs.nvidia.com/cuda/cuda-installation-guide-linux/"
# ref: https://docs.nvidia.com/cuda/cuda-installation-guide-linux/index.html#rhel-7-centos-7
# ref: https://docs.nvidia.com/cuda/cuda-installation-guide-linux/index.html#rhel-8-rocky-8
# ref: https://docs.nvidia.com/cuda/cuda-installation-guide-linux/index.html#rhel-9-rocky-9
# ref: https://docs.nvidia.com/cuda/cuda-installation-guide-linux/index.html#fedora
install_cuda_driver_yum() {
    status 'Installing NVIDIA repository...'

    case $PACKAGE_MANAGER in
        yum)
            $SUDO $PACKAGE_MANAGER -y install yum-utils
            if curl -I --silent --fail --location "https://developer.download.nvidia.com/compute/cuda/repos/$1$2/$(uname -m | sed -e 's/aarch64/sbsa/')/cuda-$1$2.repo" /dev/null ; then
                $SUDO $PACKAGE_MANAGER-config-manager --add-repo https://developer.download.nvidia.com/compute/cuda/repos/$1$2/$(uname -m | sed -e 's/aarch64/sbsa/')/cuda-$1$2.repo
            else
                error $CUDA_REPO_ERR_MSG
            fi
            ;;
        dnf)
            if curl -I --silent --fail --location "https://developer.download.nvidia.com/compute/cuda/repos/$1$2/$(uname -m | sed -e 's/aarch64/sbsa/')/cuda-$1$2.repo" >/dev/null ; then
                $SUDO $PACKAGE_MANAGER config-manager --add-repo https://developer.download.nvidia.com/compute/cuda/repos/$1$2/$(uname -m | sed -e 's/aarch64/sbsa/')/cuda-$1$2.repo
            else
                error $CUDA_REPO_ERR_MSG
            fi
            ;;
    esac
    case $1 in
        rhel)
            status 'Installing EPEL repository...'
            # EPEL is required for third-party dependencies such as dkms and libvdpau
            $SUDO $PACKAGE_MANAGER -y install https://dl.fedoraproject.org/pub/epel/epel-release-latest-$2.noarch.rpm || true
            ;;
    esac
    status 'Installing CUDA driver...'
    if [ "$1" = 'centos' ] || [ "$1$2" = 'rhel7' ]; then
        $SUDO $PACKAGE_MANAGER -y install nvidia-driver-latest-dkms
    fi
    $SUDO $PACKAGE_MANAGER -y install cuda-drivers
}
# ref: https://docs.nvidia.com/cuda/cuda-installation-guide-linux/index.html#ubuntu
# ref: https://docs.nvidia.com/cuda/cuda-installation-guide-linux/index.html#debian
install_cuda_driver_apt() {
    status 'Installing NVIDIA repository...'
    if curl -I --silent --fail --location "https://developer.download.nvidia.com/compute/cuda/repos/$1$2/$(uname -m | sed -e 's/aarch64/sbsa/')/cuda-keyring_1.1-1_all.deb" >/dev/null ; then
        curl -fsSL -o $TEMP_DIR/cuda-keyring.deb https://developer.download.nvidia.com/compute/cuda/repos/$1$2/$(uname -m | sed -e 's/aarch64/sbsa/')/cuda-keyring_1.1-1_all.deb
    else
        error $CUDA_REPO_ERR_MSG
    fi
    case $1 in
        debian)
            status 'Enabling contrib sources...'
            $SUDO sed 's/main/contrib/'  /dev/null
            if [ -f "/etc/apt/sources.list.d/debian.sources" ]; then
                $SUDO sed 's/main/contrib/'  /dev/null
            fi
            ;;
    esac
    status 'Installing CUDA driver...'
    $SUDO dpkg -i $TEMP_DIR/cuda-keyring.deb
    $SUDO apt-get update
    [ -n "$SUDO" ] && SUDO_E="$SUDO -E" || SUDO_E=
    DEBIAN_FRONTEND=noninteractive $SUDO_E apt-get -y install cuda-drivers -q
}
if [ ! -f "/etc/os-release" ]; then
    error "Unknown distribution. Skipping CUDA installation."
fi
. /etc/os-release
OS_NAME=$ID
OS_VERSION=$VERSION_ID
PACKAGE_MANAGER=
for PACKAGE_MANAGER in dnf yum apt-get; do
    if available $PACKAGE_MANAGER; then
        break
    fi
done
if [ -z "$PACKAGE_MANAGER" ]; then
    error "Unknown package manager. Skipping CUDA installation."
fi
if ! check_gpu nvidia-smi || [ -z "$(nvidia-smi | grep -o "CUDA Version: [0-9]*\.[0-9]*")" ]; then
    case $OS_NAME in
        centos|rhel) install_cuda_driver_yum 'rhel' $(echo $OS_VERSION | cut -d '.' -f 1) ;;
        rocky) install_cuda_driver_yum 'rhel' $(echo $OS_VERSION | cut -c1) ;;
        fedora) [ $OS_VERSION -lt '39' ] && install_cuda_driver_yum $OS_NAME $OS_VERSION || install_cuda_driver_yum $OS_NAME '39';;
        amzn) install_cuda_driver_yum 'fedora' '37' ;;
        debian) install_cuda_driver_apt $OS_NAME $OS_VERSION ;;
        ubuntu) install_cuda_driver_apt $OS_NAME $(echo $OS_VERSION | sed 's/\.//') ;;
        *) exit ;;
    esac
fi
if ! lsmod | grep -q nvidia || ! lsmod | grep -q nvidia_uvm; then
    KERNEL_RELEASE="$(uname -r)"
    case $OS_NAME in
        rocky) $SUDO $PACKAGE_MANAGER -y install kernel-devel kernel-headers ;;
        centos|rhel|amzn) $SUDO $PACKAGE_MANAGER -y install kernel-devel-$KERNEL_RELEASE kernel-headers-$KERNEL_RELEASE ;;
        fedora) $SUDO $PACKAGE_MANAGER -y install kernel-devel-$KERNEL_RELEASE ;;
        debian|ubuntu) $SUDO apt-get -y install linux-headers-$KERNEL_RELEASE ;;
        *) exit ;;
    esac
    NVIDIA_CUDA_VERSION=$($SUDO dkms status | awk -F: '/added/ { print $1 }')
    if [ -n "$NVIDIA_CUDA_VERSION" ]; then
        $SUDO dkms install $NVIDIA_CUDA_VERSION
    fi
    if lsmod | grep -q nouveau; then
        status 'Reboot to complete NVIDIA CUDA driver install.'
        exit 0
    fi
    $SUDO modprobe nvidia
    $SUDO modprobe nvidia_uvm
fi
# make sure the NVIDIA modules are loaded on boot with nvidia-persistenced
if available nvidia-persistenced; then
    $SUDO touch /etc/modules-load.d/nvidia.conf
    MODULES="nvidia nvidia-uvm"
    for MODULE in $MODULES; do
        if ! grep -qxF "$MODULE" /etc/modules-load.d/nvidia.conf; then
            echo "$MODULE" | $SUDO tee -a /etc/modules-load.d/nvidia.conf > /dev/null
        fi
    done
fi
status "NVIDIA GPU ready."
install_success
保存并执行安装脚本
(py38) root@wangt:~/ollama# bash install.sh
# 等待安装结束
(py38) root@wangt:~/ollama# vim /etc/systemd/system/ollama.service
[Unit]
Description=Ollama Service
After=network-online.target
[Service]
ExecStart=/usr/local/bin/ollama serve
User=ollama
Group=ollama
Restart=always
RestartSec=3
Environment="PATH=/usr/local/cuda-11.8/bin:/root/miniconda3/envs/py38/bin:/root/miniconda3/condabin:/usr/local/sbin:/usr/local/bin:/usr/sbin:/usr/bin:/sbin:/bin:/snap/bin"
Environment="OLLAMA_HOST=0.0.0.0:8890"
[Install]
WantedBy=default.target
(py38) root@wangt:~/ollama# systemctl daemon-reload
(py38) root@wangt:~/ollama# systemctl restart ollama
(py38) root@wangt:~/ollama# netstat -tnlpu|grep 8890
tcp6       0      0 :::8890                 :::*                    LISTEN      3073/ollama
2.3. 其它容器安装方式(备选项)
实验环境也可以考虑使用docker安装,不会干扰本地环境,但使用异常排查问题时相对麻烦一些,docker运行需要有NVIDIA显卡支持,需要配置
-
拉取 Ollama 镜像
docker pull ollama/ollama:latest
-
启动 Ollama 容器
docker run -d --name ollama -p 11434:11434 ollama/ollama:latest
-
验证安装
curl http://localhost:11434/
3. 使用和维护Ollama
3.1 基础维护命令
-
启动服务
systemctl start ollama
-
停止服务
systemctl stop ollama
-
查看服务状态
systemctl status ollama
(py38) root@wangt:~/ollama# curl 127.0.0.1:8890
Ollama is running
-
查看版本信息
root@wangt:~/ollama# ollama --version
ollama version is 0.6.2
- 模型存储路径
root@wangt:~# ll /usr/share/ollama/.ollama/models/
total 16
drwxr-xr-x 4 ollama ollama 4096 Apr  1 03:17 ./
drwxr-xr-x 3 ollama ollama 4096 Apr  1 02:58 ../
drwxr-xr-x 2 ollama ollama 4096 Apr  1 04:40 blobs/
drwxr-xr-x 3 ollama ollama 4096 Apr  1 03:17 manifests/
3.2 模型管理命令
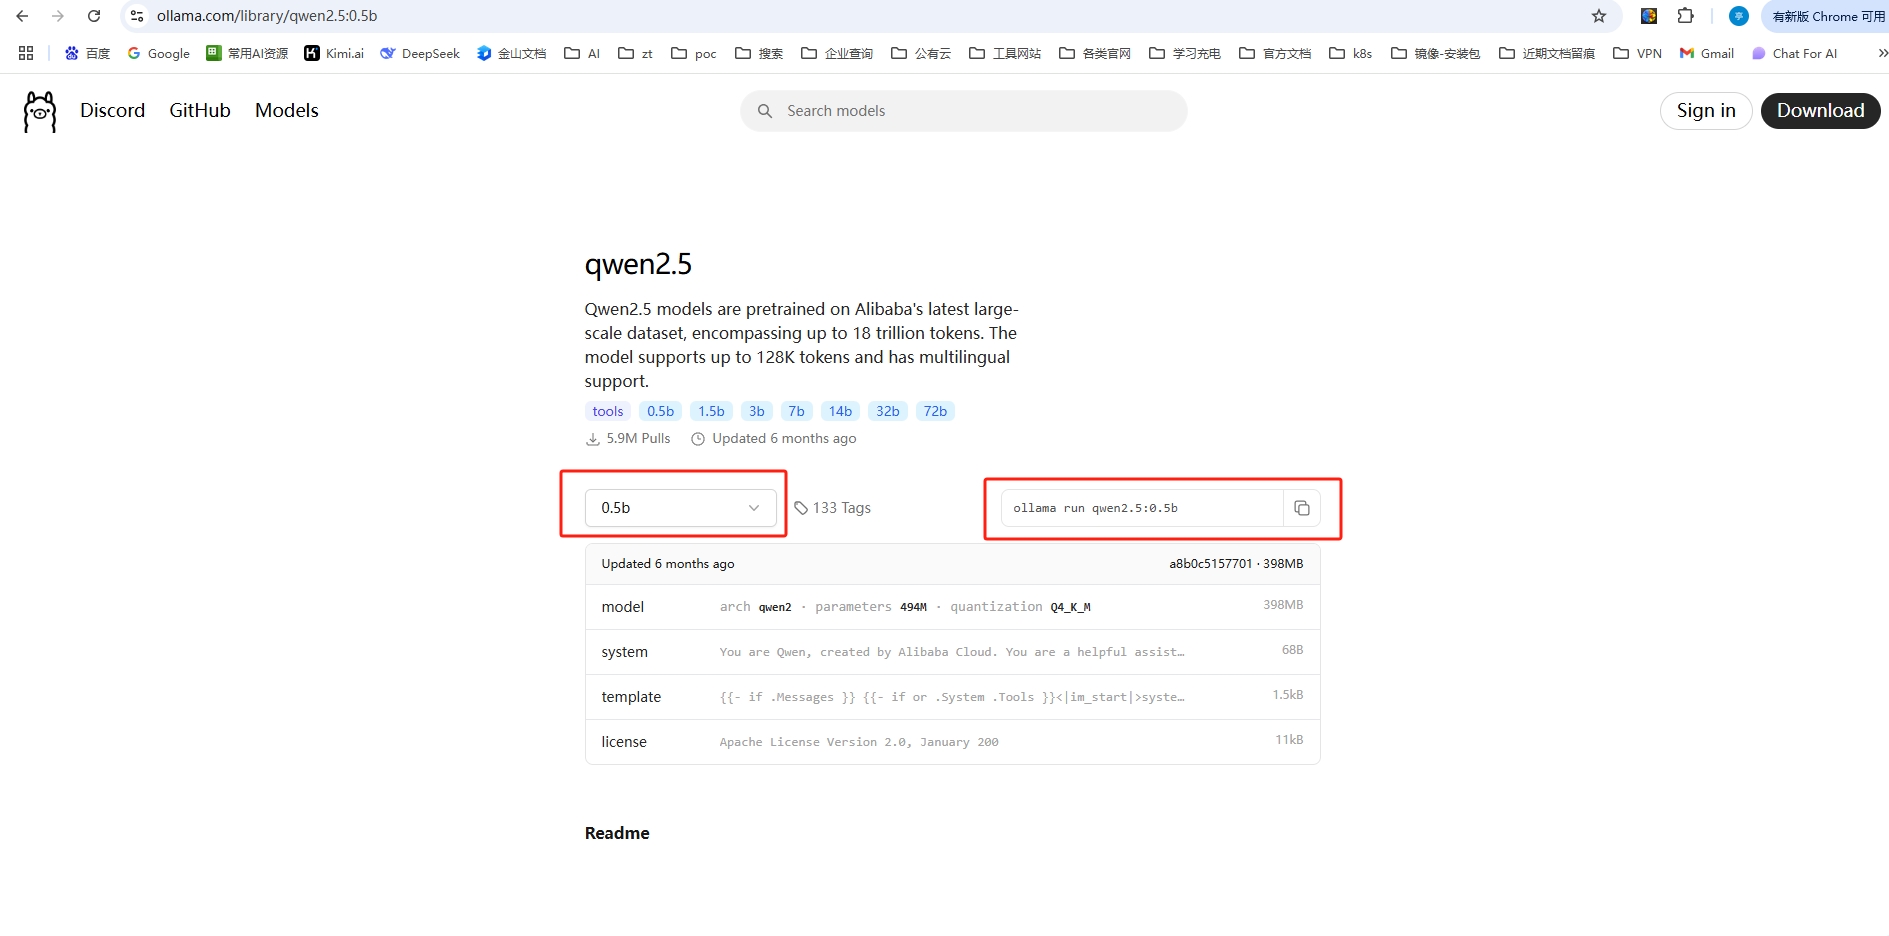
ollama官方模型仓库地址:https://ollama.com/library
3.2.1 运行模型
在官方模型仓库,找到自己想要的模型进入,根据自己用途情况,选择参数量后,复制右边的运行命令即可,类似于docker的使用方式
root@wangt:~/ollama# OLLAMA_HOST=127.0.0.1:8890 ollama run qwen2.5:0.5b
pulling manifest
pulling c5396e06af29... 100%
verifying sha256 digest
writing manifest
success
# 尝试体验,问出问题
>>> 现在股票市场,创业板一共有多少家上市公司?
目前,创业板在A股市场上共设有50家公司。这个数目已经随着市场的变动而有所调整。如果您需要最新的资讯和详细信息,请留意财经新闻、官方网站或其他官方渠道以获取最准确的信息。不过,一般来说,创业板的规模较大,通常与市值相对较高的公司有关,其上市公司的数量较多,
因为它们往往是具有较高知名度和技术实力的企业。
>>> Send a message (/? for help)
安装完成会进入到模型交互界面,直接可以和离线模型进行交互提问,使用命令/?,可以查看操作清单
>>> /?
Available Commands:
  /set            Set session variables
  /show           Show model information
  /load    Load a session or model
  /save    Save your current session
  /clear          Clear session context
  /bye            Exit
  /?, /help       Help for a command
  /? shortcuts    Help for keyboard shortcuts
Use """ to begin a multi-line message.
>>> /bye
root@wangt:~/ollama#
-
根据自己需要,可以去下载多个需要使用到的模型,例如再下载安装一个deepseek-r1
-
当ollama run运行的模型,会先检查本地model,本地已经存在时,不会重新拉取,直接运行
root@wangt:~/ollama# OLLAMA_HOST=127.0.0.1:8890 ollama run deepseek-r1:7b
pulling manifest
pulling 96c415656d37... 100%
verifying sha256 digest
writing manifest
success
>>> 你是什么模型?
我是一个AI助手,由中国的深度求索(DeepSeek)公司独立开发,我清楚自己的身份与局限,会始终秉持专业和诚实的态度帮助用户。
>>> /bye
3.2.2 列出可用模型
root@wangt:~/ollama# OLLAMA_HOST=127.0.0.1:8890 ollama list
NAME              ID              SIZE      MODIFIED
deepseek-r1:7b    0a8c26691023    4.7 GB    2 minutes ago
qwen2.5:0.5b      a8b0c5157701    397 MB    21 minutes ago
也可以通过接口的方式查看:
root@wangt:~/ollama# curl http://localhost:8890/api/tags
{
  "models": [
    {
      "name": "deepseek-r1:7b",
      "model": "deepseek-r1:7b",
      "modified_at": "2025-04-01T03:35:42.956003391Z",
      "size": 4683075271,
      "digest": "0a8c266910232fd3291e71e5ba1e058cc5af9d411192cf88b6d30e92b6e73163",
      "details": {
        "parent_model": "",
        "format": "gguf",
        "family": "qwen2",
        "families": [
          "qwen2"
        ],
        "parameter_size": "7.6B",
        "quantization_level": "Q4_K_M"
      }
    },
    {
      "name": "qwen2.5:0.5b",
      "model": "qwen2.5:0.5b",
      "modified_at": "2025-04-01T03:17:35.053991433Z",
      "size": 397821319,
      "digest": "a8b0c51577010a279d933d14c2a8ab4b268079d44c5c8830c0a93900f1827c67",
      "details": {
        "parent_model": "",
        "format": "gguf",
        "family": "qwen2",
        "families": [
          "qwen2"
        ],
        "parameter_size": "494.03M",
        "quantization_level": "Q4_K_M"
      }
    }
  ]
}
3.2.3 模型管理
- 查看模型信息
root@wangt:~/ollama# OLLAMA_HOST=127.0.0.1:8890 ollama show qwen2.5:0.5b Model architecture qwen2 parameters 494.03M context length 32768 embedding length 896 quantization Q4_K_M System You are Qwen, created by Alibaba Cloud. You are a helpful assistant. License Apache License Version 2.0, January 2004- 下载模型
root@wangt:~/ollama# OLLAMA_HOST=127.0.0.1:8890 ollama pull deepseek-r1:14b
使用到这里,命令总是加OLLAMA_HOST参数并不是很方便,我们可以增加alias,来简化命令
root@wangt:~/ollama# alias ollama='OLLAMA_HOST=127.0.0.1:8890 ollama'
root@wangt:~/ollama# ollama list
NAME               ID              SIZE      MODIFIED
deepseek-r1:14b    ea35dfe18182    9.0 GB    25 minutes ago
deepseek-r1:7b     0a8c26691023    4.7 GB    58 minutes ago
qwen2.5:0.5b       a8b0c5157701    397 MB    About an hour ago
- 删除模型
root@wangt:~/ollama# ollama rm qwen2.5:0.5b
deleted 'qwen2.5:0.5b'
root@wangt:~/ollama# ollama list
NAME               ID              SIZE      MODIFIED
deepseek-r1:14b    ea35dfe18182    9.0 GB    32 minutes ago
deepseek-r1:7b     0a8c26691023    4.7 GB    About an hour ago
- 模型复制拷贝
root@wangt:~/ollama# ollama cp deepseek-r1:14b deepseek-r1_bak20250401:14b
copied 'deepseek-r1:14b' to 'deepseek-r1_bak20250401:14b'
root@wangt:~/ollama# ollama list
NAME                           ID              SIZE      MODIFIED
deepseek-r1_bak20250401:14b    ea35dfe18182    9.0 GB    5 seconds ago
deepseek-r1:14b                ea35dfe18182    9.0 GB    37 minutes ago
deepseek-r1:7b                 0a8c26691023    4.7 GB    About an hour ago
- 列出正在运行的模型
# 运行一个model
root@wangt:~# ollama run deepseek-r1:14b
>>> Send a message (/? for help)
# 另起一个会话窗口查看
root@wangt:~# ollama ps
NAME               ID              SIZE     PROCESSOR    UNTIL
deepseek-r1:14b    ea35dfe18182    11 GB    100% GPU     3 minutes from now
- 非交互式查询大模型
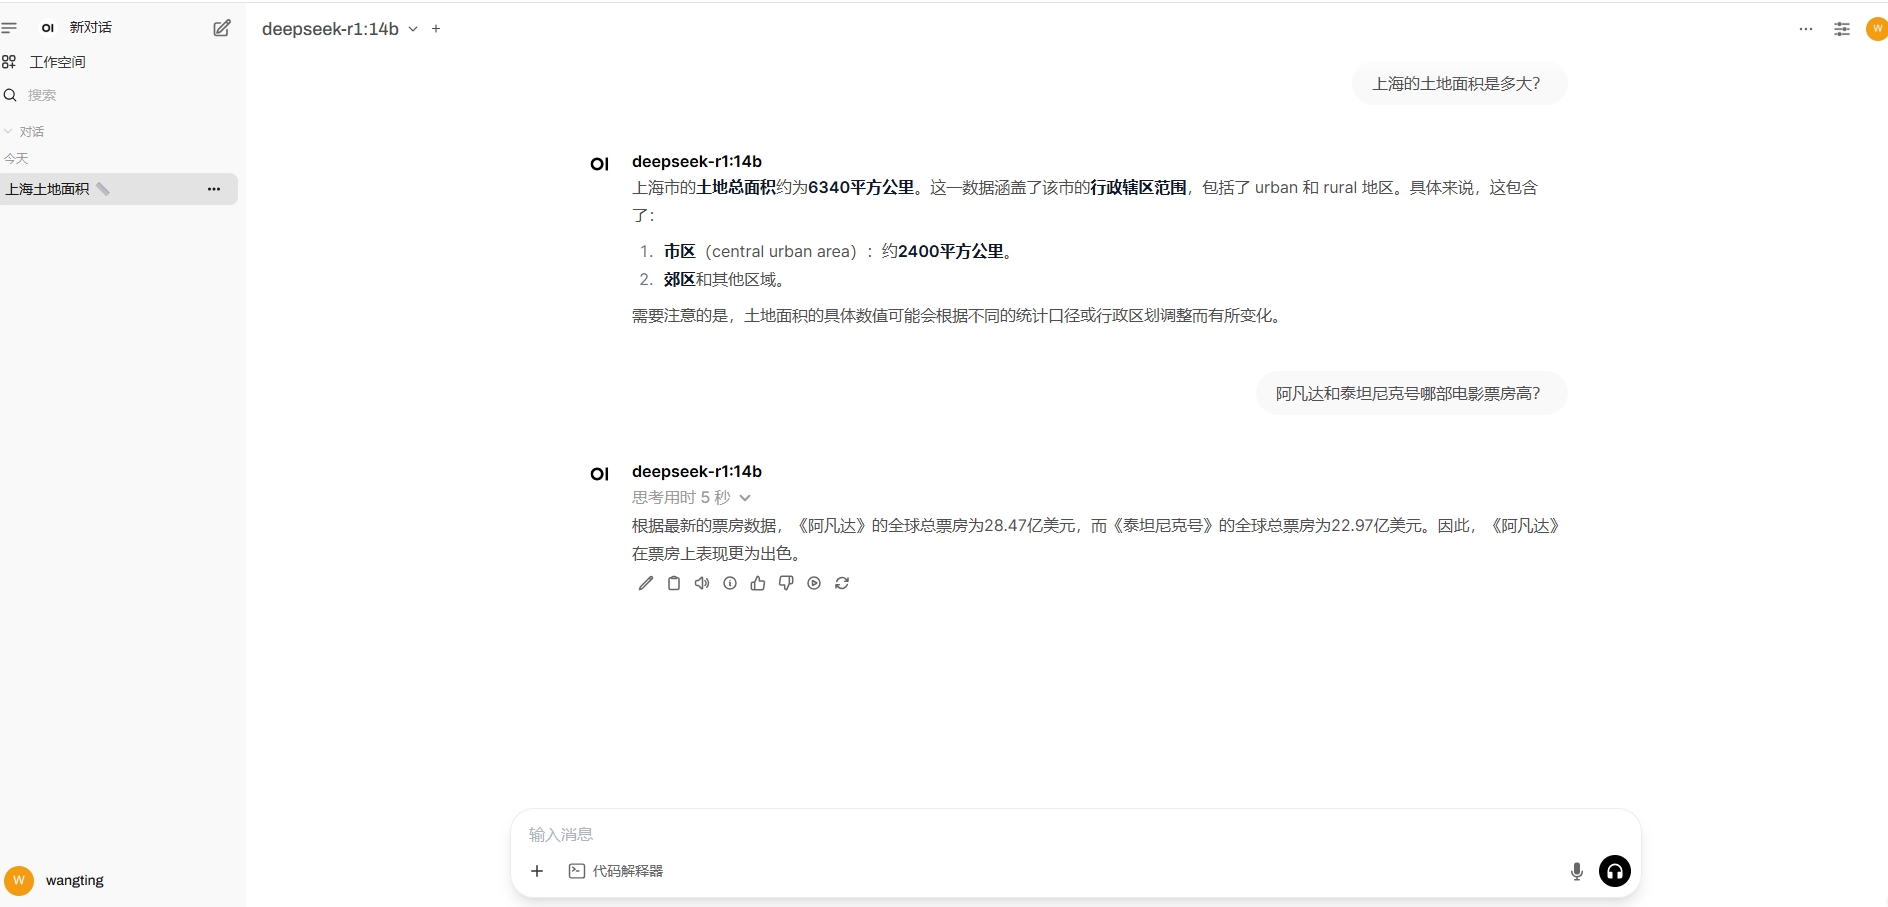
root@wangt:~/ollama# echo "上海的土地面积是多大?" | ollama run deepseek-r1:14b
上海市的市域总面积约为6340平方公里。
root@wangt:~/ollama#
3.2.4 通过调接口方式查询ollama大模型
# 格式如下
curl -X POST http://localhost:8890/api/generate -d '{
  "model": "deepseek-r1:14b",
  "prompt": "上海的土地面积是多大?",
  "stream": false
}'
# 返回
{"model":"deepseek-r1:14b","created_at":"2025-04-01T06:14:56.00815753Z","response":"\u003cthink\u003e\n\n\u003c/think\u003e\n\n截至2023年,上海市的**土地总面积**约为**6,340平方公里**。这一数据包括了市辖区、郊县等区域的土地面积。具体来说:\n\n- **市区**(包括黄浦、静安、长宁、徐汇、杨浦、虹口、普陀、闸北、浦东新区等区)面积较小,约为**500平方公里**。\n- **郊区和远郊地区**面积较大,约占总面积的绝大部分。\n\n需要注意的是,上海市的土地利用情况复杂,包括建设用地、农用地、生态保护区等多种类型。如果您需要更详细的数据或具体区域的面积信息,可以参考当地统计局或自然资源部门发布的官方资料。","done":true,"done_reason":"stop","context":[151644,100633,109633,100210,20412,42140,26288,11319,151645,151648,271,151649,271,102219,17,15,17,18,7948,3837,105425,9370,334,101962,111603,334,107679,334,21,11,18,19,15,107231,334,1773,100147,20074,100630,34187,22697,103022,5373,103074,24342,49567,101065,109633,100210,1773,100398,99883,48443,12,3070,105587,334,9909,100630,99789,101465,5373,99541,50285,5373,45861,99503,5373,101957,99833,5373,101058,101465,5373,101522,39426,5373,99537,103441,5373,107964,48309,5373,112407,104879,49567,23836,7552,100210,109413,3837,107679,334,20,15,15,107231,334,8997,12,3070,117074,33108,99427,103074,100361,334,100210,104590,3837,115085,111603,9370,113604,3407,107916,100146,3837,105425,109633,100152,99559,102181,3837,100630,115138,5373,99288,102763,5373,100171,113891,107860,31905,1773,106870,85106,33126,100700,105918,57191,100398,101065,9370,100210,27369,3837,73670,101275,100198,112997,57191,110130,99667,105645,100777,101111,1773],"total_duration":2058396882,"load_duration":16299691,"prompt_eval_count":10,"prompt_eval_duration":13808729,"eval_count":150,"eval_duration":2027756646}
3.3 加载自定义模型(按需使用场景)
如果有需要加载一些自定义的模型,操作方式如下
-
其它途径下载的模型文件
将模型文件(如 .bin 或 .gguf 格式)下载到本地。
-
加载模型
ollama create --file
4. 界面化操作-Ollama WebUI
4.1 安装Open WebUI
(原 Ollama WebUI)
- docker方式部署
docker run -d -p 8891:8080 -e OLLAMA_BASE_URL=http://140.210.92.250:8890 -v open-webui:/app/backend/data --name ollama-web --restart always ghcr.io/open-webui/open-webui:main
注意:
- -p 8891:8080 ,表示web-ui通过8891端口进行访问,本容器则表示ui地址:http://140.210.92.250:8891
- OLLAMA_API_BASE_URL=http://140.210.92.250:8890,这里需要改成自己的ollama服务地址
4.2 使用Open WebUI
第一次登录,需要注册,且这个注册账号为管理员,注册完成后登录即可

截止到这里,相当于一个离线的大模型+web-ui查询的整个环境就算完成了,选择一个模型,尝试使用一下。
只要本地资源充足,可以通过ollama下载更大的模型进行使用
- docker方式部署
-
- 非交互式查询大模型
- 列出正在运行的模型
- 模型复制拷贝
- 删除模型
- 下载模型
- 查看模型信息
-
- 模型存储路径
-
-


