
Spring AI Ollama + Spring AI MCP实现MCP案例(Web应用)

MCP介绍
直接看官网就行:MCP中文简介 – MCP 中文站(Model Context Protocol 中文)
首先要知道的概念就是:
- Mcp Client:mcp客户端,负责与mcp server建立一对一连接,可以获取到mcp server暴露的工具或者资源等,是维护mcp协议的核心组件
- Mcp Server:mcp服务端,可以理解为专门干活的服务,以标准的模型上下文协议暴露工具(tools)或者资源(resource)
- transport:mcp client和mcp server通信的桥梁
好了,你已经精通MCP了,开始码。
首先明确两端的依赖和版本,这个很重要,目前实测下来webflux方式的server实现存在明显的bug(虽然官方推荐生产环境使用webflux的方式实现),例如mcp client跟mcp server建立连接时就会报错404(这个可以通过重写McpAutoConfigration的自动配置方法来实现,不过比较麻烦),或者其他的问题。
版本
Spring AI版本:1.0.0-SNAPSHOT快照版本 >>> 也就是最新版,跟随官方团队脚步的更新开发。
JDK版本:JDK 21
模型:qwen3:8b (ollama 安装[官网:Ollama,直接download安装即可]后ollama run qwen3:8b就会自动拉取模型并运行,模型大小5.1G,选他是因为他是支持Tool Call的模型)
项目结构和依赖
项目结构:
ai(Mcp Client端)和ai-mcp(Mcp Server端)两个服务
Mcp Client端依赖:
            UTF-8
            1.0.0-SNAPSHOT


            org.springframework.ai
            spring-ai-starter-model-ollama
            ${spring-ai.version}


            org.springframework.ai
            spring-ai-starter-mcp-client


            spring-milestones
            Spring Milestones
            https://repo.spring.io/milestone

                false


            spring-snapshots
            Spring Snapshots
            https://repo.spring.io/snapshot

                false


            Central Portal Snapshots
            central-portal-snapshots
            https://central.sonatype.com/repository/maven-snapshots/

                false


                true


                    org.springframework.ai
                    spring-ai-bom
                    1.0.0-SNAPSHOT
                    pom
                    import
Mcp Server端依赖:
        UTF-8
        1.0.0-SNAPSHOT


            org.springframework.ai
            spring-ai-starter-mcp-server-webmvc
            ${spring-ai.version}


            com.hankcs
            hanlp
            portable-1.8.3


            org.apache.commons
            commons-lang3
            3.12.0


                org.springframework.boot
                spring-boot-maven-plugin


            spring-milestones
            Spring Milestones
            https://repo.spring.io/milestone

                false


            spring-snapshots
            Spring Snapshots
            https://repo.spring.io/snapshot

                false


            Central Portal Snapshots
            central-portal-snapshots
            https://central.sonatype.com/repository/maven-snapshots/

                false


                true


                org.springframework.ai
                spring-ai-bom
                1.0.0-SNAPSHOT
                pom
                import
以上是两端依赖和mvn部分必要配置。
Mcp Server端实现:
1、创建一个工具服务类WhetherServer.class
我这里以获取天气为例,但是也可以自己改成其他的。和风天气官网:城市天气 | 和风天气开发服务
package tb.mcp.service.service.mcp;
import cn.hutool.http.HttpUtil;
import com.fasterxml.jackson.databind.JsonNode;
import com.fasterxml.jackson.databind.ObjectMapper;
import net.sourceforge.pinyin4j.PinyinHelper;
import net.sourceforge.pinyin4j.format.HanyuPinyinCaseType;
import net.sourceforge.pinyin4j.format.HanyuPinyinOutputFormat;
import net.sourceforge.pinyin4j.format.HanyuPinyinToneType;
import net.sourceforge.pinyin4j.format.exception.BadHanyuPinyinOutputFormatCombination;
import org.slf4j.Logger;
import org.slf4j.LoggerFactory;
import org.springframework.ai.tool.annotation.Tool;
import org.springframework.ai.tool.annotation.ToolParam;
import org.springframework.stereotype.Service;
import tb.common.result.R;
@Service
public class WhetherServer {
    private static final Logger log = LoggerFactory.getLogger(WhetherServer.class);
    /**
     * 获取指定城市天气的工具
     *
     * @param cityName
     * @return
     */
    @Tool(description = "获取指定城市的天气",returnDirect = true)
    public R getWhether(@ToolParam(description = "城市名称,例如:北京、武汉、上海...") String cityName) {
        log.info("调用获取天气接口");
        R whether = heFengWhether.getWhether(cityName);
        return whether;
    }
    /**
     * 和风天气实现
     */
    static class heFengWhether {
        // TODO 临时数据
        private static final String API_KEY = "xxxxxxxxxac948e9808xxxxxxxc";
        private static final String API_HOST = "xxxxxxx.re.qweatherapi.com";
        /**
         * 获取城市天气
         *
         * @param name
         * @return
         */
        static R getWhether(String name) {
            String id = getGeoWithName(name);
            String url = "https://" + API_HOST + "/v7/weather/now?location=" + id + "&key=" + API_KEY;
            String response = HttpUtil.get(url);
            return R.success(response);
        }
        /**
         * 获取位置id
         *
         * @param name
         * @return
         */
        static String getGeoWithName(String name) {
            String pinyinName = toPinyin(name);
            // 构建和风天气地址
            String url = "https://" + API_HOST + "/geo/v2/city/lookup?location=" + pinyinName + "&key=" + API_KEY;
            String response = HttpUtil.get(url);
            ObjectMapper objectMapper = new ObjectMapper();
            try {
                // 1. 将JSON字符串解析为JsonNode
                JsonNode rootNode = objectMapper.readTree(response);
                // 2. 获取location数组
                JsonNode locationArray = rootNode.path("location");
                // 3. 检查数组是否存在且非空
                if (locationArray.isArray() && locationArray.size() > 0) {
                    // 4. 获取第一个元素
                    JsonNode firstLocation = locationArray.get(0);
                    // 5. 提取id字段
                    String id = firstLocation.path("id").asText();
                    System.out.println("第一个location的id: " + id); // 输出: 101010100
                    return id;
                } else {
                    System.out.println("location数组为空或不存在");
                }
            } catch (Exception e) {
                e.printStackTrace();
            }
            return null;
        }
        /**
         * 将汉字转换为拼音
         *
         * @param chinese 汉字字符串
         * @return 拼音字符串
         */
        static String toPinyin(String chinese) {
            HanyuPinyinOutputFormat format = new HanyuPinyinOutputFormat();
            format.setCaseType(HanyuPinyinCaseType.LOWERCASE);
            format.setToneType(HanyuPinyinToneType.WITHOUT_TONE);
            StringBuilder pinyin = new StringBuilder();
            char[] chars = chinese.toCharArray();
            for (char ch : chars) {
                try {
                    String[] pinyinArray = PinyinHelper.toHanyuPinyinStringArray(ch, format);
                    if (pinyinArray != null) {
                        pinyin.append(pinyinArray[0]);
                    } else {
                        pinyin.append(ch);
                    }
                } catch (BadHanyuPinyinOutputFormatCombination e) {
                    e.printStackTrace();
                }
            }
            return pinyin.toString();
        }
    }
}
2、再启动类上直接注册工具(也可以自己在建个配置类)
package tb.mcp.service;
import org.springframework.ai.tool.ToolCallbackProvider;
import org.springframework.ai.tool.method.MethodToolCallbackProvider;
import org.springframework.boot.SpringApplication;
import org.springframework.boot.autoconfigure.SpringBootApplication;
import org.springframework.cloud.client.discovery.EnableDiscoveryClient;
import org.springframework.cloud.openfeign.EnableFeignClients;
import org.springframework.context.annotation.Bean;
import org.springframework.scheduling.annotation.EnableAsync;
import tb.mcp.service.service.mcp.WhetherServer;
@EnableFeignClients
@SpringBootApplication
@EnableAsync
@EnableDiscoveryClient
public class McpServiceApplication {
    public static void main(String[] args) {
        SpringApplication.run(McpServiceApplication.class, args);
    }
    // 注册工具服务
    @Bean
    public ToolCallbackProvider toolCallbackProvider(WhetherServer whetherServer) {
        return MethodToolCallbackProvider.builder().toolObjects(whetherServer).build();
    }
}
3、配置文件配置
server:
  port: 9111
spring:
  ai:
    mcp:
      server:
        name: whether-server
        version: 1.0.0
        type: ASYNC  # Recommended for reactive applications
#        sse-endpoint: /sse/connect
        sse-message-endpoint: /mcp/messages
这样,服务端就算是完成了。
Mcp Client端实现:
这一端配置比较多,所以先讲配置
1、application.yml配置Mcp Client
server:
  port: 8000
spring:
  ai:
    mcp:
      client:
        enabled: true
        name: my-mcp-client
        version: 1.0.0
        request-timeout: 30s
        type: ASYNC  # or SYNC
        sse:
          connections:
            server1:
              url: http://localhost:9111
2、配置Ollama
在spring.ai级联下与mcp配置同级接上以下配置:
    ollama:
      base-url: http://localhost:11434
      chat:
        model: qwen3:8b // 指定模型版本
    chat:
      client:
        enabled: false
3、Ollama配置类
package tb.ai.service.config.llm.model;
import lombok.extern.slf4j.Slf4j;
import org.springframework.ai.chat.client.ChatClient;
import org.springframework.ai.chat.client.advisor.MessageChatMemoryAdvisor;
import org.springframework.ai.chat.memory.ChatMemory;
import org.springframework.ai.ollama.OllamaChatModel;
import org.springframework.ai.ollama.api.OllamaApi;
import org.springframework.ai.ollama.api.OllamaOptions;
import org.springframework.ai.ollama.management.ModelManagementOptions;
import org.springframework.beans.factory.annotation.Autowired;
import org.springframework.beans.factory.annotation.Value;
import org.springframework.context.annotation.Bean;
import org.springframework.context.annotation.Configuration;
import org.springframework.context.annotation.Primary;
/**
 * @author JasonLong
 * @date 2025-03-17 22:31
 * keeping loving and keep study
 *
 * Ollama-模型配置类
 */
@Slf4j
@Configuration
public class OllamaModelConfig {
    @Value("${spring.ai.ollama.chat.model}")
    private String model;
    @Autowired
    ChatMemory chatMemory;
    @Bean
    OllamaApi ollamaApi() {
        return OllamaApi.builder()
                .build();
    }
    /**
     * 对话模型
     *
     * @return
     */
    @Bean
    @Primary
    OllamaChatModel ollamaChatModel() {
        // options配置
        OllamaOptions ollamaOptions = OllamaOptions.builder()
                .model(model)
                .build();
        // 模型管理配置
        ModelManagementOptions managementOptions = ModelManagementOptions.builder()
                .build();
        // 模型配置
        return OllamaChatModel.builder()
                .ollamaApi(ollamaApi())
                .modelManagementOptions(managementOptions)
                .defaultOptions(ollamaOptions)
                .build();
    }
    /**
     * 对话ChatClient
     *
     * @param model
     * @return
     */
    @Bean(name = "ollamaChatClient")
    @Primary
    public ChatClient ollamaChatClient(OllamaChatModel model) {
        ChatClient chatClient = ChatClient.builder(model)
                // 添加内存记忆:默认以滑动窗口的形式维持最大20条上下文消息
                .defaultAdvisors(MessageChatMemoryAdvisor.builder(chatMemory).build())
                .build();
        log.info("初始化 Ollama ChatClient");
        return chatClient;
    }
}
4、AI对话
package tb.ai.service.controller;
import jakarta.annotation.Resource;
import org.springframework.ai.chat.client.ChatClient;
import org.springframework.ai.tool.ToolCallbackProvider;
import org.springframework.web.bind.annotation.RequestMapping;
import org.springframework.web.bind.annotation.RequestMethod;
import org.springframework.web.bind.annotation.RequestParam;
import org.springframework.web.bind.annotation.RestController;
@RestController
public class ChatTest {
    @Resource(name = "ollamaChatClient")
    private ChatClient chatClient;
    @Resource
    private ToolCallbackProvider toolCallbackProvider;
    @RequestMapping(value = "/chat-test",method = RequestMethod.GET)
    public String chatTest(@RequestParam("msg")String msg){
        String content = chatClient.prompt()
                .tools(toolCallbackProvider.getToolCallbacks())
                .user(msg)
                .call()
                .content();
        System.err.println(content);
        return content;
    }
}
最后
先启动Mcp Server服务再启动Mcp Client服务,因为Mcp Client要跟Mcp Server建立Sse连接,依赖Mcp Server。
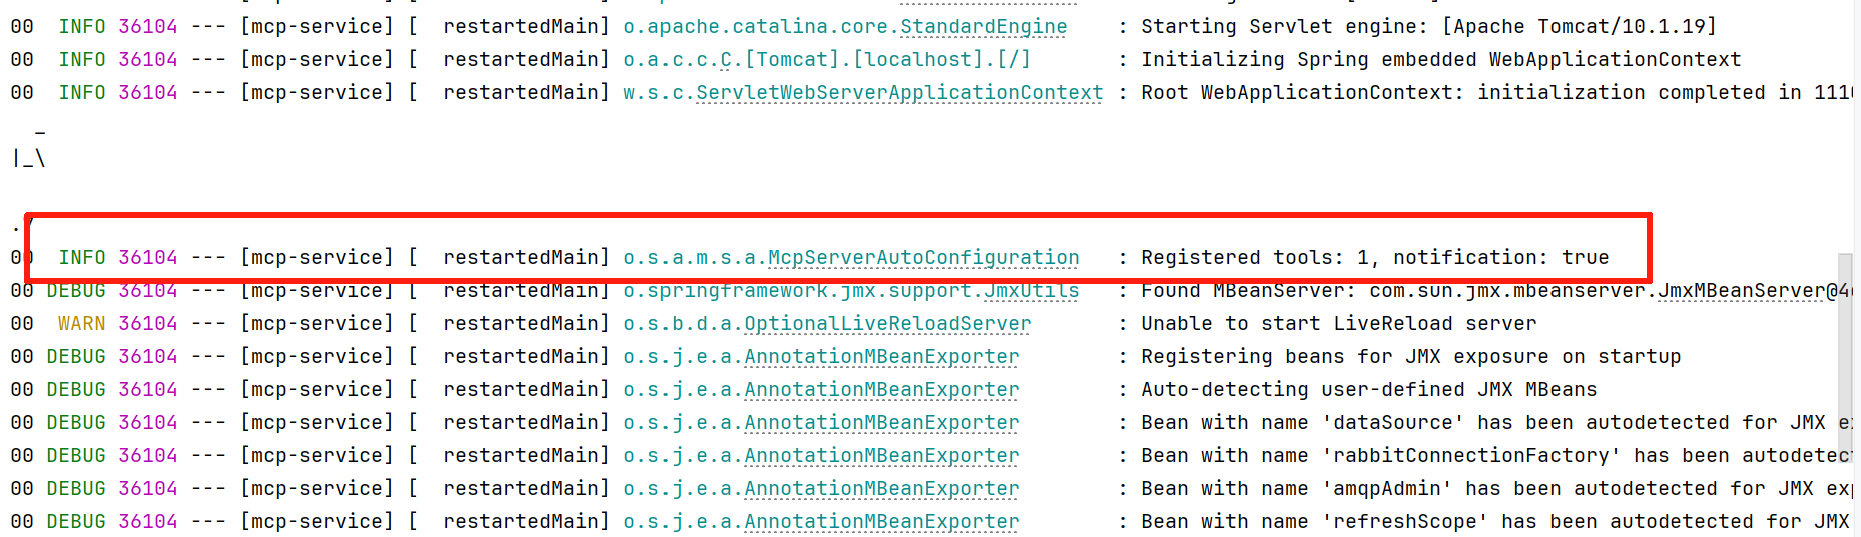
Server端正常启动时会看到一条工具注册成功的日志:
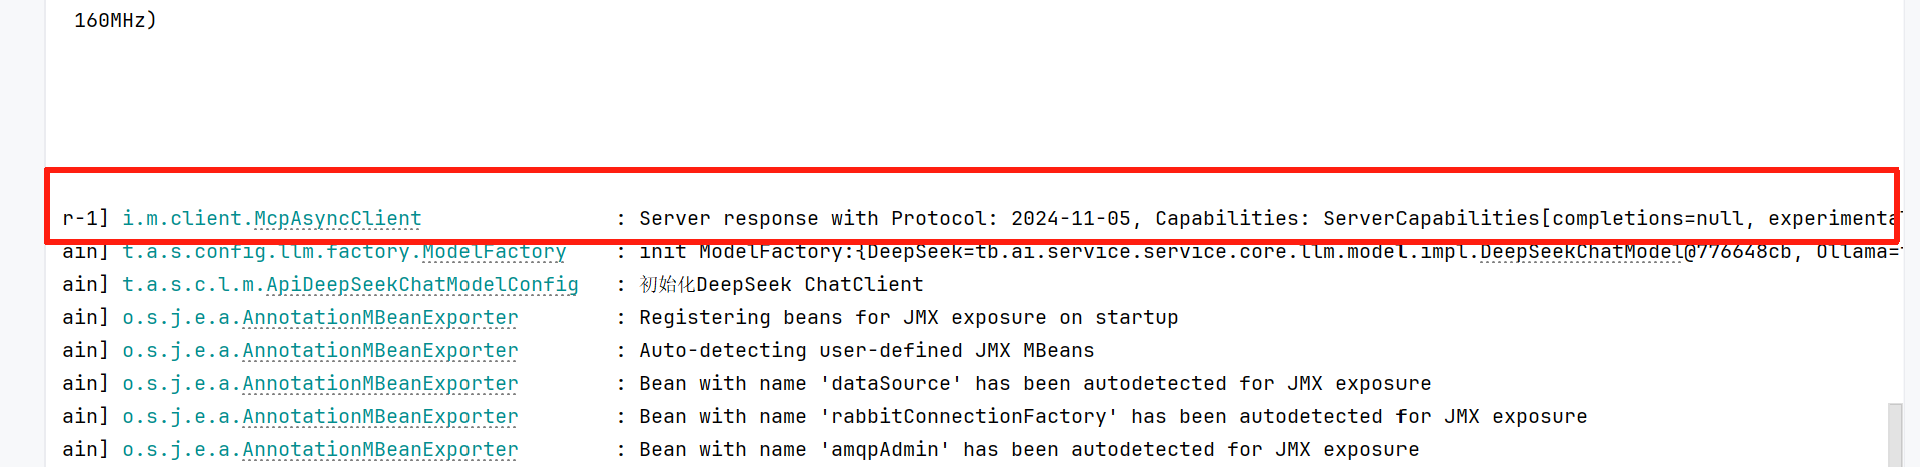
Client端正常启动时会看到一条McpAsyncClient的日志,往后拖动能看到连接到的Server服务:

访问Controller观察Mcp Server端工具内的日志,成功调用工具就说明成功了。


Server端工具内日志:

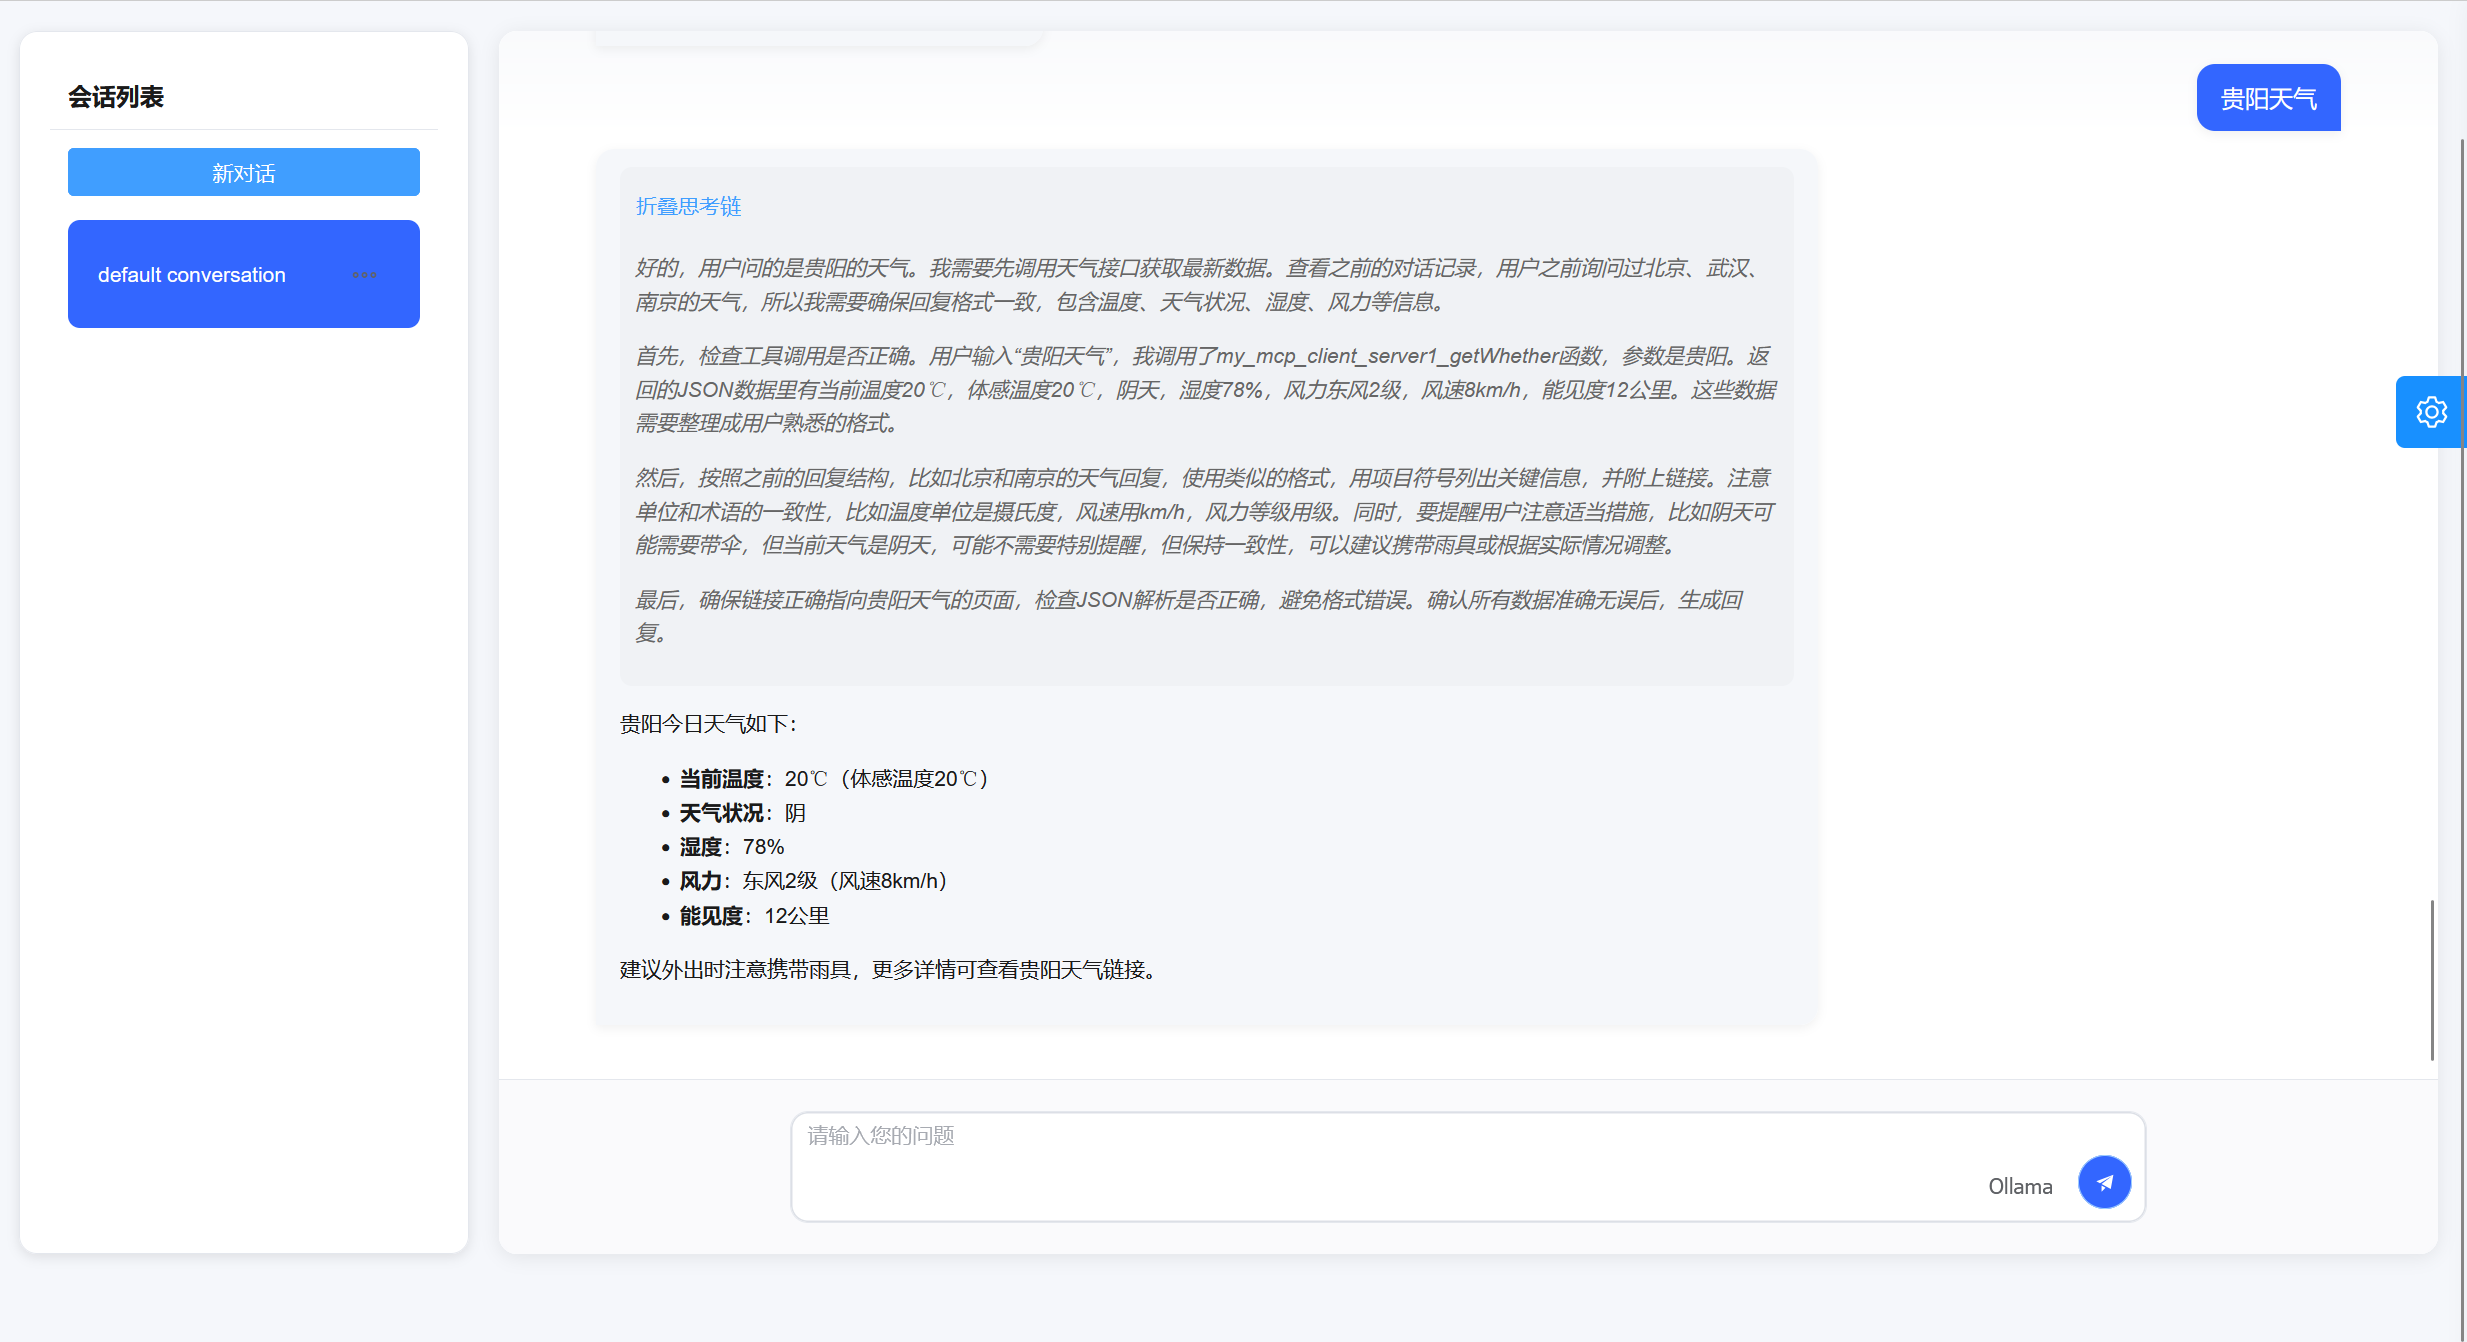
效果展示:
Over,网上资源较少,同志们仍需努力,共创更美好的IT环境。


