
SpringCloud基础 入门级 学习SpringCloud 超详细(简单通俗易懂)

Spring Cloud 基础入门级学习 超详细(简单通俗易懂)
- 一、SpringCloud核心组件
- 第一代:SpringCloud Netflix组件
- 第二代:SpringCloud Alibaba组件
- SpringCloud原生组件
- 二、SpringCloud体系架构图
- 三、理解分布式与集群
- 分布式
- 集群
- 四、最简单的样例实现微服务调用
一、SpringCloud核心组件
SpringCloud是在SpringBoot的基础上,增加了很多微服务相关的规范。目前,SpringCloud规范已经由Spring官方、SpringCloud Netflix、SpringCloud Alibaba等实现。通过组件化的方式,SpringCloud将这些实现整合起来,构成全家桶式的微服务技术栈。
第一代:SpringCloud Netflix组件
目前SpringCloud Netflix已经停止维护
组件名称 作用 Eureka 服务注册与发现组件 Ribbon 负载均衡组件 Feign 声明式服务调用 Hystrx 熔断器组件 Zuul API网关组件 第二代:SpringCloud Alibaba组件
Spring Cloud Alibaba是阿里开源的一套Sping Cloud规范的实现,配置比 NetFlix 更简单易用。
组件名称 作用 nacos 服务注册与发现 配置中心 流量控制 (Eureka + config) Sentinel 容错保护组件 Dubbo 服务治理 负载均衡与容错 远程调用 服务降级 RecketMQ 消息中间件 Seata 分布式事务 SpringCloud原生组件
组件名称 作用 Consul 服务注册 Zookeeper 服务发现和配置管理 Config 分布式配置中心 Sleuth/Zipkin 分布式链路追踪 Gateway API服务网关(新一代API网关,提供路由,负载均衡,过滤等) OpenFeign 声明式服务调用 Stream 消息驱动 简化消息的发送和接收 Bus 消息总线 LoadBalancer 客户端负载均衡 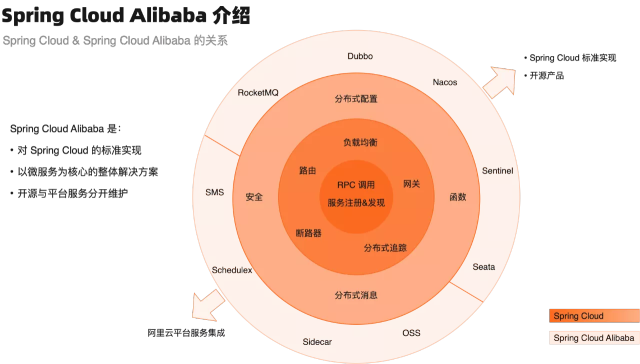
目前市场主流选择:
- SpringCloud Alibaba+SpringCloud原生
- 网关:Spring Cloud GateWay
- 服务注册与发现、配置中心:SpringCloud Alibaba Nacos
- 服务间调用:Spring Cloud OpenFeign
- 负载均衡:Spring Cloud LoadBalance
- 客户端容错保护:SpringCloud Alibaba Sentinel
- 消息中间件:RabbitMQ
二、SpringCloud体系架构图

三、理解分布式与集群
分布式
分布式:把一个大业务拆分成多个子业务,每个子业务都是一套独立的系统,子业务之间相互协作最终完成整体的大业务
比如: 小明是一家烧烤店的烧烤师傅,每天不仅要,准备食材,准备配料,烧烤(可以看作一个单体架构)。 后来小明烤的太好吃了,客人也多了,又专门雇了两位师傅小红,李华,小红专门准备食材,李华专门准备配料,小明专门烧烤。小明,小红,李华这三者的关系就是分布式。

分工完成一件事,就是分布式
集群
集群:在几个服务器上部署相同的应用程序来分担客户端的请求。
比如: 小明不雇用小红和李华了,找到了自己的好朋友烧烤师傅 王刚来帮忙,王刚每天工作和小明一样要准备食材,准备配料,烧烤。此时王刚和小明的关系就是集群

各自做同一件事情,就是集群
四、最简单的样例实现微服务调用
- 创建shop父模块 和 shop-provider(服务提供者) 和 shop-consumer(服务消费者)三个maven模块

- 父依赖pom.xml (锁定Springboot和SpringCloud版本 和 写一些通用的依赖)
4.0.0 org.example cloud-shop pom 1.0-SNAPSHOT cloud-shop-provider cloud-shop-consumer UTF-8 1.8 1.8 4.12 1.2.17 1.18.22 8.0.24 1.2.8 3.0.7.1 org.springframework.boot spring-boot-starter-web com.alibaba druid-spring-boot-starter 1.2.8 mysql mysql-connector-java org.springframework.boot spring-boot-starter-jdbc org.projectlombok lombok com.baomidou mybatis-plus-boot-starter ${mybatis-plus.version} true com.baomidou mybatis-plus-generator org.springframework.boot spring-boot-dependencies 2.2.2.RELEASE pom import org.springframework.cloud spring-cloud-dependencies Hoxton.SR1 pom import org.springframework.boot spring-boot-maven-plugin true- 准备一张数据表(任意数据都行)

- 对服务提供者进行操作
application.yml文件
server:
  port: 8001  #服务端口号
spring:
  application:
    name: cloud-shop-provider    #服务名称
  datasource:
    type: com.alibaba.druid.pool.DruidDataSource      #当前数据源操作类型
    driver-class-name: com.mysql.cj.jdbc.Driver          #mysql驱动包
    url: jdbc:mysql://127.0.0.1:3306/csdn?characterEncoding=utf8&serverTimezone=Asia/Shanghai
    username: root
    password: 1234
mybatis-plus:
  configuration:
    log-impl: org.apache.ibatis.logging.stdout.StdOutImpl
  type-aliases-package: com.chq.csdn.entity
  mapper-locations: classpath:mapping/*xml
entity
@Data
@AllArgsConstructor
@NoArgsConstructor
public class Payment extends Model {
    private Long id;
    private String serial;
}
PaymentDao
@Mapper
public interface PaymentDao extends BaseMapper {
}
PaymentService
public interface PaymentService extends IService {
}
PaymentServiceImpl
@Service
public class PaymentServiceImpl extends ServiceImpl implements PaymentService {
}
PaymentController
@RestController
@RequestMapping("/payment")
public class PaymentController extends ApiController {
    /**
     * 通过主键查询单条数据
     * @param id 主键
     * @return 单条数据
     */
    @GetMapping("/getPayment/{id}")
    public R selectOne(@PathVariable Serializable id) {
        return success(this.paymentService.getById(id));
    }
    /**
     * 新增数据
     * @param payment 实体对象
     * @return 新增结果
     */
    @PostMapping("/insertPayment")
    public R insert(@RequestBody Payment payment) {
        return success(this.paymentService.save(payment));
    }
启动类
@SpringBootApplication @MapperScan("com.chq.csdn.dao") public class ShopProviderApplication { public static void main(String[] args) { SpringApplication.run(ShopProviderApplication.class,args); } }- 启动消费者项目
访问localhost:8001/payment/insertPayment

数据库数据

访问localhost:7001/payment/getPayment

- 在对服务消费者进行操作
再次编写一次entity,这里就有点重复操作了,实际开发时,我们可以将实体类通通放入一个模块进行调用,这里方便理解,就再写一遍
@Data
@AllArgsConstructor
@NoArgsConstructor
public class Payment extends Model {
    private Long id;
    private String serial;
}
进行服务调用这里我们使用RestTemplate,准备好RestTemplate配置类
@Configuration
public class ApplicationContextConfig {
    @Bean
    public RestTemplate restTemplate(){
        return new RestTemplate();
    }
}
ConsumerController
@RestController
@RequestMapping("/consumer")
public class ConsumerController extends ApiController {
	//服务端口号这里建议使用127.0.0.1,不建议使用localhost
    private static final String HOST = "http://127.0.0.1:8001";
    @Autowired
    private RestTemplate restTemplate;
	//还是刚才的方法 获取 和 添加
    @GetMapping("/payment/get/{id}")
    public R get(@PathVariable("id") Long id){
    	//拼接结果 http://127.0.0.1:8001/payment/getPayment/id
    	//R.class是返回类型
        return restTemplate.getForObject(HOST + "/payment/getPayment/" + id,R.class);
    }
    @PostMapping("/payment/insert")
    public R insert(@RequestBody Payment payment){
    	//payment是请求参数
        return restTemplate.postForObject(HOST + "/payment/insertPayment" ,payment,R.class);
    }
}
application.yml文件 注意这里的配置文件,端口号改变,并且没有配置数据源,无法对数据库直接操作
server:
  port: 8002  #服务端口号
spring:
  application:
    name: cloud-shop-consumer    #服务名称
启动类
//因为我们添加了数据库的依赖,却没有配置数据源 加上 //(exclude = {DataSourceAutoConfiguration.class, DruidDataSourceAutoConfigure.class}) //可以忽略数据源启动 @SpringBootApplication(exclude = {DataSourceAutoConfiguration.class, DruidDataSourceAutoConfigure.class}) public class ShopConsumerApplication { public static void main(String[] args) { SpringApplication.run(ShopConsumerApplication.class,args); } }- 启动成功后
访问localhost:8002/consumer/payment/insert

查看数据表

访问localhost:8002/consumer/payment/get/id

此时服务调用就结束了,我们可以发现消费者consumer没有配置数据源,却通过RestTemplate访问消费者服务,从而间接访问数据库,这就是服务的调用。
服务注册中心扮演者一个仓储功能,服务提供者提供服务注册到注册中心,服务消费者通过http消息或组件到注册中心(而非RestTemplate)去找到所需的服务,这也就是服务中心,服务消费者和服务提供者三者关系

- 创建shop父模块 和 shop-provider(服务提供者) 和 shop-consumer(服务消费者)三个maven模块


