
Web Component 教程(四):如何优雅的使用 template 模块

前言
Web Component 已经成为前端开发者们不可或缺的技术工具。它赋予我们创建可重用、自包含组件的能力,改变了传统的开发模式。其中,template 模块在 Web Component 中扮演了至关重要的角色。
今天,我们将深入探讨如何优雅地处理 template 模块,让你的 Web Component 更加灵活、可维护,同时保持高效的开发体验。
什么是 Web Component 和 Template?
在深入研究之前,我们先快速回顾一下几个概念:
Web Component: 是一套浏览器原生支持的技术,它允许开发者创建可重用的定制元素。这些元素可以封装自己的样式和行为,不会与其他元素产生冲突。
Template: 是一种用来定义 HTML 片段的方式,可以在多个地方重复使用。它的内容不会立即渲染,直到明确被插入到文档中。
如何优雅地使用 Template 模块?
步骤一:创建 Template
首先,你需要在 HTML 文件中定义一个 标签。这个标签内的内容不会直接显示在页面上,可以理解为一个“模板”。
    .my-class {
      color: red;
      font-size: 20px;
    }

  Hello, Web Component!
在上面的代码中,我们定义了一个含有样式和 HTML 内容的模板。
步骤二:在 Web Component 中引用 Template
接下来,我们需要在自定义元素中引用这个模板。首先,你需要定义一个自定义元素,并在其构造函数内获取模板的内容。
class MyComponent extends HTMLElement {
constructor() {
super();
const template = document.getElementById('my-template');
const templateContent = template.content;
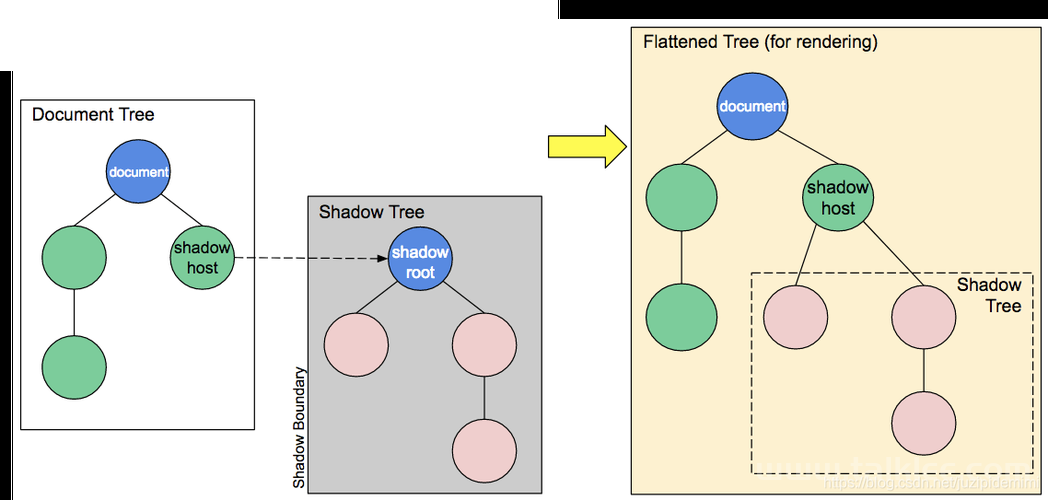
// 创建一个 shadow DOM
const shadowRoot = this.attachShadow({ mode: 'open' });
shadowRoot.appendChild(templateContent.cloneNode(true));
}
}
// 注册这个自定义元素
customElements.define('my-component', MyComponent);
在上面的代码中,我们做了以下几件事:
- 获取模板内容: 使用 document.getElementById('my-template') 获取模板,然后通过 template.content 方式获取其内容。
- 创建 Shadow DOM: 使用 this.attachShadow({ mode: 'open' }) 创建一个 shadow DOM,并将模板内容克隆到这个 shadow DOM 中。这确保了样式和结构的封装,不会影响页面上的其他元素。
步骤三:使用自定义元素
现在,我们可以在 HTML 中使用这个自定义元素:
当浏览器解析这个自定义元素时,它将显示模板中的内容。
优雅处理 Template 的技巧
优雅地处理 template 不仅仅是简单地引用和展示,还需要考虑以下几点:
1. 模板管理
对于复杂应用,可能有多个模板。建议使用模块化方式管理模板,例如将模板放在独立文件中,并使用 JavaScript 动态加载。
async function loadTemplate(url) {
  const response = await fetch(url);
  const text = await response.text();
  const template = document.createElement('template');
  template.innerHTML = text;
  return template;
}
2. 数据绑定
为了更动态地处理内容,可以使用数据绑定技术。例如,使用 innerHTML 或者 innerText 动态修改模板内容。
class MyComponent extends HTMLElement {
  constructor() {
    super();
    const template = document.getElementById('my-template');
    const templateContent = template.content;
    const shadowRoot = this.attachShadow({ mode: 'open' });

    // 克隆模板内容
    shadowRoot.appendChild(templateContent.cloneNode(true));

    // 动态设置内容
    shadowRoot.querySelector('.my-class').innerText = 'Hello, Dynamic Web Component!';
  }
}
3. 样式隔离
确保样式不会影响全局,可以使用 shadow DOM 进一步隔离样式。同时,可以使用 CSS 变量和其他现代 CSS 技术提高样式管理的灵活性。
  :host {
    display: block;
    padding: 10px;
    background-color: var(--background-color, white);
  }
  .my-class {
    color: var(--text-color, black);
  }
这样,我们可以通过设置自定义属性来动态修改样式。
优雅处理 Template 的进阶技巧
继续深入,我们来探讨一些进阶技巧,让你的 Web Component 更加灵活和强大。
4. 模板缓存
在大型应用中,频繁加载和解析模板可能会影响性能。可以考虑使用缓存技术来优化模板的处理。
const templateCache = new Map();
async function getTemplate(url) {
  if (templateCache.has(url)) {
    return templateCache.get(url);
  } else {
    const template = await loadTemplate(url);
    templateCache.set(url, template);
    return template;
  }
}
在这个例子中,我们使用 Map 来缓存模板,避免每次都重新加载。

5. 模板条件渲染
有时你需要根据某些条件来渲染不同的模板,可以使用条件渲染技术。
class MyConditionComponent extends HTMLElement {
  constructor() {
    super();
    const templateId = this.hasAttribute('special') ? 'special-template' : 'normal-template';
    const template = document.getElementById(templateId);
    const templateContent = template.content;
    const shadowRoot = this.attachShadow({ mode: 'open' });
    shadowRoot.appendChild(templateContent.cloneNode(true));
  }
}
customElements.define('my-condition-component', MyConditionComponent);
通过检查元素属性,我们可以动态选择使用哪个模板。
6. 事件处理与交互
为了使 Web Component 更加动态和互动,可以在模板中添加事件处理器。
class MyInteractiveComponent extends HTMLElement {
  constructor() {
    super();
    const template = document.getElementById('interactive-template');
    const templateContent = template.content;
    const shadowRoot = this.attachShadow({ mode: 'open' });
    shadowRoot.appendChild(templateContent.cloneNode(true));
    // 添加事件监听器
    shadowRoot.querySelector('.my-button').addEventListener('click', () => {
      alert('Button clicked!');
    });
  }
}
customElements.define('my-interactive-component', MyInteractiveComponent);
通过在模板中添加事件处理器,我们可以创建具有交互功能的组件。
实战例子:动态表单组件
结合上述技巧,我们可以创建一个动态表单组件,其模板会根据数据动态更新,并可以进行表单提交。
首先,定义一个包含表单的模板:
    .form-container {
      padding: 20px;
      border: 1px solid #ccc;
    }
    .form-field {
      margin-bottom: 10px;
    }


        Name:


        Email:


      Submit
然后创建一个自定义元素来使用这个模板,并添加表单提交处理:
class DynamicFormComponent extends HTMLElement {
  constructor() {
    super();
    const template = document.getElementById('form-template');
    const templateContent = template.content;
    const shadowRoot = this.attachShadow({ mode: 'open' });
    shadowRoot.appendChild(templateContent.cloneNode(true));
    const form = shadowRoot.querySelector('#dynamic-form');
    form.addEventListener('submit', (event) => {
      event.preventDefault();
      const formData = new FormData(form);
      console.log('Form Submitted:', Object.fromEntries(formData.entries()));
    });
  }
}
customElements.define('dynamic-form-component', DynamicFormComponent);
这个组件将会展示一个表单,并在提交时打印表单数据。
总结
通过优雅地处理 Web Component 中的 template 模块,你不仅能简化开发流程,还能提升组件的可维护性和性能。模块化设计、命名规范、性能优化和充分测试都是确保你的组件在各种环境下稳定运行的关键。


