
mac中加载C++动态库文件

前言
需要再mac系统下运行C++开发的程序,通过摸索,初步实现了一版,大致记录下
1. 前提准备
- 安装OpenCV
- 使用Homebrew安装OpenCV:
brew install opencv
- 确认安装路径:
brew --prefix opencv
默认路径为/opt/homebrew/opt/opencv。
- 确保头文件和动态库路径正确,以便在后续编译中正确链接。
2. 将C++程序编译成动态库
2.1 编写C++代码
- 编写基于OpenCV的C++代码,通过C++类实现图像处理过程,通过
链接函数。
- 示例代码:头文件
#ifndef IMAGE_PROCESS_H
#define IMAGE_PROCESS_H
#include
class ImageProcess
{
public:
    cv::Mat getImageProcess(const cv::Mat &image);
};
#ifdef __cplusplus
extern "C"
{
#endif
    // 声明一个 C 链接的函数,返回原始指针
    extern "C" unsigned char *processImage(unsigned char *input, int width, int height, int bytesPerRow);
#ifdef __cplusplus
}
#endif
#endif
#include "image.h" using namespace cv; cv::Mat ImageProcess::getImageProcess(const cv::Mat &image) { // 获取图像的宽度和高度 int width = image.cols; int height = image.rows; // 计算矩形的左上角和右下角坐标 int rectWidth = 150; // 矩形的宽度 int rectHeight = 50; // 矩形的高度 int startX = (width - rectWidth) / 2; // 矩形的左上角 x 坐标 int startY = (height - rectHeight) / 2; // 矩形的左上角 y 坐标 int endX = startX + rectWidth; // 矩形的右下角 x 坐标 int endY = startY + rectHeight; // 矩形的右下角 y 坐标 // 绘制矩形 rectangle(image, Point(startX, startY), Point(endX, endY), Scalar(0, 255, 0), 4); // 使用绿色绘制矩形,线条宽度为 2 return image; } extern "C" unsigned char *processImage(unsigned char *input, int width, int height, int bytesPerRow) { cv::Mat inputMat(height, width, CV_8UC4, input, bytesPerRow); ImageProcess imageProcess; cv::Mat outputMat = imageProcess.getImageProcess(inputMat); // 将输出 Mat 的数据复制到一个新的缓冲区 unsigned char *outputData = new unsigned char[outputMat.total() * outputMat.elemSize()]; std::memcpy(outputData, outputMat.data, outputMat.total() * outputMat.elemSize()); return outputData; } extern "C" int add(int a, int b) { return a + b; }- 注意:使用extern "C"声明函数,避免C++的名称修饰问题,确保从Swift或其他语言调用时能够正确链接。
2.2 编译动态库
- 编写CMakeLists.txt文件(推荐)或直接使用g++命令编译。
- 示例CMakeLists.txt:
cmake_minimum_required(VERSION 3.10) project(ImageLib) # 设置 C++ 标准 set(CMAKE_CXX_STANDARD 17) set(CMAKE_CXX_STANDARD_REQUIRED True) # 设置头文件路径 include_directories(${PROJECT_SOURCE_DIR}/include) # 添加动态库 add_library(Image SHARED src/image.cpp) # 找到 OpenCV 库 find_package(OpenCV REQUIRED) include_directories(${OpenCV_INCLUDE_DIRS}) # 链接 OpenCV 库 target_link_libraries(Image ${OpenCV_LIBS})- 编译命令:通过执行 sh build.sh编译
#!/bin/bash # 设置项目根目录 PROJECT_DIR=$(pwd) echo "Project directory: $PROJECT_DIR" # 创建构建目录 BUILD_DIR="${PROJECT_DIR}/build" echo "Creating build directory: $BUILD_DIR" mkdir -p "${BUILD_DIR}" # 清空构建目录 if [ -d "${BUILD_DIR}" ]; then echo "Cleaning previous build directory..." rm -rf "${BUILD_DIR}"/* else echo "Build directory does not exist. Creating it..." mkdir -p "${BUILD_DIR}" fi # 检查构建目录是否创建成功 if [ ! -d "${BUILD_DIR}" ]; then echo "Failed to create build directory: $BUILD_DIR" exit 1 fi # 进入构建目录 echo "Changing directory to: $BUILD_DIR" cd "${BUILD_DIR}" # 运行 CMake echo "Running CMake..." cmake .. # 检查 CMake 是否成功 if [ $? -ne 0 ]; then echo "CMake failed. Exiting..." exit 1 fi # 编译项目 echo "Compiling project..." make -j$(sysctl -n hw.ncpu) # 检查编译是否成功 if [ $? -ne 0 ]; then echo "Compilation failed. Exiting..." exit 1 fi # 检查动态库是否生成 if [ ! -f "${BUILD_DIR}/libImage.dylib" ]; then echo "Dynamic library not found: ${BUILD_DIR}/libImage.dylib" exit 1 fi # 输出构建结果 echo "Build completed. Dynamic library is in ${BUILD_DIR}/libImage.dylib"- 生成的动态库文件为libImage.dylib(在macOS上)。
3. 在Swift中调用动态库
- 加载动态库
- 使用dlopen加载动态库,并通过dlsym获取函数地址。
- 示例代码:
image_processimport Foundation import AppKit func main() { // 1. 动态库加载模块 typealias ProcessImageFunction = @convention(c) (UnsafeMutablePointer?, Int32, Int32, Int32) -> UnsafeMutablePointer? // 加载动态库 let handle = dlopen("/Users/gongyong/Desktop/Keyi/test_ws/image_process/build/libImage.dylib", RTLD_LAZY) if handle == nil { print("Failed to load library: \(String(cString: dlerror()))") exit(1) } else { print("Library loaded successfully") } // 获取函数地址 let processImageFunctionPointer = dlsym(handle, "processImage") if processImageFunctionPointer == nil { print("Failed to find function: \(String(cString: dlerror()))") dlclose(handle) exit(1) } else { print("Function 'processImage' found successfully") } // 将指针转换为函数指针类型 let processImageFunction = unsafeBitCast(processImageFunctionPointer, to: ProcessImageFunction.self) // 2. 加载图像,并且调用动态库处理 let filePath = "/Users/gongyong/Desktop/Keyi/test_ws/demo/Source/demo/face.png" let outputPath = "/Users/gongyong/Desktop/Keyi/test_ws/demo/Source/demo/output.png" if let (pixelData, width, height, bytesPerRow) = loadPNGImage(from: filePath) { print("Image loaded successfully with dimensions: \(width) x \(height), bytesPerRow: \(bytesPerRow)") // 调用 C+ 图像处理函数 let processedPixelData = processImageFunction(pixelData, Int32(width), Int32(height), Int32(bytesPerRow)) if processedPixelData == nil { print("Image processing failed: processImage returned nil") } else { print("Image processed successfully") // 保存处理后的图像 savePNGImage(to: outputPath, pixelData: processedPixelData, width: width, height: height, bytesPerRow: bytesPerRow) // 打印输出图像的长宽 print("Output image dimensions: \(width) x \(height)") } // 释放动态分配的内存 free(processedPixelData) } else { print("Failed to load image from \(filePath)") } // 关闭动态库 dlclose(handle) print("Library closed successfully") } // 加载 PNG 图像的辅助函数 func loadPNGImage(from path: String) -> (UnsafeMutablePointer?, Int, Int, Int)? { print("Loading image from \(path)") guard let image = NSImage(contentsOfFile: path) else { print("Failed to load image from \(path)") return nil } guard let tiffData = image.tiffRepresentation, let bitmapRep = NSBitmapImageRep(data: tiffData) else { print("Failed to create bitmap representation from image") return nil } let width = Int(bitmapRep.size.width) let height = Int(bitmapRep.size.height) let bytesPerRow = bitmapRep.bytesPerRow guard let pixelData = malloc(bytesPerRow * height)?.assumingMemoryBound(to: UInt8.self) else { print("Failed to allocate memory for pixel data") return nil } // Copy the bitmap data to the allocated memory memcpy(pixelData, bitmapRep.bitmapData, bytesPerRow * height) print("Image data copied to memory") // 打印输入图像的长宽 print("Input image dimensions: \(width) x \(height)") return (pixelData, width, height, bytesPerRow) } // 保存 PNG 图像的辅助函数 func savePNGImage(to path: String, pixelData: UnsafeMutablePointer?, width: Int, height: Int, bytesPerRow: Int) { guard let pixelData = pixelData else { print("Failed to save image: pixelData is nil") return } var pixelDataPointer: UnsafeMutablePointer? = pixelData // For RGBA image let bitmapRep = NSBitmapImageRep(bitmapDataPlanes: &pixelDataPointer, pixelsWide: width, pixelsHigh: height, bitsPerSample: 8, samplesPerPixel: 4, hasAlpha: true, isPlanar: false, colorSpaceName: .calibratedRGB, bitmapFormat: .alphaFirst, bytesPerRow: bytesPerRow, bitsPerPixel: 32) guard let bitmapRep = bitmapRep else { print("Failed to create NSBitmapImageRep") return } guard let pngData = bitmapRep.representation(using: .png, properties: [:]) else { print("Failed to generate PNG data") return } do { try pngData.write(to: URL(fileURLWithPath: path)) print("Image saved successfully to \(path)") } catch { print("Failed to save image: \(error)") } } main()- 注意:确保动态库路径正确,且动态库中的函数签名与Swift中声明的类型一致。
- 加载和处理图像
- 使用Swift的NSImage和NSBitmapImageRep加载和保存图像。
- 将图像数据传递给C++动态库进行处理,并接收处理后的数据。
4. 注意事项
- 动态库路径
- 确保动态库路径正确,可通过dlopen加载指定路径的动态库。
- 如果动态库路径不正确,会报错“Failed to load library”。
- 函数签名一致性
- C++动态库中的函数签名必须与Swift中声明的函数指针类型一致,否则会报错“Failed to find function”或运行时崩溃。
- 内存管理
- 动态分配的内存需要手动释放,避免内存泄漏。
- 在Swift中使用malloc分配内存,并在处理完成后使用free释放。
- 图像格式
- 确保输入和输出图像格式一致,例如RGBA或灰度图像。
- 如果格式不一致,可能导致图像处理失败或输出图像异常。
- 调试
- 使用dlerror获取动态库加载和函数查找的错误信息,便于调试。
- 在开发过程中,建议逐步测试每个模块(如动态库加载、图像加载、图像处理、图像保存等),确保每个部分正常工作。
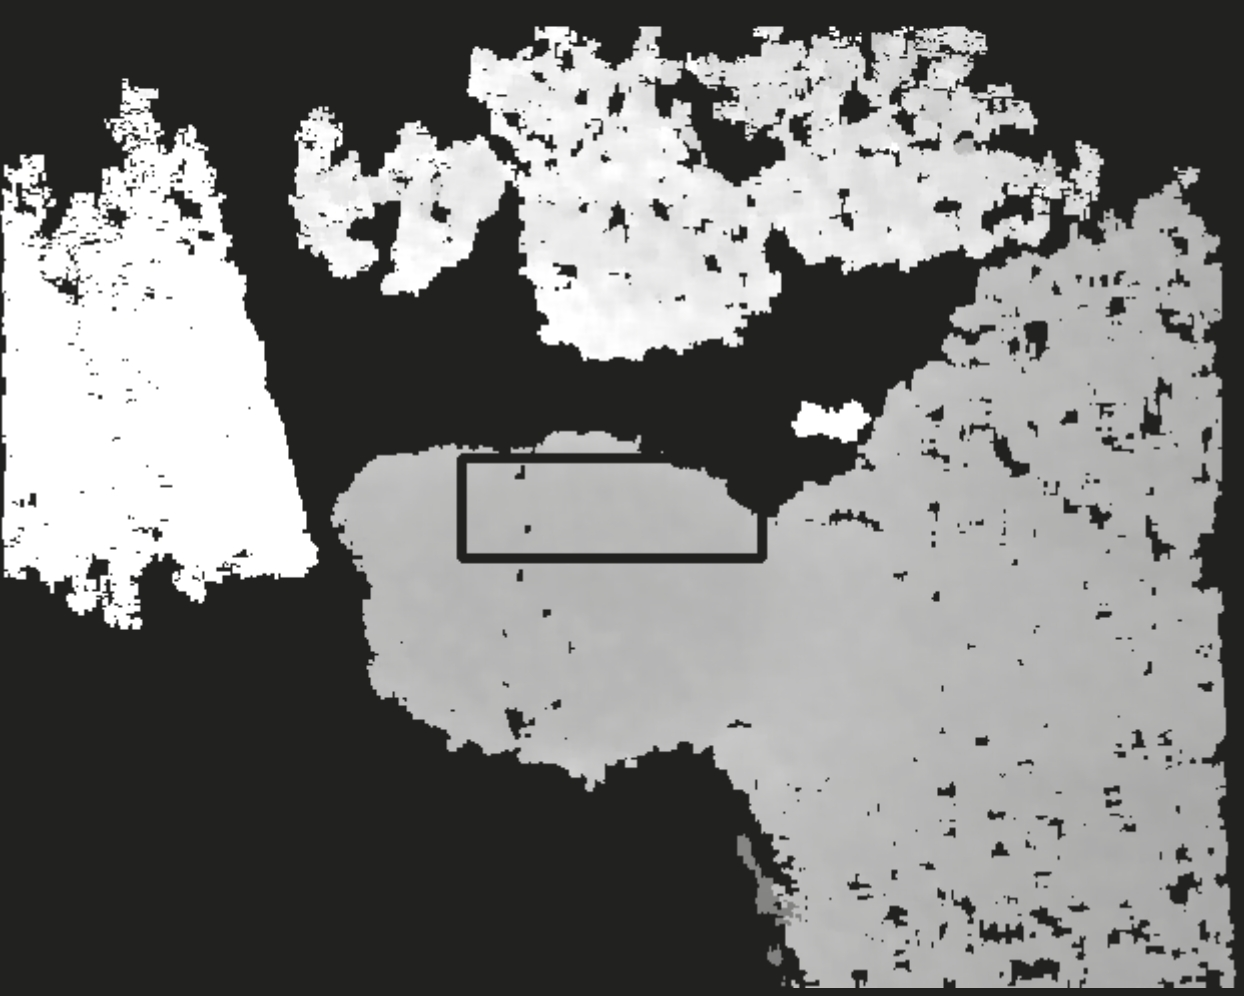
5. 效果演示
加载图像

调用C++处理后的图像
附件
先编译完image_process下的C++文件
然后xcode打开demo解压文件,更新动态库路径、加载图片和输出图片的绝对路径。
文件下载地址:
git clone git@github.com:xjturmy/xcode_c-.git
- 注意:确保动态库路径正确,且动态库中的函数签名与Swift中声明的类型一致。
- 生成的动态库文件为libImage.dylib(在macOS上)。
- 编译命令:通过执行 sh build.sh编译
- 注意:使用extern "C"声明函数,避免C++的名称修饰问题,确保从Swift或其他语言调用时能够正确链接。
- 编写基于OpenCV的C++代码,通过C++类实现图像处理过程,通过
- 确保头文件和动态库路径正确,以便在后续编译中正确链接。
- 确认安装路径:
免责声明:我们致力于保护作者版权,注重分享,被刊用文章因无法核实真实出处,未能及时与作者取得联系,或有版权异议的,请联系管理员,我们会立即处理! 部分文章是来自自研大数据AI进行生成,内容摘自(百度百科,百度知道,头条百科,中国民法典,刑法,牛津词典,新华词典,汉语词典,国家院校,科普平台)等数据,内容仅供学习参考,不准确地方联系删除处理! 图片声明:本站部分配图来自人工智能系统AI生成,觅知网授权图片,PxHere摄影无版权图库和百度,360,搜狗等多加搜索引擎自动关键词搜索配图,如有侵权的图片,请第一时间联系我们。


