
FastMCP - 快速、Pythonic风格的构建MCP server 和 client

文章目录
- 一、关于 FastMCP
- 相关链接资源
- 快速构建示例
- 什么是MCP?
- 为什么选择FastMCP?
- 核心特性
- 服务器
- 客户端
- v2 版本更新内容
- 二、安装
- 添加
- 验证安装
- 安装用于开发
- 三、核心概念
- 1、`FastMCP` 服务器
- 2、工具
- 3、资源
- 4、提示
- 5、上下文
- 6、图片
- 7、MCP 客户端
- 7.1 客户端方法
- 7.2 运输选项
- 7.3 LLM Sampling
- 7.4 根访问
- 四、高级功能
- 1、代理服务器
- 2、组成 MCP 服务器
- 3、OpenAPI & FastAPI 生成
- 4、处理 `stderr`
- 五、运行您的服务器
- 1、开发模式(推荐用于构建和测试)
- 2、Claude 桌面集成(常规使用)
- 3、直接执行(适用于高级用例)
- 4、服务器对象名称
- 六、示例
一、关于 FastMCP
模型上下文协议 (MCP) 是一种新的、标准化的方式,为您的LLMs提供上下文和工具,FastMCP使构建MCP服务器和客户端变得简单直观。创建工具、公开资源、定义提示,并使用干净、Pythonic的代码连接组件。
相关链接资源
- github : https://github.com/jlowin/fastmcp
- 📚文档: https://gofastmcp.com
快速构建示例
# server.py
from fastmcp import FastMCP
mcp = FastMCP("Demo 🚀")
@mcp.tool()
def add(a: int, b: int) -> int:
    """Add two numbers"""
    return a + b
if __name__ == "__main__":
    mcp.run()
fastmcp run server.py
什么是MCP?
模型上下文协议(MCP) 允许您以安全、标准化的方式构建服务器,这些服务器可以将数据和功能暴露给大型语言模型(LLM)应用。想象一下,它就像一个Web API,但专门为LLM交互设计。MCP服务器可以:
- 通过资源(类似于GET端点;将信息加载到上下文中)暴露数据
- 通过工具(类似于POST/PUT端点;执行操作)提供功能
- 通过提示(可重用的模板)定义交互模式
- 以及更多!
FastMCP提供了一个高级的Pythonic接口,用于构建和与这些服务器交互。
为什么选择FastMCP?
MCP协议功能强大,但实现它需要大量的模板代码——服务器设置、协议处理程序、内容类型、错误管理。FastMCP处理所有复杂的协议细节和服务器管理,让您可以专注于构建优秀的工具。它旨在提供高级且Python风格的接口;在大多数情况下,只需装饰一个函数即可。
FastMCP的目标是:
🚀 快速:高级接口意味着代码更少,开发更快
🍀 简单:用最少的模板代码构建MCP服务器
🐍 Python风格:对Python开发者来说感觉自然
🔍 完整:FastMCP旨在为服务器和客户端提供核心MCP规范的完整实现
核心特性
服务器
- 创建:使用直观的装饰器以最小化样板代码创建服务器
- 代理:将现有服务器代理以修改配置或传输
- 组合:将服务器组合成复杂的应用程序
- 生成:从 OpenAPI 规范或 FastAPI 对象生成服务器
客户端
- 交互与MCP服务器进行程序化交互
- 连接使用任何传输方式连接到任何MCP服务器
- 测试无需人工干预测试您的服务器
- 创新利用核心MCP功能,如LLM采样进行创新
v2 版本更新内容
FastMCP 1.0 使得构建 MCP 服务器变得非常简单,现在它已成为 官方模型上下文协议 Python SDK 的一部分!对于基本用例,您可以通过导入 mcp.server.fastmcp.FastMCP(或安装 fastmcp=1.0)来使用上游版本。
基于 MCP 生态系统的演变,FastMCP 2.0 在这个基础上引入了各种新功能(以及更多实验性想法)。它添加了高级功能,如代理和组合 MCP 服务器,以及从 OpenAPI 规范或 FastAPI 对象自动生成它们。FastMCP 2.0 还引入了新的客户端功能,如 LLM 抽样。
二、安装
我们强烈建议使用 uv 来安装 FastMCP,因为它对于通过 CLI 部署服务器是必需的:
添加
uv add fastmcp
直接安装
uv pip install fastmcp
验证安装
查看版本
fastmcp version
安装用于开发
git clone https://github.com/jlowin/fastmcp.git
cd fastmcp
# Install with dev dependencies
uv sync
这将安装所有依赖
 (图片来源网络,侵删)
运行测试:
pytest
三、核心概念
这些是使用熟悉的基于装饰器的方法创建MCP服务器的构建块。
 (图片来源网络,侵删)
1、FastMCP 服务器
代表您的 MCP 应用程序的核心对象。它处理连接、协议细节和路由。
from fastmcp import FastMCP
# Create a named server
mcp = FastMCP("My App")
# Specify dependencies needed when deployed via `fastmcp install`
mcp = FastMCP("My App", dependencies=["pandas", "numpy"])
2、工具
工具允许LLMs通过执行您的Python函数来执行操作。它们非常适合涉及计算、外部API调用或副作用的任务。
 (图片来源网络,侵删)
使用@mcp.tool()装饰同步或异步函数。FastMCP会根据类型提示 和 文档字符串 自动生成必要的MCP模式。
可以使用Pydantic模型来处理复杂的输入。
import httpx
from pydantic import BaseModel
class UserInfo(BaseModel):
    user_id: int
    notify: bool = False
@mcp.tool()
async def send_notification(user: UserInfo, message: str) -> dict:
    """Sends a notification to a user if requested."""
    if user.notify:
        # Simulate sending notification
        print(f"Notifying user {user.user_id}: {message}")
        return {"status": "sent", "user_id": user.user_id}
    return {"status": "skipped", "user_id": user.user_id}
@mcp.tool()
def get_stock_price(ticker: str) -> float:
    """Gets the current price for a stock ticker."""
    # Replace with actual API call
    prices = {"AAPL": 180.50, "GOOG": 140.20}
    return prices.get(ticker.upper(), 0.0)
3、资源
资源将数据暴露给LLMs。它们应主要提供信息,而不进行显著的计算或副作用(如GET请求)。
使用@mcp.resource("your://uri")装饰函数。
在URI中使用花括号{}定义动态资源(模板),其中URI的部分将成为函数参数。
# Static resource returning simple text
@mcp.resource("config://app-version")
def get_app_version() -> str:
    """Returns the application version."""
    return "v2.1.0"
# Dynamic resource template expecting a 'user_id' from the URI
@mcp.resource("db://users/{user_id}/email")
async def get_user_email(user_id: str) -> str:
    """Retrieves the email address for a given user ID."""
    # Replace with actual database lookup
    emails = {"123": "alice@example.com", "456": "bob@example.com"}
    return emails.get(user_id, "not_found@example.com")
# Resource returning JSON data
@mcp.resource("data://product-categories")
def get_categories() -> list[str]:
    """Returns a list of available product categories."""
    return ["Electronics", "Books", "Home Goods"]
4、提示
提示定义了可重用的模板或交互模式,用于LLM。
它们有助于指导LLM 如何有效地使用服务器的能力。
使用@mcp.prompt()装饰函数。该函数应返回所需的提示内容,可以是简单的字符串、Message对象(如UserMessage或AssistantMessage),或这些对象的列表。
from fastmcp.prompts.base import UserMessage, AssistantMessage
@mcp.prompt()
def ask_review(code_snippet: str) -> str:
    """Generates a standard code review request."""
    return f"Please review the following code snippet for potential bugs and style issues:\n```python\n{code_snippet}\n```"
@mcp.prompt()
def debug_session_start(error_message: str) -> list[Message]:
    """Initiates a debugging help session."""
    return [
        UserMessage(f"I encountered an error:\n{error_message}"),         AssistantMessage("Okay, I can help with that. Can you provide the full traceback and tell me what you were trying to do?")
    ]
5、上下文
通过添加一个使用 fastmcp.Context 类型提示的参数,在您的工具或资源功能中 获取 MCP 服务器功能。
from fastmcp import Context, FastMCP
mcp = FastMCP("Context Demo")
@mcp.resource("system://status")
async def get_system_status(ctx: Context) -> dict:
    """Checks system status and logs information."""
    await ctx.info("Checking system status...")
    # Perform checks
    await ctx.report_progress(1, 1) # Report completion
    return {"status": "OK", "load": 0.5, "client": ctx.client_id}
@mcp.tool()
async def process_large_file(file_uri: str, ctx: Context) -> str:
    """Processes a large file, reporting progress and reading resources."""
    await ctx.info(f"Starting processing for {file_uri}")
    # Read the resource using the context
    file_content_resource = await ctx.read_resource(file_uri)
    file_content = file_content_resource[0].content # Assuming single text content
    lines = file_content.splitlines()
    total_lines = len(lines)
    for i, line in enumerate(lines):
        # Process line...
        if (i + 1) % 100 == 0: # Report progress every 100 lines
            await ctx.report_progress(i + 1, total_lines)
    await ctx.info(f"Finished processing {file_uri}")
    return f"Processed {total_lines} lines."
6、图片
使用 fastmcp.Image 辅助类轻松处理图片输出。
以下代码需要安装 pillow 库。
from mcp.server.fastmcp import FastMCP, Image
from io import BytesIO
try:
    from PIL import Image as PILImage
except ImportError:
    raise ImportError("Please install the `pillow` library to run this example.")
mcp = FastMCP("My App")
@mcp.tool()
def create_thumbnail(image_path: str) -> Image:
    """Create a thumbnail from an image"""
    img = PILImage.open(image_path)
    img.thumbnail((100, 100))
    buffer = BytesIO()
    img.save(buffer, format="PNG")
    return Image(data=buffer.getvalue(), format="png")
7、MCP 客户端
Client 类允许您从 Python 代码中 与任何 MCP 服务器(不仅仅是 FastMCP 服务器)进行交互:
from fastmcp import Client
async with Client("path/to/server") as client:
    # Call a tool
    result = await client.call_tool("weather", {"location": "San Francisco"})
    print(result)

    # Read a resource
    res = await client.read_resource("db://users/123/profile")
    print(res)
7.1 客户端方法
Client 类公开了几个用于与 MCP 服务器交互的方法。
async with Client("path/to/server") as client:
    # List available tools
    tools = await client.list_tools()

    # List available resources
    resources = await client.list_resources()

    # Call a tool with arguments
    result = await client.call_tool("generate_report", {"user_id": 123})

    # Read a resource
    user_data = await client.read_resource("db://users/123/profile")

    # Get a prompt
    greeting = await client.get_prompt("welcome", {"name": "Alice"})

    # Send progress updates
    await client.progress("task-123", 50, 100)  # 50% complete

    # Basic connectivity testing
    await client.ping()
7.2 运输选项
FastMCP支持多种传输协议以连接到MCP服务器:
from fastmcp import Client
from fastmcp.client.transports import (
    SSETransport,
    PythonStdioTransport,
    FastMCPTransport
)
# Connect to a server over SSE (common for web-based MCP servers)
async with Client(SSETransport("http://localhost:8000/mcp")) as client:
    # Use client here...
# Connect to a Python script using stdio (useful for local tools)
async with Client(PythonStdioTransport("path/to/script.py")) as client:
    # Use client here...
# Connect directly to a FastMCP server object in the same process
from your_app import mcp_server
async with Client(FastMCPTransport(mcp_server)) as client:
    # Use client here...
7.3 LLM Sampling
采样是MCP(多客户端协议)的一个功能,允许服务器从客户端的LLM(大型语言模型)请求完成,从而在保持服务器安全性和隐私性的同时,实现复杂的使用场景。
import marvin  # Or any other LLM client
from fastmcp import Client, Context, FastMCP
from fastmcp.client.sampling import RequestContext, SamplingMessage, SamplingParams
# -- SERVER SIDE --
# Create a server that requests LLM completions from the client
mcp = FastMCP("Sampling Example")
@mcp.tool()
async def generate_poem(topic: str, context: Context) -> str:
    """Generate a short poem about the given topic."""
    # The server requests a completion from the client LLM
    response = await context.sample(
        f"Write a short poem about {topic}",         system_prompt="You are a talented poet who writes concise, evocative verses."
    )
    return response.text
@mcp.tool()
async def summarize_document(document_uri: str, context: Context) -> str:
    """Summarize a document using client-side LLM capabilities."""
    # First read the document as a resource
    doc_resource = await context.read_resource(document_uri)
    doc_content = doc_resource[0].content  # Assuming single text content

    # Then ask the client LLM to summarize it
    response = await context.sample(
        f"Summarize the following document:\n\n{doc_content}",         system_prompt="You are an expert summarizer. Create a concise summary."
    )
    return response.text
# -- CLIENT SIDE --
# Create a client that handles the sampling requests
async def sampling_handler(
    messages: list[SamplingMessage],     params: SamplingParams,     ctx: RequestContext, ) -> str:
    """Handle sampling requests from the server using your preferred LLM."""
    # Extract the messages and system prompt
    prompt = [m.content.text for m in messages if m.content.type == "text"]
    system_instruction = params.systemPrompt or "You are a helpful assistant."

    # Use your preferred LLM client to generate completions
    return await marvin.say_async(
        message=prompt,         instructions=system_instruction,     )
# Connect them together
async with Client(mcp, sampling_handler=sampling_handler) as client:
    result = await client.call_tool("generate_poem", {"topic": "autumn leaves"})
    print(result.content[0].text)
7.4 根访问
FastMCP公开了MCP根功能,允许客户端指定它们可以访问的文件系统根。这为需要处理文件的工具创建了一个安全边界。请注意,服务器必须明确考虑客户端的根。
from fastmcp import Client, RootsList
# Specify file roots that the client can access
roots = ["file:///path/to/allowed/directory"]
async with Client(mcp_server, roots=roots) as client:
    # Now tools in the MCP server can access files in the specified roots
    await client.call_tool("process_file", {"filename": "data.csv"})
四、高级功能
在核心概念的基础上,FastMCP v2 引入了针对更复杂场景的强大功能:
1、代理服务器
创建一个FastMCP服务器,充当中间代理,将请求代理到另一个MCP端点(这可能是一个服务器或另一个客户端连接)。
使用场景:
- 传输转换: 将运行在Stdio(如许多本地工具)上的服务器通过SSE或WebSockets暴露出来,使其可被Web客户端或Claude桌面访问。
- 添加功能: 包装现有服务器以添加身份验证、请求记录或修改工具行为。
- 聚合服务器: 在单个代理接口后组合多个后端MCP服务器(尽管mount可能更简单)。
import asyncio
from fastmcp import FastMCP, Client
from fastmcp.client.transports import PythonStdioTransport
# Create a client that connects to the original server
proxy_client = Client(
    transport=PythonStdioTransport('path/to/original_stdio_server.py'), )
# Create a proxy server that connects to the client and exposes its capabilities
proxy = FastMCP.from_client(proxy_client, name="Stdio-to-SSE Proxy")
if __name__ == "__main__":
    proxy.run(transport='sse')
2、组成 MCP 服务器
通过创建模块化的 FastMCP 服务器并将它们“挂载”到父服务器上,来构建更大的 MCP 应用程序。这会自动处理工具名称和资源 URI 的前缀,从而防止冲突。
from fastmcp import FastMCP
# --- Weather MCP ---
weather_mcp = FastMCP("Weather Service")
@weather_mcp.tool()
def get_forecast(city: str):
    return f"Sunny in {city}"
@weather_mcp.resource("data://temp/{city}")
def get_temp(city: str):
    return 25.0
# --- News MCP ---
news_mcp = FastMCP("News Service")
@news_mcp.tool()
def fetch_headlines():
    return ["Big news!", "Other news"]
@news_mcp.resource("data://latest_story")
def get_story():
    return "A story happened."
# --- Composite MCP ---
mcp = FastMCP("Composite")
# Mount sub-apps with prefixes
mcp.mount("weather", weather_mcp) # Tools prefixed "weather/", resources prefixed "weather+"
mcp.mount("news", news_mcp)       # Tools prefixed "news/", resources prefixed "news+"
@mcp.tool()
def ping():
    return "Composite OK"
if __name__ == "__main__":
    mcp.run()
3、OpenAPI & FastAPI 生成
通过自动从现有网络 API 中生成 FastMCP 服务器,利用您的现有网络 API。
默认情况下,应用以下规则:
- GET 请求 -> MCP 资源
- 带路径参数的 GET 请求 -> MCP 资源模板
- 所有其他 HTTP 方法 -> MCP 工具
您可以覆盖这些规则来自定义或忽略某些端点。
从 FastAPI:
from fastapi import FastAPI
from fastmcp import FastMCP
# Your existing FastAPI application
fastapi_app = FastAPI(title="My Existing API")
@fastapi_app.get("/status")
def get_status():
    return {"status": "running"}
@fastapi_app.post("/items")
def create_item(name: str, price: float):
    return {"id": 1, "name": name, "price": price}
# Generate an MCP server directly from the FastAPI app
mcp_server = FastMCP.from_fastapi(fastapi_app)
if __name__ == "__main__":
    mcp_server.run()
import httpx import json from fastmcp import FastMCP # Load the OpenAPI spec (dict) # with open("my_api_spec.json", "r") as f: # openapi_spec = json.load(f) openapi_spec = { ... } # Your spec dict # Create an HTTP client to make requests to the actual API endpoint http_client = httpx.AsyncClient(base_url="https://api.yourservice.com") # Generate the MCP server mcp_server = FastMCP.from_openapi(openapi_spec, client=http_client) if __name__ == "__main__": mcp_server.run()4、处理 stderr
MCP 规范允许服务器将任何它想要写入的内容写入 stderr,并且没有以任何方式指定格式。FastMCP 将将服务器的 stderr 转发到客户端的 stderr。
五、运行您的服务器
选择最适合您需求的方法:
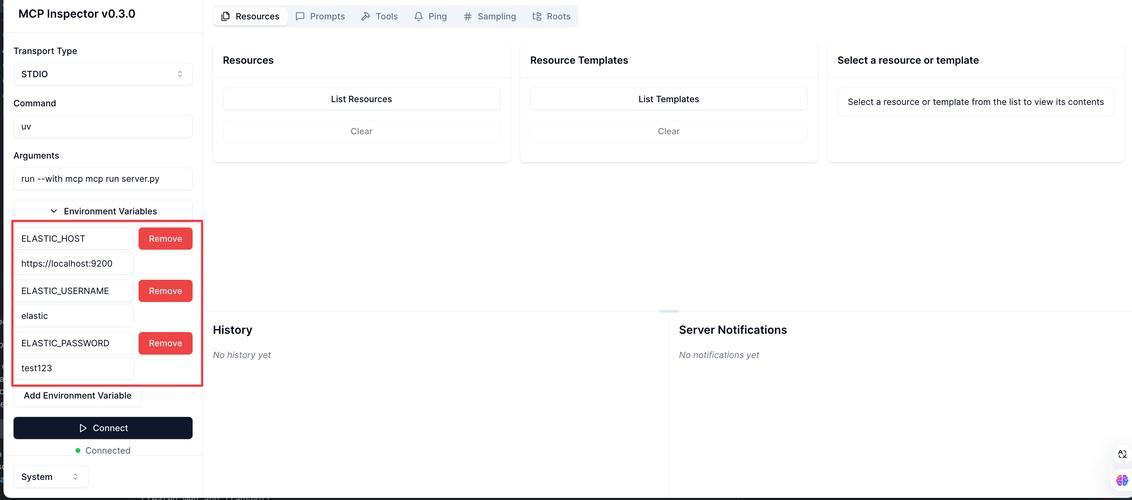
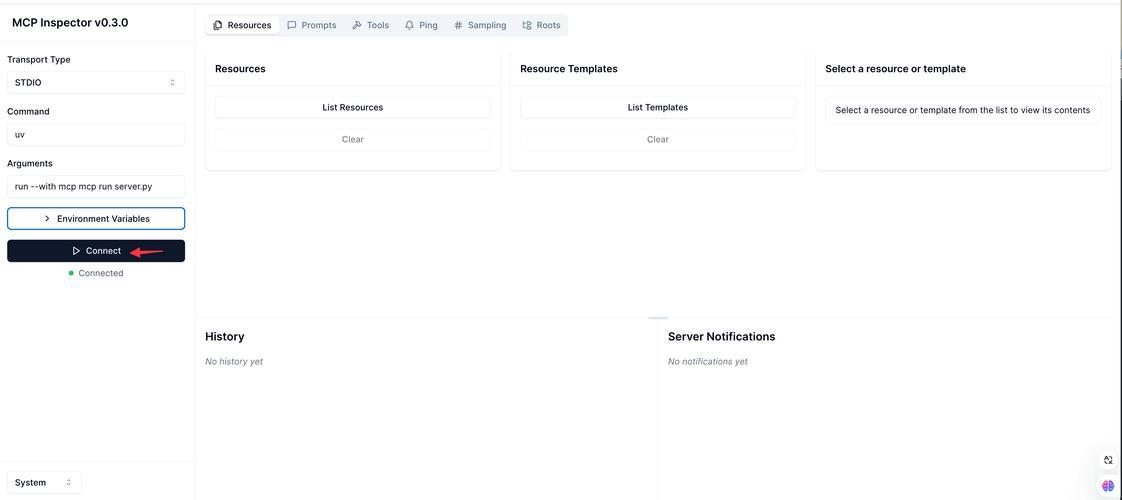
1、开发模式(推荐用于构建和测试)
使用 fastmcp dev 以获得带有 MCP 检查器的交互式测试环境。
fastmcp dev your_server_file.py
# With temporary dependencies
fastmcp dev your_server_file.py --with pandas --with numpy
# With local package in editable mode
fastmcp dev your_server_file.py --with-editable .
2、Claude 桌面集成(常规使用)
使用 fastmcp install 命令来设置您的服务器,以便在 Claude 桌面应用程序中持久使用。它负责使用 uv 创建一个隔离的环境。
fastmcp install your_server_file.py
# With a custom name in Claude
fastmcp install your_server_file.py --name "My Analysis Tool"
# With extra packages and environment variables
fastmcp install server.py --with requests -v API_KEY=123 -f .env
3、直接执行(适用于高级用例)
直接运行您的服务器脚本,用于Claude之外的定制部署或集成。您自己管理环境和依赖。
将以下内容添加到您的 your_server_file.py 文件中:
if __name__ == "__main__":
    mcp.run() # Assuming 'mcp' is your FastMCP instance
python your_server_file.py # or uv run python your_server_file.py
4、服务器对象名称
如果您的 FastMCP 实例名称不是 mcp、server 或 app,请在 dev 和 install 命令中使用 file:object 语法来指定它:
fastmcp dev my_module.py:my_mcp_instance
fastmcp install api.py:api_app
六、示例
探索 examples/ 目录以获取展示各种功能的代码示例:
- simple_echo.py:基本工具、资源和提示。
- complex_inputs.py:使用 Pydantic 模型进行工具输入。
- mount_example.py:挂载多个 FastMCP 服务器。
- sampling.py:在您的 MCP 服务器中使用 LLM 补充。
- screenshot.py:返回 Image 对象的工具。
- text_me.py:与外部 API 交互的工具。
- memory.py:具有数据库交互的更复杂示例。
伊织 xAI 2025-05-03(六)


